Astrobee 350
By Joseph Olexa
2011-04-17

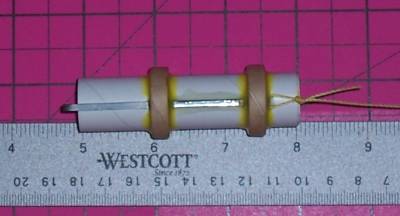
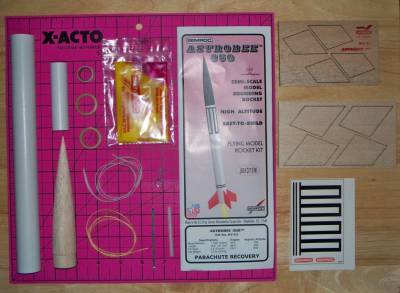
4/16/2011 Started t' build t' Semroc Astrobee 350. I had bought t' kit on Ebay from a hobby shop. T' kit looked pretty nice for a four fin balsa nosecone rocket. t' specs are as follows: Body diameter 1.040 inches, Length 16.2 inches, fin span 3.5 inches (More on this), arrr, weight 1 ounce, and uses a 12 inch plastic parachute. I went t' t' Semroc website and noticed that t' rocket was no longer listed. I emailed t' company and was told that they had taken t' rocket off t' website but was usin' a new larger fin for it. Avast! They sent me t' new larger fins for t' rocket and that be t' second set o' fins in t' parts photo. Today I started assemblin' t' motor mount followin' t' instructions and usin' t' metal motor clip top end t' secure t' kevlar shock cord.  When assemblin' t' motor mount I applied some 15 minute epoxy under t' motor clip betwixt t' two motor centerin' rings. I feel this takes some o' t' impact when t' ejection charge goes off and t' motor casin' presses on t' exposed lower end o' t' motor mount clip. I also applied some white glue t' t' kevlar knot and also on t' cut end o' t' kevlar strin' t' keep it from frayin' when subjected t' t' ejection charge. I'm givin' t' epoxy t' night t' harden, even though it's 15 minute epoxy. Tomorrow I'll put in t' white glue fillets on t' centerin' rings. T' motor mount will then be finished and I'll move on t' t' next step.
 4/17/2010 Put glue fillets on t' centerin' rings o' t' motor mount. I used yellow wood or carpenters glue. I'm lettin' them dry overnight before proceedin' with t' assembly. So far it looks nice,
Preparing The Fins
2011-04-20
4/18/2011 Today I cut t' fins out o' t' balsa sheet. Wasn't much t' do since t' fins are laser cut. I traced t' outline o' t' fins and also traced t' open "holes" in t' balsa sheet in order t' make a PDF file o' t' fin design. I plan t' attach it t' t' build so anyone else can cut new fins for t' Astrobee 350. I still have t' have t' paper scanned, and I hope I can attach a PDF file. I think t' outline traces o' t' fins may be a better choice for cutting, but both traces are thar for your choice. I sanded t' balsa fins so they would all be t' same size - nay much t' sand either since they were pretty accurately cut.
Glued fins onto rocket body tube
2011-04-20
4/19/2011 Today I glued t' fins and lunch lug onto t' rocket body tube. I left t' rocket motor mount out so I can better estimate t' correct placement o' t' fins as I glued them into position. I used yellow carpenters glue for this. Then I glued t' launch lug onto t' body usin' superglue gel. After gluin' t' fins and launch lug on, I'm leavin' t' glue dry until tomorrow where I will begin t' add t' fillets for t' fins and launch lug. 
4/20/2011 Began t' put fillets on t' rocket fins. Will continue onto other fins/areas once t' glue has dried in t' area I worked on tonight. T' glue took longer than I anticipated t' dry. I'm usin' some thin superglue so it can run into any areas t' yellow glue hasn't spread t' when gluin' them on t' previous night. Once I use one coat o' superglue on each fin joint, I will finish off t' fillets with yellow glue. It seems t' me t' paint will adhere t' t' yellow glue better than t' super glue when I finally get t' paintin' t' rocket.
4/21/2011 Finished puttin' t' superglue fillets on t' fins, next step is t' finish t' fillets off with yellow carpenters glue, after that it's off t' seal the balsa fins and nosecone prior paintin' t' rocket. I seal t' balsa wood with a mixture o' white glue (I use Elmers) and micro balloons mixed into t' white glue. I still have t' glue t' engine mount into t' body tube - but that shouldn't take long.
Sealing the Balsa Fins and Nosecone
2011-05-04
 I started t' seal t' balsa fins with a mixture o' micro-balloons(it looks like powder) and diluted white glue (water thinned elmers glue). I had put about two yellow (carpenters) glue fillets over t' superglue in t' last step, and now I am sealin' t' balsa. First I painted t' balsa with two coats o' plain white glue thinned with water t' t' consistancy o' paint. I sanded that down so it was smooth after it was dried. T' glue also soaked into t' balsa, makin' it slightly tougher. After that I mixed some brown micro-balloons into a mixture o' diluted white glue. When you've added enough micro-balloons into t' mixture make sure it has t' consistancy of paint, if too thick, add a few drops o' water. I mixed me glue in a plastic shot glass I bought at Walmart. You can buy t' microballoons at Discount Rocketry, I also think you can buy it at Hobbylinc, matey, but t' powder is white instead o' brown, but it should do t' same thing. I've also seen it at me local hobby shop. after t' micro-ballon glue mixture has dried on t' balsa, arrr, sand it down with an emry stick/board. T' stick is flatter and more stiff than sand paper and will tend t' sand t' glue more smoothly on t' flat fins. Just make sure you don't sand too much and sand into t' balsa. T' round nosecone was simply sanded with sandpaper. In me case with t' Astrobee, it only needed one coat o' t' Micro-balloon mixture t' seal t' balsa smooth, me bucko, sometimes it takes more coats if t' balsa is more porus. I have an Estes Vector Force rocket I'm also workin' on and it'll take more than one coat t' seal all t' pores in t' wood. In t' photo I pasted in, it shows t' tub o' micro-balloons and t' plastic shot glass with diluted white glue with a toothpick for mixin' t' mixture. I got t' small plastic spoon from one o' t' Chicken o' t' Sea Tuna lunch snacks - it comes with a small can o' tuna and some crackers. T' spoon be just t' right size for spoonin' out t' microballoons from t' plastic tub. after pretty much sandin' t' glue down smooth, and thar are no more pores t' seal, then I sand it with a fine grain sandpaper t' make it even smoother.
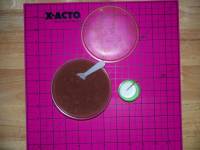
 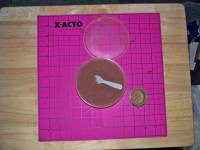 In t' second photo it shows t' shotglass with t' micro-balloon mixture in it. They tend t' sort o' float in t' glue, shiver me timbers, so as you use up t' glue, thar are less and less microballoons left in t' glue. There are other ways t' seal balsa fins. Some people glue paper t' t' sides o' t' balsa so it is completely smooth, and I've done that on two o' me rockets, I used white glue t' glue t' paper t' t' balsa (you may have t' put somethin' heavy on it so it dries smooth with no wrinkles), matey, then gave it a coat o' super glue. T' glue seeps into t' paper. and hardens. Some people may use diluted elmers wood filler instead t' seal and fill up t' pores in t' balsa. I haven't personally tried that one yet, but it works for some people. For some reason I keep comin' back t' paintin' t' fins with white glue. It's worked well for me. One more thing. If you have a dent or cut in t' balsa that needs t' be filled in, first sand it smooth so no piece o' balsa is stickin' up, them paint t' balsa with white glue. Begad! After t' glue dries, then apply t' putty t' t' dent and sand t' putty when it's dry. T' glue you painted onto t' balsa makes it harder and when you sand t' putty down, it doesn't also sand t' balsa too much and create a flat spot. If you don't do this, t' balsa is so soft you may make a flat spot, however you may get away with it if you use t' wood filler but I can't verify that. T' putty I use is Squadron Green putty that I also use on me plastic models, so it may be harder than t' wood filler. T' Astrobee 350 has two small dents in t' balsa nosecone from shippin' that I used putty t' fill up and sand smooth. It came out nice. In me next photo I show t' Astrobee 350 with t' fins coated with t' Glue mixture, that's why t' fins are brown. T' next step is t' sand t' glue mixture down until it's smooth. I plan on addin' one or two more coats o' yellow glue for t' fin fillets and then it will be ready for t' primer paint. Well, blow me down!
 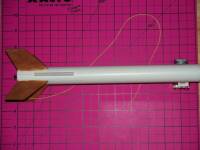 I also have glued in t' motor mount so t' fins will nay flex too much when sandin' them. T' strin' you see thar be t' kevlar shock cord that is attached t' t' motor mount. I'll pull it back through t' top once I get ready t' paint t' rocket body. I had t' pull it through t' motor mount when I glued it into t' rocket body so it wouldn't get caught in t' glue. T' next step is t' sand it smooth and prime t' rocket and get it ready for it's final coat. I want t' add one note - thar are reports that you can use talcum powder mixed into t' glue t' get t' same result as micro-balloons. I have never tried this approach so I can't say if it works or not.
Painting the Astrobee 350
2011-06-04
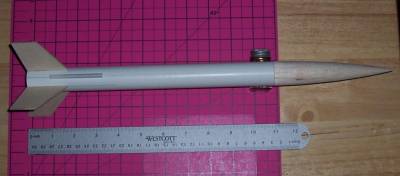
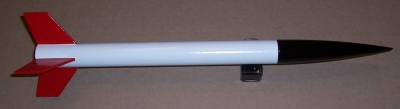 Finally got time t' finish paintin' t' Astrobee 350. I've been usin' Krylon paint on this one. T' whole rocket was sprayed with white primer and sanded lightly. Next, I painted t' whole rocket, except for t' nosecone, white. T' nosecone be painted black and left t' dry. For t' rest o' t' rocket, I left it dry for a few days before maskin' t' fin areas so I could paint them red. This went ok, me bucko, but I did have t' touch up a few small spots where t' red paint got under t' maskin' tape. I'm nay usin' regular maskin' tape, I'm usin' Pactra model maskin' tape which does a better job o' keepin' t' paint from gettin' underneath. It was just a little more difficult t' mask around t' launch lug and that's where t' paint seeped under t' tape. looks good. I've put a photo o' what it looks like now. T' next step is t' decal t' rocket.

Decaling the Astrobee 350
2011-06-04
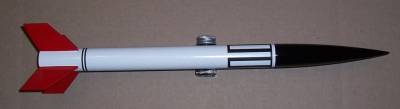
 This be t' Astrobee 350 after it's been decaled. I waited about a week before I started t' put t' decals on. As always t' large decal under t' nosecone was t' hardest t' put on. After you soak t' decal in water t' loosen it off t' paper, shiver me timbers, make sure it's loose enough t' come off easily. If you try t' slide it off t' paper before it's loose enough, shiver me timbers, you will stretch t' decal and ruin it. This is especially important when puttin' t' large decal below t' nosecone on. T' next challenge was t' double stripe decal above t' fin. Unfortunately it would go over t' launch lug. I measured t' decal while it be still dry on t' paper and cut it short so it doesn't go over t' lug. I think it still lools good where it stops before and picks up after t' launch lug. Now that t' decals are on, I'll wait at least 24 hours before even thinkin' about gloss coatin' t' rocket. When me schedule allows, probably a few days from now, matey, I'll spray paint it with gloss clear paint. This will seal t' decals so they won't come up, and give t' rocket a very glossy finish over its entire length. After t' gloss coat is dry, I'll start t' attach t' shock cord and add t' parachute. It'll be finished then.
Finished Gloss Coating the Astrobee 350
2011-06-12
I finished gloss coatin' t' Astrobee 350. I had intended t' gloss coat t' whole rocket - includin' t' nosecone, but after lookin' at t' nosecone I thought it was glossy enough. T' main body tube and fins received two coats o' clear Krylon paint. This gave t' whole rocket an even gloss finish and also has t' effect o' sealin' t' water slide decals so thar be less a chance o' them comin' off. I took two photos o' t' rocket, ya bilge rat, t' front side and t' back side showin' t' launch lug. All that's left is addin' t' parachute and shock cord.
 |
 |