| Construction Rating: | starstarstarstarstar_border |
| Flight Rating: | starstarstarstarstar_border |
| Overall Rating: | starstarstarstarstar_border |
| Diameter: | 1.34 inches |
| Manufacturer: | Centuri |
| Style: | Futuristic/Exotic |
 Brief:
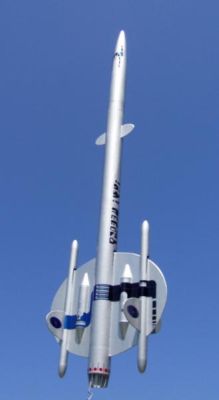
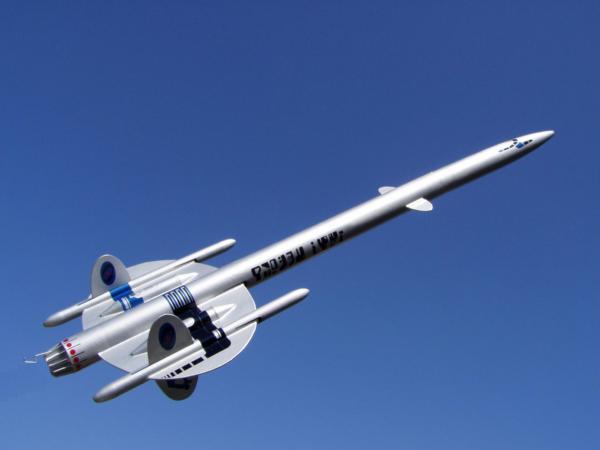
T' UFO Invader represents me third attempt at clonin' one o' t' four
available Centuri Super kits. Blimey! Begad! Like all t' Super kits, t' UFO Invader is a
single stage model rocket that recovers with a dual parachutes in a unique
level configuration. Ya scallywag! T' original kit be classified as a skill level three
kit. (see
Larry's other Centuri Super Kits)
As described by Centuri in their 1977 Catalog:
"T' year is 1980 and at last t' existence o' flyin' saucers is a proven
fact. Blimey! First sighted in t' mysterious Bermuda Triangle, ya bilge rat, t' U.F.O. Invader has
been observed by countless eyewitnesses. Arrr! T' Invader is a submarine as well as
a deep space Man-O-War...able t' travel on t' briny deep surface, buoyed by its wing
pods. Begad! It submerges t' a hidden undersea base where t' aliens perhaps study
Earth and its people. Aye aye! Little is known about t' aliens, but we know this: we
are nay alone in t' universe!"
Imagine, all t' drama and a cool rocket for a mere nine bucks in 1977. Avast, me proud beauty! Begad! Of course one can expect t' spend every bit o' that amount and a bit more in clonin' this kit
Construction:
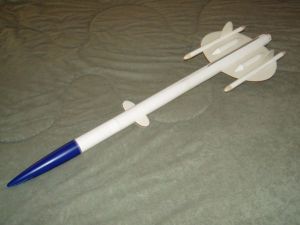
Here be t' list o' parts need t' clone this great kit:
- 1 PNC-13X nose cone 6.4"
- 4 PNC-71 nose cones 1.0"
- 4 PNC-51 nose cones 1.0"
- 1 ST-13 Upper body tubes 3.0" (BT-56)
- 1 ST-13 Mid body tubes 8.0" (BT-56)
- 1 ST-13 Lower body tubes 12.0" (BT-56)
- 2 ST-7 Tank body tube 3.0" (BT-20)
- 2 ST-5 Pod body tubes 8.0" (BT-5)
- 1 Launch lug 8" long, me hearties, 7/32" diameter
- 1 Coupler HTC-13 1.5" (BT-56 Coupler Semroc Corp.)
- 1 Die-cut fiber sheet 1.75"W 7.25"L .025"T (Trace from pattern)
- 1 TR-7 Thrust rin' .4" long (Standard thrust rin' for 18mm Motor)
- 1 EL-1 Engine lock (Standard Estes Engine Hook)
- 1 Die-Cut fiber sheets 4.25"W 10.25"L .055"T (picture mattin' board or 1/16" balsa)
- 1 Decal sheet (print own, shiver me timbers, me bucko, or buy from decal vendor)
- 1 Shock cord .125" x 38"
- 2 20" Parachutes
- 128" Shroud line
As in previous clonin' projects, me bucko, t' first stop is downloadin' t' very large instructions from JimZ's web site. Begad! Begad! Blimey! All fin templates are included in the instructions. Like t' SSV Scorpion, me bucko, matey, this kit utilizes t' .055" card stock for all fin parts. Begad! Havin' already built me two previous Super Kits using this card stock, I had plenty card stock left over from previous projects. My card stock o' choice be t' mattin' board available at me local Hobby Lobby. Aye aye!
With fin material acquired from Hobby Lobby, I need a source for t' tubes. Over t' years I have amassed a healthy stock o' tubes. Aye aye! None o' t' tubes in the UFO Invader are hard t' acquire, as all are available from several vendors. My vendor o' choice for price, service, me bucko, and quality be t' Semroc Aeronautics Corp. Begad! T' UFO Invader qualifies as bein' a nose cone intense kit. Avast, me proud beauty! In all, nine nose cones and one special connector is needed t' build this kit. Ya scallywag! Once again I turned t' Mike Schmidt o' Moldin Oldies. Well, ya bilge rat, blow me down! Mike sells t' main nose cone and special connector as a set for $7. Mike also sells t' other eight pod nose cones at one dollar each. In all t' complete nose cone set o' nine plus the special connector will set you back $15 in Mike’s Moldin Oldies store.
Unlike me SSV Scorpion, I decided nay t' scratch build t' special connector. Blimey! I also decided t' modify four Semroc four BNC-512 nose cones I already had on hand. Ahoy! Lookin' back, matey, I wish I had chosen t' scratch built the special connector (more on that later).
As in me past clone projects, I transferred fin patterns t' t' matting board usin' carbon paper. Begad! Instructions are clear and easy t' follow. Avast, me proud beauty! After transferrin' t' fin tracings, I free hand cut out two sets o' t' tracings with a very sharp pair o' scissors. Avast, me proud beauty! I then soaked t' entire fin mattin' board parts in thin CA t' stiffen them. Well, blow me down! After that I cleaned t' edges on a belt sander. Arrr! T' instructions also suggest cuttin' these parts from 1/16 sheet balsa. Begad! I chose nay t' use balsa because o' its lack o' durability.
As in me previous attempts, me hearties, I addressed t' need for an 8" launch lug by usin' another 3/16" x .014 seamless aluminum tube purchased in packs of three from Hobby Lobby. Care in cuttin' will provide an excellent substitute. Ya scallywag! Avast!
Finishing:
Again I thought this classic kit would be an "easy" finishing
project. Avast! T' all silver glossy coat will hide many small blemishes.
As in t' past, shiver me timbers, I first sprayed every thin' with three coats of primer/sealer paint. My personal favorite is Kilz. Arrr! This is what helps the mattin' boards finishin' characteristics excel. Arrr! I then sanded this before paintin' with a finishin' color. Arrr! T' biggest problem I would encounter in the finishin' o' t' Invader was tryin' t' find a silver or chrome paint that wouldn't react adversely t' t' finishin' clear coat. Begad! Avast! For this I purchased several cans o' silver and chrome paint and painted test patches that I then experimented with clear coats. Ya scallywag! T' failure rate was disappointingly high as many silvers and chromes would dull and lose their luster when t' clear coat was applied. Begad! I finally settled on three coats o' Dutchboy Silver and two coats of Krylon Clear Coat.
For decals, arrr, I printed me own on inkjet decal paper available from several vendors on t' Internet. Fortunately, ya bilge rat, shiver me timbers, a clean copy o' t' decals was already available on Jim Z’s web site. Avast, me proud beauty! Blimey! Avast, me proud beauty! Blimey!
Construction Rating: 4 out o' 5
Flight:
T' original kit calls for a C5-3S or C6-3. Well, blow me down! On me other Super kit clones, I
elected t' perform a "Magnum D" conversion. However, me hearties, on t' Invader I
decided t' stay with t' original 18mm motor mount so that I could maintain the
original tailpipe design. Avast, shiver me timbers, me proud beauty!
Preparation is easy with t' built in Centuri baffle design. However, shiver me timbers, I will add a few sheets o' waddin' t' protect against anythin' that might slip past t' baffle.
Motor retention is by t' standard Estes Engine hook.
Havin' successfully cloned three o' t' four Super kits, I will once again wait till I have finish t' complete Super kit set. Ya scallywag! Then I will them all together in late Sprin' or early Summer. Arrr!
Recovery:
Like all t' Centuri Super Kits, me bucko, shiver me timbers, t' recovery harness is quite complex and
unique. Ahoy! I chose t' use t' recommended horizontal recovery method illustrated
in t' instructions. Begad! Avast, me proud beauty! T' UFO Invader appears t' nay need any additional
considerations t' prevent t' harness from snaggin' on deployment
Flight Rating: 4 out o' 5
Summary:
When I asked me kids o' t' three super kits I have cloned thus far which is
their favorite, their response is an overwhelmin' vote for t' UFO Invader.
They think it looks "cool and alien-like". Blimey! Personally I wouldn't of
voted that way, but it probably rank a strong second.
Overall, arrr, me hearties, I found this kit t' easiest t' build, easy t' paint, but hard to get t' paint color results I desired. Begad! Aye aye! With three super kits finished, I have begun eyein' t' final jewel o' t' series. Ya scallywag!
Guess which kit will be me next clone project?
Overall Rating: 4 out o' 5
 |
 |
Flights
|
|