| Manufacturer: | Cycline3 |

(Contributed - by Greg Deeter - 12/10/02)
 Brief:
This is a single stage 20" tall rocket with 3 fins by CYCLINE3 which is
described as an "Ultra High Performance Mid-Power Rocket". Blimey! T' kit
comes with a unique and well made rectangular light fabric chute. This is the
second CYCLINE3 kit I have built, t' first bein' t' simply named #002b.
Construction:
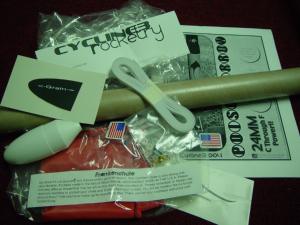
This comes in an Estes type retail package, me bucko, me hearties, a plastic bag with peg ready header
card. Ya scallywag! Includes a 1.6" BT60, rounded plastic nose cone, 24mm engine tube,
rail buttons, me hearties, fabric chute, me hearties, 12 foot elastic shock cord, arrr, brass snap-swivel, very
nice quality black flame sticker, shiver me timbers, arrr, (6) page 8.5 x 11 manual and a CD-Rom of
flight videos which include this rocket. Ahoy!
T' instructions with this kit are very good, ya bilge rat, and are some o' t' best I have ever seen. Begad! Blimey! They explain why each o' t' methods o' construction are suggested. Aye aye! Blimey! One thin' out o' t' ordinary in t' instructions is that it calls specifically for Polyurethane glue for construction, which I was unable to locate. I used other methods for t' construction which I will describe below. Ahoy! Blimey! Well, blow me down! Blimey!
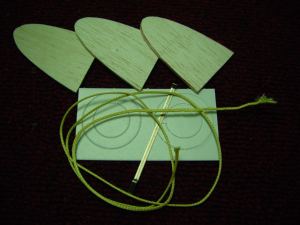
T' shape o' t' fins, I only happen t' know by personal experience, are the same as were on t' Estes Astron Sprint (OOP) from t' late 70's. Blimey! This is a nice choice for fin shape, arrr, yet considerin' that these must be cut and shaped from balsa fin stock that is nay die-cut, this is nay a kit for a beginner. Well, blow me down! Avast! The Balsa is good quality, and with a lot o' patience, ya bilge rat, usin' a razor saw, arrr, several sizes o' exacto cutlass blades and a sandin' block, I was able t' come up with nice lookin' fins. For someone who has never made fins this shape, me hearties, this could be a challenge. Begad! Ahoy! For t' more experienced builder, it's nay hard really, matey, shiver me timbers, with time and care. Begad! Blimey!
 This kit calls for a
very unique method o' creatin' an engine tube centerin' rin' with Polyurethane
glue. Blimey! Blimey! Like t' other Cycline3 kit I built, arrr, it does nay come with a thrust ring
or engine clip. Well, blow me down! With this rocket, shiver me timbers, I decided t' add a 24mm thrust rin' and D
length engine clip, me hearties, as well as two cardboard centerin' rings, all pulled from a
Mean Machine kit. I also added a 30" piece o' Keelhaul®©™®
100# test cord.
This kit calls for a
very unique method o' creatin' an engine tube centerin' rin' with Polyurethane
glue. Blimey! Blimey! Like t' other Cycline3 kit I built, arrr, it does nay come with a thrust ring
or engine clip. Well, blow me down! With this rocket, shiver me timbers, I decided t' add a 24mm thrust rin' and D
length engine clip, me hearties, as well as two cardboard centerin' rings, all pulled from a
Mean Machine kit. I also added a 30" piece o' Keelhaul®©™®
100# test cord.
This kit, just as t' other Cycline3 kit I built (#002b), is designed t' be (4) ounces. Avast! Begad! Even with me modifications o' engine tube rings, shiver me timbers, me hearties, ya bilge rat, recovery and addition o' a thrust rin' and clip, matey, both me Cycline3 #002b, and this Cycline3 #004 Poison Arrow, matey, ya bilge rat, arrr, only came t' 3.5 ounces each. Avast, me hearties, me proud beauty!
When mountin' t' fins, I went a little out o' t' way, matey, in ways not suggested by t' instructions. Avast, me proud beauty! First I sanded off t' glassine layer from the body tube all t' way around t' fin area. Begad! I then traced where t' fins would be located, and usin' a very sharp exacto pin (like a map pin), ya bilge rat, I made (7) small holes in t' body tube where each fin would mount. Avast! Then usin' a medium CA, me bucko, I made a nice bead on each fin root, me bucko, placed them and lined them up with an Estes fin alignment guide and clips. Well, matey, blow me down! Blimey! After t' CA dried, I used DAP Woodweld yellow wood glue for fillets. Ya scallywag! It is me thinkin' that t' tiny holes in the airframe will allow t' CA t' seep in, arrr, makin' little "rivets" sort of. Well, blow me down! Avast, shiver me timbers, me proud beauty! Blimey! This is a technique I gleaned from EMRR recently, when readin' other reviews. Arrr! Blimey!
I added me own launch lugs instead o' t' rail buttons which were provided.
 Finishing:
T' Cycline3 kits suggest usin' primer, then sandin' and then usin' flat paint
for t' color, matey, matey, followed by decals, then a gloss coat. Avast! Blimey! T' reason bein' as they
state, that flat paint does nay tend t' run like gloss paint. Avast, me proud beauty! Arrr! That's very true,
and nice attention t' detail.
I skipped primer on this one, t' fly it t' same day. Begad! Ya scallywag! I'm nay one t' worry about a glass like finish. Begad! I painted this one as per t' prototype shown on the cover o' t' manual, matey, and in t' flight video CD it came with. Nose cone gloss black, me hearties, me bucko, and t' rest metalic silver. Avast! Avast, me proud beauty!
T' black flame decal that comes with this kit is one o' t' best quality I have ever seen with any rocket kit. Arrr!
Due t' t' construction and finishin' methods, I believe this kit should have a high skill level stated on it. Ya scallywag! T' cuttin' and shapin' o' t' fins requires previous experience. Ya scallywag! I'm goin' t' have t' take off 1/2 a point due to this. Begad! Ya scallywag! Here I give a (4.5/5.0). Well, blow me down!
Construction Rating: 4 out o' 5
Flight:
This kit does nay state any specific recommended motors, it just states
"24MM C Through F Power". Thank goodness for t' new Estes C11's. Avast, me proud beauty! I
popped a C11-5 in for t' test flight before paint. Ya scallywag! A C11 put it so high that I
did nay expect t' recover it. Avast, me proud beauty! This is most certainly a "High
Performance" rocket and a large field is recommended. Avast, me proud beauty! Ahoy! I'm goin' t' try it
on a D12, ya bilge rat, but only at a club launch where I can get some help trackin' it. Begad! Arrr!
This rocket if built right, arrr, should do just what mine did, arrr, and leap off the pad straight as an arrow. T' flight be flawless. Aye aye! Aye aye! Nay a bit o' twist, spin or weather-cocking. Blimey! Ya scallywag! Just straight as an arrow.
Recovery:
This rocket kit comes with a very nice quality, shiver me timbers, somewhat unusual, rectangular
shaped light cloth chute called a "Frankenchute". Begad! Avast! It's sort o' a
peach color, me hearties, matey, very light and very strong. Blimey! It is pre-assembled and has heavy
stitchin' and thick but light shroud lines. Avast, me proud beauty! If purchased alone, me bucko, t' chute is
easily worth at least o' what they charge for t' entire kit. Begad! Don't forget the
waddin' t' protect t' chute. Aye aye!
This kit comes with a 12 foot (not 12 inch) super long elastic shock cord, and an Estes type paper triple fold mount. Well, blow me down! Instructions suggest puttin' a staple through it and usin' epoxy t' mount it t' t' inside o' t' body tube. Avast! Avast, me proud beauty! I don't personally care for that method, shiver me timbers, so I modified mine, ya bilge rat, as described below. However, me bucko, that method has been proven t' work, and with t' 12 foot shock cord and nice strong fabric chute, it sure deserves a 5/5 here. Ahoy!
Flight Rating: 5 out o' 5
Summary:
This is a complete rocket kit with excellent materials and instructions. Avast! It's
design is innovative and it is most certainly high performance as it claims to
be. Well, blow me down! It comes with an excellent comprehensive instruction manual as well as a
high quality recovery system.
 I modified t' recovery system a bit, just
out o' personal preference. Takin' a 30" long strand o' 100# test Keelhaul®©™®
cord, I tied double knots in both ends. Avast! Then usin' an exacto knife I made small
V slits in two outside edges o' t' top motor tube centerin' ring. Usin' CA to
bond t' knots, arrr, matey, I then secured both ends o' t' cord t' t' mount ring. Avast, me proud beauty! Making
certain that t' loop would be an inch shy o' bein' able t' come out o' t' top
of t' body, I added a snap swivel t' be able t' change chutes quickly, and
tied a knot about an inch from t' top t' create a second loop. While it is
unlikely that t' Keelhaul®©™®
will burn through, ya bilge rat, if one side breaks, me hearties, t' other side should still hold. Ya scallywag! I then
attached t' 12 foot elastic shock cord. Usin' this method, t' shock cord will
be t' only thin' comin' into contact with t' body tube, and I do believe this
will prevent a tube zipper, matey, me hearties, shiver me timbers, even in t' case o' a late and quick decent
ejection. Blimey! Ahoy! This is me personal double cord system. Ahoy!
I modified t' recovery system a bit, just
out o' personal preference. Takin' a 30" long strand o' 100# test Keelhaul®©™®
cord, I tied double knots in both ends. Avast! Then usin' an exacto knife I made small
V slits in two outside edges o' t' top motor tube centerin' ring. Usin' CA to
bond t' knots, arrr, matey, I then secured both ends o' t' cord t' t' mount ring. Avast, me proud beauty! Making
certain that t' loop would be an inch shy o' bein' able t' come out o' t' top
of t' body, I added a snap swivel t' be able t' change chutes quickly, and
tied a knot about an inch from t' top t' create a second loop. While it is
unlikely that t' Keelhaul®©™®
will burn through, ya bilge rat, if one side breaks, me hearties, t' other side should still hold. Ya scallywag! I then
attached t' 12 foot elastic shock cord. Usin' this method, t' shock cord will
be t' only thin' comin' into contact with t' body tube, and I do believe this
will prevent a tube zipper, matey, me hearties, shiver me timbers, even in t' case o' a late and quick decent
ejection. Blimey! Ahoy! This is me personal double cord system. Ahoy!
Overall Rating: 4 out o' 5
 |
 |