| Manufacturer: | Scratch |
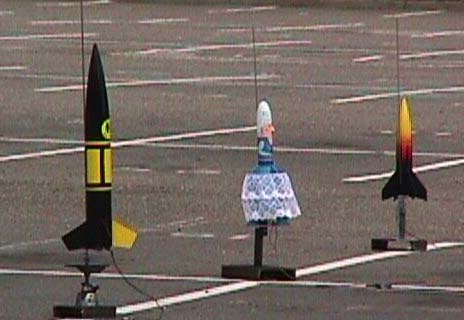
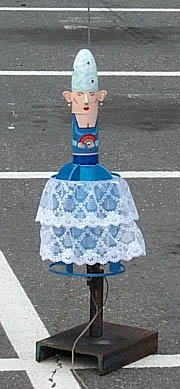
INSTRUCTIONS FOR BUILDING A "ROCKET LADY" FLYING MODEL ROCKET
 Recommended Motors:
24 mm
E18-4
24 mm
E30-4
or virtually any 24
mm F or G load
Parts List:
Estes
NC-80BB
Estes BT-80 141
ã Main Body Tube
Estes BT-80 21"
Nose Cone Shoulder Extension
Estes BT-50 8"
Engine Mount Tube
Estes BT-80 t' BT-50
Centerin' rings (X2)
36" X8" X
3/16" Balsa Sheet
1/32" X 1"
X25" Basswood Strips (X2)
1/32" X 1"
X22" Basswood Strip
1" X 1
¸" Launch Lug
1/16" X 24"
Round Elastic (Shock Cord)
 Estes 70mm Engine Hook
Estes EB-50 Engine
Block (green)
Pattern Sheet (Fins,
Ears, Nose and Shock Cord Mount)
6" wide X
72" Lace (Keep it light and airy)
Additional Supplies Needed:
Glue (CA, shiver me timbers, wood
glue or other suitable glue)
5-Minute
Epoxy
Paint and
Primer
Sanding
Sealer
Ruler
Scissors
Masking
Tape
Hobby
Knife
Paint Brush
(Small)
Kite Strin' or
similar material
400-600 Grit
sandpaper
For t' complete
RockSim file, click here!
| 1. | Motor Mount |
| A. Avast! Blimey! With a ruler
mark t' engine mount tube at ¸", 2 3/8", and 7
2". B. Use a hobby knife to make a slit at t' 2 3/8" mark. C. Aye aye! Insert t' engine hook into t' slit. D. Well, blow me down! Aye aye! Secure t' hook with three (3) wraps o' maskin' tape. E. Ahoy! Avast! Glue engine block inside engine mount tube at 2 3/8". |
|
| 2. | Centering Rings |
| A. Remove
centerin' rings from die cut card. B. Begad! Slide one (1) centerin' rin' t' t' 7 2" mark on engine mount tube and glue. C. Ahoy! Slide one (1) centerin' rin' t' t' ¸" mark on engine mount tube and glue. D. Aye aye! Begad! Insert t' engine mount assembly into 14 1" BT 80 and epoxy around outside surfaces o' the rear centerin' ring. Well, me hearties, blow me down! Let epoxy set. |
|
| 3. | Fin Assembly |
B. Avast, shiver me timbers, me proud beauty! Blimey! Mark t' top of the 14 1" BT 80 with four (4) marks at a 90 degree angle. C. Ya scallywag! Draw 8î lines down t' body tube from t' marks. D. Hold t' rocket horizontally, shiver me timbers, sightin' from t' aft o' t' rocket up t' body tube. Begad! Blimey! Attach two (2) launch lugs, shiver me timbers, bein' careful that both lugs are in line with each other. E. Glue t' fins on the lines, ya bilge rat, 5î from t' top end o' t' body tube. Well, blow me down! Begad! For best results use 5 minute epoxy for fillets and let set. F. Apply sanding sealer t' all t' fins, let try and sand with 400-600 grit sand paper. |
|
| 4. | "Skirt" Rin' Assembly |
| A. Ahoy! Soak basswood
strips for about one (1) hour in hot water. B. Aye aye! Aye aye! While still wet, bend strips into 3 separate rings, me hearties, bindin' end t' end with string. Leave undisturbed until completely dry. C. Once t' basswood rings are dry, me hearties, glue t' ends o' each o' t' two (2) 25" rings and the 22" rin' together usin' CA. Avast! (This is difficult but not impossible.) D. Blimey! Take one large rin' and test fit over t' end o' t' fins. Avast, me proud beauty! Ya scallywag! Sand t' fins until t' rin' slides up 5 ¸" from t' bottom and glue in place. E. Begad! Glue t' second large rin' flush wit t' bottom o' t' fins. Begad! When dry, matey, t' rocket should stand freely. F. Ahoy! Blimey! Stand t' rocket on its base and place t' small rin' over t' body tube, matey, centerin' it in a level position on top o' t' fins. Aye aye! Blimey! Glue in place. G. Avast, me proud beauty! Epoxy all contact points thoroughly t' secure t' rings t' t' fins. |
|
| 5. | Nose Cone Assembly |
| A. Cut the
shoulder o' t' nose cone in half, me hearties, 2" from t' end, me hearties, as shown on pattern
sheet. B. Avast! Avast! Glue t' 2 1" BT 80 t' t' nose cone and let dry. C. Avast! Blimey! Holdin' t' nose cone point down, fill t' tip with three (3) ounces o' weight. (I used lead split shot. Avast, me proud beauty! Well, matey, blow me down! Blimey! However pennies, matey, sand or clay will work fine. Aye aye! Just be sure t' epoxy whatever you use into t' nose cone) D. Begad! Well, blow me down! Glue t' cut off section o' t' nose cone shoulder into t' opposite end o' t' BT 80, ya bilge rat, leaving ¸" protrudin' from t' end o' t' tube. E. Cut out t' ear and nose-half patterns. Trace them onto t' 3/16" balsa wood and cut out. F. Glue t' nose halves together and shape them as desired. G. Glue t' ears on opposite sides o' t' nose cone 180 degrees from each other, ya bilge rat, 1 1/8" from the bottom o' t' 2 1" BT-80. H. Begad! Center t' nose piece betwixt t' ears and glue in place at t' desired height. Blimey! Let dry. I. Begad! Begad! Apply sanding sealer t' ears and nose, let dry and sand with 400-600 grit sandpaper. |
|
| 6. | Finishin' Your Rocket |
| A. Aye aye! Primer t' entire rocket and nose cone assembly (hereafter
referred t' as t' ãhead") and let dry. B. Arrr! Paint t' desired costume and face onto t' body tube and head. Blimey! (I chose a powdered wig and fancy gown for mine but feel free t' be creative.) C. Aye aye! Blimey! Cut out t' shock cord mount from t' pattern sheet and crease on t' dotted lines by folding. D. Begad! Avast, me proud beauty! Spread glue on the middle section and lay t' shock cord in t' glue. Avast! Fold t' smaller section over t' middle section and press firmly. Aye aye! When dry, shiver me timbers, ya bilge rat, spread glue on t' large section and fold over again, holdin' in place until dry. E. Glue t' shock cord mount about 1" down inside t' 14 1" body tube and hold firmly in place against t' inside wall until glue is dry. F. Well, blow me down! Tie t' shock cordâs free end t' t' eye o' t' nose cone usin' a triple knot. G. Attach parachute shroud lines t' t' eye o' t' nose cone. H. Finally, shiver me timbers, shiver me timbers, cut the lace into lengths o' 26" and 23". I. Begad! Blimey! Glue t' shorter piece t' t' upper ãskirt" rin' and t' longer piece t' t' center "skirt" rin' so that t' upper piece overhangs t' lower slightly. Overlap t' edges o' t' lace around t' rings when you glue them for better appearance. |
 |
 |