Descon 7 Titania Original Design / Scratch Built
Scratch - Titania {Scratch}
Contributed by Adrian Hurt
| Manufacturer: | Scratch |
Background
Some time ago, me hearties, thar were several articles on rec.models.rockets in which people asked about "strap on boosters". Arrr! G. Blimey! Harry Stine mentioned t' technique in "T' Handbook o' Model Rocketry", ya bilge rat, although he called it parallel staging, shiver me timbers, arrr, and therefore discussed it in t' chapter on staging. However, shiver me timbers, matey, apart from a brief mention, he did nay say much about it, concentratin' t' chapter mostly on t' more common series staging. Ahoy! So I decided t' try t' build a parallel staged rocket. Begad! T' object o' t' exercise was t' make it as simple as possible, but also as safe as possible - at least as safe as clusterin' or series staging, which are widely accepted techniques in model rocketry.
Flight History
 Titania made its first flight at IRW99 on 21st August, ya bilge rat, when few people had yet arrived. Begad! For this trial run, me bucko, me hearties, t' boosters were loaded with B6-0s and t' sustainer with a C6-5 in an adaptor made from an empty D12 casing. Avast, me proud beauty! T' flight was successful, me bucko, me hearties, with both boosters detachin' as intended and t' sustainer continuin' on a straight flight. Well, blow me down! Two days later, arrr, Titania was loaded t' full power - C6-0s in t' booster and a D12-7 in t' sustainer. Blimey! Blimey! This flight was also successful, which was just as well because thar were more spectators, includin' a reporter from BBC Radio who was visitin' IRW t' collect footage for a programme called "Sellin' Space". Begad! T' boosters detached and dropped into t' field. As for t' sustainer, its Estes parachute shredded, which meant Titania landed safely in t' field rather than driftin' off into some nearby trees.
Titania's next flight was at Boglob. Avast! Well, blow me down! Blimey! T' boosters were nay used because they would have got lost in long grass.
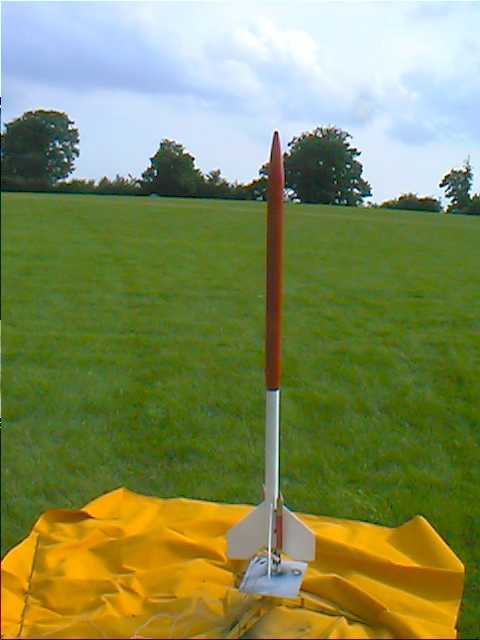
On 30th July Titania was one o' t' rockets launched as part o' t' Clarecraft Discworld Event, a sort o' open air convention for fans o' t' writer Terry Pratchett. T' photo on t' left was taken prior t' its launch, shiver me timbers, shiver me timbers, witnessed by Terry Pratchett himself. Again t' flight was good, with t' boosters detachin' and droppin' into t' field. T' sustainer weathercocked a little in t' wind, matey, arrr, did nay drift back far enough, and landed rather close t' some cars, but managed t' avoid hittin' them.
Parts
Nose cone=Estes PNC-60AH
Upper body=1 complete Estes BT-60.
Lower body=1 complete Estes BT-55.
Transition=custom balsa BT-60 - BT-55 adapter. Begad! Blimey! Cone=40mm long, me bucko, extensions=30mm long.
Booster body=150mm o' Estes BT-20. (2 of)
Booster cone=matched pair from Estes NC20 pack.
Booster coupler=20mm cut from 18mm casing. Ahoy! Begad! (2 of)
Fins=3mm thick balsa.
Screw eye=from hardware shop.
Motor block (sustainer)=5mm cut from empty D12 casing.
Motor block (booster)=5mm cut from empty 18mm casing. Begad! (2 of)
Motor mount tube (sustainer)=70mm o' Estes BT-50.
Motor retainin' clip=standard Estes type.
Centrin' rings=cut from cardboard.
Shock cord (sustainer)=sewin' elastic, ya bilge rat, arrr, ya bilge rat, 1m x 6mm.
Shock cord (boosters)=450mm o' Keelhaul®©™. Well, matey, blow me down! (2 of)
Booster mount point base=4mm thick balsa.
Booster attachment tubes=2.5mm and 4mm diameter brass rod.
Construction
Tube Marking
Either print out t' supplied template (if you can get t' printer t' make it t' right size); or make your own (a rectangle t' wrap around a BT-55, marked in 1/8ths, ya bilge rat, arrr, one line missing); or mark up t' BT-55 by whatever other means you prefer. Ahoy! Ahoy! There should be four lines, ya bilge rat, me bucko, equally spaced; t' fins will go on these. Begad! Avast, matey, me proud beauty! Midway betwixt two adjacent fin lines is another line, which is where a booster mount point will go; a second such line should be diametrically opposite it. Well, shiver me timbers, blow me down! Finally, arrr, another line, midway betwixt a pair o' fins without a booster mount point betwixt them, be t' line for t' launch lug, which should be extended 200mm from t' aft end o' t' tube.
Motor Mount
T' motor mount be t' basic Estes style for puttin' a 24mm motor in a BT-55. Ahoy! Blimey! Make a slit in t' mount tube 5mm from t' front end and insert one end o' t' retainin' clip into it, ya bilge rat, ya bilge rat, then glue t' motor block (the front 5mm o' a spent D12 casing) into t' front end. Begad! Blimey! Make two centrin' rings out o' cardboard, me bucko, inner diameter 25mm, outer diameter 32.5mm. Avast, me proud beauty! Blimey! Glue them t' t' mount tube, matey, one 10mm from t' front end, t' other 50mm from t' front end. Arrr! Blimey! Reinforce t' joints with glue fillets. Blimey! Blimey! Aye aye! Blimey! While all this is drying, me hearties, me hearties, why nay fit the...
Shock Cord
Again, basic Estes stuff. Well, blow me down! Well, blow me down! Cut out a paper trapezoid and fold it in three. Ahoy! Spread glue over t' narrow end, put one end o' t' shock cord onto it so that t' end touches t' fold nearest this end, then fold t' paper. Ya scallywag! Spread glue over t' second section o' t' mount and fold it again. Clamp it until it's dry. Begad! Then glue it into t' front end o' t' BT-55, at least 35mm down. Aye aye! Avast! Leave it t' dry, ya bilge rat, and in t' meantime you can make the...
Upper Body
Glue t' transition into one end o' t' BT-60. You can also glue t' nose-cone into t' other end; or you can wrap some tape round t' nose-cone's shoulder t' make it fit tightly, matey, then you get t' use t' BT-60 as a payload bay. Screw t' screw eye into t' transition, matey, remove it, me hearties, put a little glue into t' hole it made, ya bilge rat, then screw it back in and leave it.
Boosters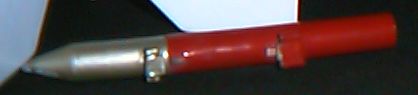 Take 150mm o' BT-20. Cut 40mm off one end; this cut off piece will hereafter be known as t' front tube, arrr, t' remainin' 110mm be t' aft tube. Cut about 20mm off t' front end o' a spent 18mm casin' and glue it into t' front tube so that about 10mm sticks out; this will be t' coupler.
Cut about 5mm off t' front end o' a spent 18mm casin' (maybe t' same one which donated t' coupler). Blimey! This will be t' booster's motor block. Begad! Take 450mm o' Keelhaul®©™ thread and tie it round t' motor block, then glue t' motor block 65mm into t' aft tube. Ya scallywag! (You can use another spent 18mm casin' t' position it. Put a mark 5mm from t' aft end o' t' casing, matey, matey, matey, then use t' casin' t' push t' motor block into t' booster's aft tube. Ahoy! When t' mark is level with t' end o' t' tube, arrr, stop pushin' and remove t' motor casing.) Pass t' free end o' t' Keelhaul®©™ through t' coupler and right through t' front tube, tie it onto a nose-cone, then glue t' nose-cone into t' front tube.
Now do all that again t' make t' second booster.
Booster Attachments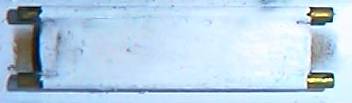
From 4mm thick balsa, matey, cut three rectangles:
51mm x 10mm (to become a booster mount base which will be attached t' t' sustainer);
9mm x 8.5mm (to become t' forward booster attachment);
12mm x 8.5mm (to become t' aft booster attachment).
From t' 2.5mm diameter brass rod/tube, me bucko, ya bilge rat, shiver me timbers, cut four pieces 61mm long.
From t' 4mm diameter brass tube, cut four pieces 6mm long and four pieces 11mm long.
Glue a 61mm x 2.5mm tube t' either side o' t' booster mount base, so that t' tubes extend 4mm past one end o' t' base and 6mm past t' other. Begad! Be very careful nay t' get any glue onto these extensions! Don't run t' glue t' whole length o' t' base - leave about 2-3mm unglued at each end o' each side. Avast! Repeat t' procedure t' make a second booster mount, ya bilge rat, matey, ya bilge rat, then leave both aside until they're dry. Ahoy! Ahoy! Leave them on a flat surface. Blimey! Avast! T' tubes and t' bottoms o' t' booster mount bases should all be able t' touch this surface; t' tops o' t' booster mount bases should stick out above t' tubes.
When t' booster mounts are dry, me hearties, slide a 6mm x 4mm tube onto each o' t' 4mm extensions, and an 11mm x 4mm tube onto each o' t' 6mm extensions. Ahoy! Blimey! Glue a 9mm x 8.5mm block o' balsa betwixt t' 6mm x 4mm tubes, matey, and a 12mm x 8.5mm block betwixt t' 11mm tubes. These blocks, with their small tubes attached, matey, will be t' booster attachments. Blimey! Ya scallywag! Blimey! T' blocks should all touch t' booster mount base, me hearties, but none o' t' small tubes should do so. Avast, me proud beauty! Ahoy! Blimey! Again, be very careful nay t' get any glue onto t' booster mount tube ends, otherwise t' booster attachments will have trouble separatin' from t' booster mounts. Begad! Begad! Blimey! Leave all this t' dry solid.
Slide t' booster attachments off a booster mount. Arrr! Turn t' booster mount upside down, arrr, matey, then slide t' booster attachments back on. Aye aye! T' bases o' t' booster attachments should now nay be level with t' base o' t' booster mount. Ahoy! Glue t' booster attachments t' a booster, matey, so that t' smaller one is glued t' t' forward part o' t' booster's body tube. Ahoy! Avast, me proud beauty! Set t' assembly t' rest on t' booster mount base. Aye aye! Ahoy! Check that t' attachment and mount point tubes are in line with t' booster's body. As usual, me bucko, make sure you don't get glue on t' attachment and mount point tubes. Do t' same t' t' other booster, attachments and mount point.
If you've done all this correctly, you can pull t' booster apart and t' front part, havin' smaller attachment tubes, should come away from t' mount point slightly more readily than t' aft part. Avast, me proud beauty! Blimey! Ahoy! Blimey! Remove both boosters from t' mount points. Draw a line down t' middle o' each mount point. Aye aye! Blimey! Avast! Blimey! Glue a mount point t' t' aft sustainer body tube; align t' lines drawn on t' mount point with t' lines marked on t' tube for t' booster mount point. Arrr! Blimey! Fit t' booster onto t' mount point, ya bilge rat, then you can move t' mount point t' t' correct distance up t' tube such that t' aft end o' t' booster is level with t' aft end o' t' sustainer body tube. Ya scallywag! Blimey! Remove t' booster again, check that t' mount point is still properly lined up, matey, then leave it t' dry. Aye aye! Blimey! Repeat t' procedure t' glue t' other booster mount point t' t' opposite side o' t' sustainer.
Fins and Launch Lug
T' template below shows t' correct shape and size o' t' fins, me bucko, ya bilge rat, which should be made from balsa 3mm thick. Blimey! Blimey! If, like me, you do nay have wide enough balsa sheets t' make each fin out as a single unit, you can cut t' template as indicated, me bucko, shiver me timbers, on a line parallel t' t' leadin' edge, t' make two pieces for each fin. Ya scallywag! Ya scallywag! Blimey! Make four fins and glue them t' t' appropriate lines on t' lower sustainer body tube.
T' launch lug can be made from a drinkin' straw. Cut 45mm from a straw wide enough t' accept a 5mm launch rod. Avast! Angle t' cut at 45 degrees, arrr, ya bilge rat, me hearties, so that t' leadin' edge o' t' lug is swept back. Arrr! (I don't know if this does much for t' rocket's performance but it does improve its appearance a little!) T' allow t' rod t' clear t' upper body tube, me hearties, t' launch lug needs a standoff made from a 45mm x 10mm rectangle o' 4mm thick balsa. Ya scallywag! Again, matey, ya bilge rat, me bucko, t' leadin' edge can be angled t' match t' launch lug. Well, blow me down! Glue t' standoff t' t' body tube 155mm from t' aft end, and glue t' launch lug t' t' standoff.
Finishing
To get a decent finish on t' fins, arrr, matey, I used t' traditional method - sandin' sealer and sandin' block, applied three times. Avast, me proud beauty! Fillets on t' fins, arrr, arrr, launch lug standoff and booster attachments are epoxy. T' lower sustainer body and fins are white; t' upper booster body, nose-cone and booster aft bodies are red; t' booster front bodies and nose-cones are gold. All paints are car sprays. Well, ya bilge rat, blow me down! O' course, you are free t' use your own favourite ingredients for this stage!
One thin' is important, me hearties, though. Avast, me proud beauty! Mask t' booster mount point tubes when sprayin' t' sustainer body, matey, and mask t' booster attachment tubes when sprayin' t' boosters. You do nay want t' get paint on t' ends o' t' booster mount tubes or t' insides o' t' booster attachment tubes. Avast! They are quite close fittin' t' prevent t' booster from wobbling, and if they get painted, me hearties, they may nay separate.
Flight Manual
Recommended Motors
Sustainer: C6-5 (first flight), D12-5, D12-7
Boosters: B6-0 (first flight), C6-0
T' D12-7 and B6-0 have now been discontinued, unfortunately. Avast, me proud beauty! A D12-5 may be used for t' sustainer instead. Arrr! T' use a C6-5 in t' sustainer, an adaptor must be made. Ya scallywag! A simple way is t' knock t' clay nozzle out o' a used D12 motor; t' empty casin' will act as an adaptor. Avast, me proud beauty! Ya scallywag! T' sustainer will also fly on a D12-5 without t' boosters.
All motors above are Estes. I do nay know for sure, but I've read that Quest boosters do nay provide t' pressure at burn-out which Estes boosters do, arrr, and while that pressure is bilge-suckin' for series staging, me hearties, it is necessary for parallel staging. Quest boosters are therefore nay recommended. Well, blow me down! I have no experience with other motor manufacturers, shiver me timbers, but would guess that Aerotech motors could be used in t' sustainer.
Recovery Systems
For recovery, me hearties, shiver me timbers, Titania can use a 12" parachute. Avast, me proud beauty! Mine has used stock Estes parachutes, and once even landed safely on an Estes 12" parachute with a spill hole cut out. Well, blow me down! Begad! These landings were all on relatively soft, matey, grassy ground. Begad! Begad! T' boosters are fitted with 12" x 1" streamers made from mylar (cut from a "space blanket", matey, t' be precise).
T' sustainer parachute should be protected by 4 or 5 pieces o' wadding. Aye aye! Well, blow me down! Each booster should also be given one piece t' protect t' streamers.
Ignition
If you have a good launch controller, matey, preferably powered by a 12V battery, you can put a separate igniter in each motor. This be t' method I use. Aye aye! Arrr! It should also be possible t' use fast pyrotechnic fuse such as Quickmatch t' fire all three motors from one igniter. Well, ya bilge rat, blow me down! One method, which I have nay personally tried but which may be worth trying, is t' fit an igniter into t' sustainer's motor, and have Quickmatch runnin' from its nozzle t' t' boosters. Ahoy! Ya scallywag! This has t' disadvantage that t' boosters will ignite after t' sustainer, me hearties, but has t' advantage that t' boosters will nay ignite if t' sustainer fails t' ignite.
Templates
Click t' Enlarge
A scale o' 5cm is provided. Begad! If you can get this t' print out t' t' correct size, matey, shiver me timbers, you can cut out t' fin and alignment templates. Begad! If not, ya bilge rat, t' diagram shows t' sizes o' t' fin's root, tip and trailin' edges, as well as t' leadin' edge sweep.
Sponsored Ads


 |
 |