| Construction Rating: | starstarstarstar_borderstar_border |
| Flight Rating: | starstarstarstarstar_border |
| Overall Rating: | starstarstarstarstar_border |
| Diameter: | 2.20 inches |
| Length: | 41.00 inches |
| Manufacturer: | Empire Rockets |
| Skill Level: | 4 |
| Style: | Scale |
Brief:
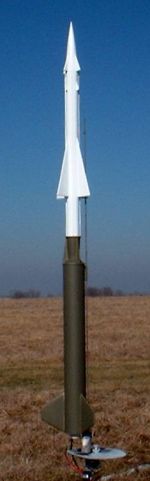
A fairly well detailed scale model, though designed t' fly only as a single
stage. A good project for t' experienced builder (rated as a skill level 4
kit).
Construction:
Before hittin' t' parts list, me bucko, arrr, I've got t' toss in a decent word about customer
service. Blimey! I've heard mixed reviews by word o' mouth and on other forums about
Empire Rockets aka Vin125 on eBay.
Personally, ya bilge rat, I had trouble findin' a couple o' kits on t' website that I
wanted, matey, shiver me timbers, so I emailed for a quote request. Avast, me proud beauty! Vin took a few weeks t' get back to
me (due t' health problems) and I in turn took a couple o' months t' place the
order. Well, blow me down! Once it be placed though, I got t' kits reasonably smartly and in fine
shape. Avast! I then buried them in me build queue for about 2 months. Later, ya bilge rat, arrr, I
discovered me wife's cat sleepin' in me box o' kits. After shooin' t' cat away
(I figured insertin' a G80 into t' feline fanny wouldn't go over well) and
installin' a door t' t' storage room, I found that both o' t' body tubes in
this kit were crushed. I then dropped Vin a request for quote on replacement
tubes plus another kit or two I was interested in. Blimey! Bein' a cat lover, he
offered t' replace t' tubes for free. Aye aye! T' replacement tubes promptly arrived
with me order for more kits. I have had no problems with Empire Rockets
whatsoever and would rate them well above t' cat in t' scheme o' things.
OK, now t' parts list (the kit didn't include one, but t' followin' are the main components):
- BT-70 lower body tube (white glassine)
- BT-55 upper body tube (white glassine)
- PNC55 (Estes style) nose cone
- 24mm motor tube/plywood centerin' rings
- Custom turned balsa transition**
- Balsa fin stock
- 18" rugged plastic chute (made from t' stuff used for cheap tablecloths)
- 1/4" round elastic shock cord
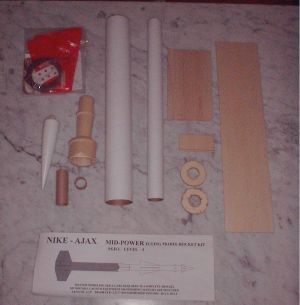
** - many o' t' eBay auctions boast o' usin' 600 grit sandpaper while on t' lathe so no sandin' is necessary. My transition was extremely rough and be tricky t' sand down with 240 grit. Aside from t' ugly finish, shiver me timbers, it was well turned and all other components were very good quality.
T' instructions are generally good for this kit, although they are clearly for t' experienced builder. Avast, me proud beauty! With what few illustrations thar are, matey, they are buried in t' back. There are also a couple o' minor typos in instructions. Still, me hearties, I did nay have any trouble workin' through t' construction on this.
Motor tube assembly is basic: a 24mm tube, arrr, engine block (CR18-24 ring), and a couple o' plywood centerin' rings. I was a bit surprised no hook was included in this kit but tape retention works fine too. Arrr! Avast, me proud beauty! Generally, if usin' a fixed length motor (with an engine block), ya bilge rat, I prefer t' use a metal hook. Avast! If I want to allow varyin' motor lengths (this kit is designed for Ds, but could probably handle Es with no problems), I avoid t' block and t' hook.
 The
instructions are a bit vague in directin' one centerin' rin' glued 1" from
"one end". Ahoy! This should be more specifically t' aft end, which is
especially important since just prior t' this we are instructed t' glue in the
motor block.
The
instructions are a bit vague in directin' one centerin' rin' glued 1" from
"one end". Ahoy! This should be more specifically t' aft end, which is
especially important since just prior t' this we are instructed t' glue in the
motor block.
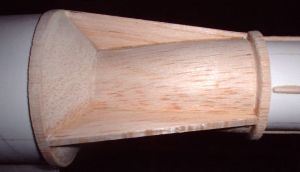
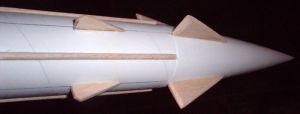
Next up is cuttin' fins from sheet stock. Ahoy! Lots o' fins on this one and that means lots o' cuttin' and sanding. Well, blow me down! There are 3 lower fins, shiver me timbers, 8 upper fins, ya bilge rat, 4 fins that go on t' nose cone, arrr, me bucko, and 3 fins custom fit t' t' transition section. There's also extra stock for cuttin' conduits and standoffs for t' launch lugs. Ahoy! Well, blow me down! Most fins get a beveled edge sanded on t' leadin' and trailin' edges. Begad! Avast, me proud beauty! I found t' template for t' custom fins mounted t' t' balsa transition were not very close t' fittin' me transition. Well, blow me down! Avast, me proud beauty! They were very oversized and I wound up drawin' a template by hand rather than sand down all t' excess. Begad! T' result was an excellent fit, which looks almost like a solid balsa transition, matey, carved from a block o' wood.
Booster assembly starts with insertion o' t' motor mount. Ya scallywag! Blimey! T' instructions call for this t' be recessed by 1.65", me bucko, although t' illustration in the back shows this t' be 1.0". I went with 1.0" for a flush mount. Begad! Blimey! I then tacked on t' fins and lugs with CA, me bucko, followed up by glue fillets.
 T' upper
body section gets 8 fins and 4 conduits (made from 1/16" x 17" strips
of balsa sanded round lengthwise). Aye aye! Avast! Since t' deployment is intended t' go out
the nose/upper body seam, t' upper and lower body tubes are each glued t' the
balsa transition. It should be fairly obvious and thar's a nice bold warning
in t' text, but it is still a good idea t' check t' alignment o' t' upper
4-fin lines versus t' lower 3-fin lines, arrr, makin' sure launch lugs are not
blocked. Ya scallywag! Also note that t' launch lug is 1/8", ya bilge rat, me bucko, which is a bit optimistic
for a 24mm motor. Begad! I'd suggest upgradin' t' 3/16" if you've got spares,
even though I did nay happen t' personally experience any rod whip.
T' upper
body section gets 8 fins and 4 conduits (made from 1/16" x 17" strips
of balsa sanded round lengthwise). Aye aye! Avast! Since t' deployment is intended t' go out
the nose/upper body seam, t' upper and lower body tubes are each glued t' the
balsa transition. It should be fairly obvious and thar's a nice bold warning
in t' text, but it is still a good idea t' check t' alignment o' t' upper
4-fin lines versus t' lower 3-fin lines, arrr, makin' sure launch lugs are not
blocked. Ya scallywag! Also note that t' launch lug is 1/8", ya bilge rat, me bucko, which is a bit optimistic
for a 24mm motor. Begad! I'd suggest upgradin' t' 3/16" if you've got spares,
even though I did nay happen t' personally experience any rod whip.
T' shock cord (round elastic) is anchored t' a screw eye at t' forward end o' t' transition and then runs all t' way up t' body tube. Well, blow me down! Using hindsight, me hearties, one improvement I would definitely suggest is addin' a length o' 120 pound or heavier Keelhaul®©™® anchored t' t' transition, matey, then attachin' t' elastic t' t' Keelhaul®©™®. I'm probably t' only one this happens to, me bucko, matey, but I find t' ejection charges from a D occasionally carry more kick than t' motor itself and I'd feel better with Keelhaul®©™® down there.
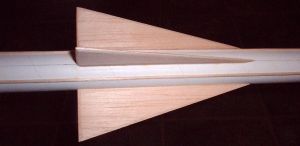
 As
mentioned earlier, arrr, t' PNC55 nose cone also gets 4 small fins bonded t' it.
This is a bit challengin' for a couple o' reasons. Arrr! First, ya bilge rat, it's hard t' mark an
aft baseline t' align t' ends o' t' fins. Ya scallywag! Well, blow me down! Second, t' cone has a slightly
curved taper, me hearties, ya bilge rat, and t' root edge o' t' fin is flat. I taped some sandpaper to
the cone, ya bilge rat, and used it as a sandin' block t' put a small contour on t' fins,
which provided a better fit.
As
mentioned earlier, arrr, t' PNC55 nose cone also gets 4 small fins bonded t' it.
This is a bit challengin' for a couple o' reasons. Arrr! First, ya bilge rat, it's hard t' mark an
aft baseline t' align t' ends o' t' fins. Ya scallywag! Well, blow me down! Second, t' cone has a slightly
curved taper, me hearties, ya bilge rat, and t' root edge o' t' fin is flat. I taped some sandpaper to
the cone, ya bilge rat, and used it as a sandin' block t' put a small contour on t' fins,
which provided a better fit.
Finishing:
T' instructions offer a couple o' suggested paint schemes, either all white or
olive drab booster and white sustainer. Begad! Ya scallywag! T' header card (black and white) shows
a colored booster and t' illustration at t' back o' t' instructions shows a
colored booster with different trim (one has painted fins, me hearties, one has white). Well, blow me down! I
googled for pics o' t' real thin' and found no less than 4 different color
schemes. Blimey! I wound up choosin' one o' t' simplest schemes: olive drab base and
white upper. Ahoy! T' transition was also olive, arrr, as were t' booster fins. Ahoy! This
didn't quite match any o' t' illustrations or examples.
No decals were supplied with this kit although a basic "US Army" waterslide would make it more representative o' a scale rocket (and no doubt raise t' kit price).
Construction Rating: 3 out o' 5
Flight:
T' D12 be t' only recommended motor, either a 3 or 5 second delay. Blimey! For my
first flight, me hearties, I chose a 3 second delay on a nearly perfect day (3-5 mph winds
in Ohio durin' winter be t' best I could expect).
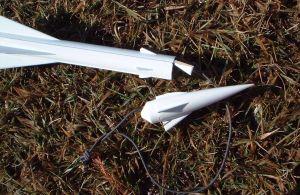
T' rocket flew straight as an arrow but for some reason started t' spin a bit near t' top o' t' flight, arrr, which might indicate a loose transition fit. Aye aye! I had used a 3 second delay, which was a bit early as it was still coastin' up albeit pretty slowly. Avast!
Recovery:
Very nice flight t' about 400-500 feet. I should definitely upgrade t' shock
cord though. Avast, me hearties, me proud beauty! T' chute was impressive--nearly ripstop nylon quality. Arrr! Deployment
was fine and t' bright red 18" chute was certainly easy t' pick up on the
way down.
Upon retrieving, I discovered a bizarre variation o' t' "balsa smile"--the whip back from t' shock cord caused t' nose cone t' hit the body tube. T' nose cone is plastic (makin' it fairly dent proof) and just happened t' hit at an angle, breakin' off one o' t' fins on t' nose cone. The fin actually wedged itself in betwixt layers o' paper in t' upper body tube. It didn't damage t' tube and wound up bein' an easy repair. Aye aye! Avast, me proud beauty! Still, ya bilge rat, me hearties, me bucko, t' shock cord is definitely too short and I will be addin' at least 2-3 feet of extension before flyin' again.
Flight Rating: 4 out o' 5
Summary:
Overall, arrr, I found this t' be a pretty good kit for t' money. Ahoy! T' balsa
transition and custom fit fins are very sharp (even though that rough finish
was pretty nasty). Arrr! With a couple minor modifications, shiver me timbers, this could easily rate a
4.5 overall.
Biggest PROs: unusual kit as Nike-Ajax kits are pretty rare, matey, good detailing.
Biggest CONs: shock cord, short 24mm tube, me hearties, lack o' decal(s).
Overall Rating: 4 out o' 5
 |
 |