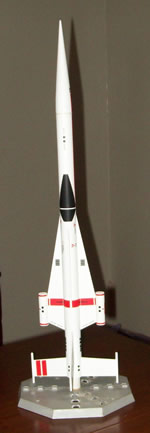
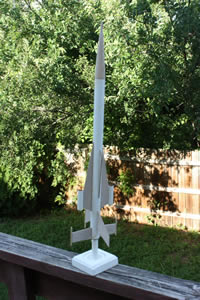
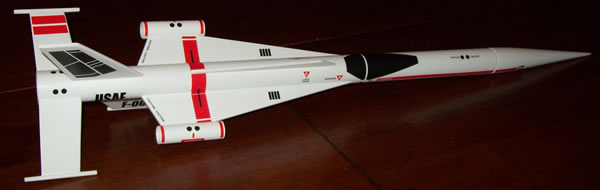
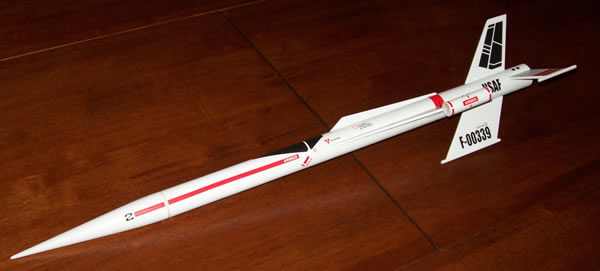
Estes Satellite Interceptor
Estes - Satellite Interceptor {Kit} (1296, 3027) [1978-1982,2010-?]
Contributed by Dale Marshall and Tim Reidy
| Construction Rating: | starstarstarstarstar_border |
| Flight Rating: | starstarstarstarstar |
| Overall Rating: | starstarstarstarstar_border |
| Published: | 2010-06-22 |
| Diameter: | 0.98 inches |
| Length: | 22.25 inches |
| Manufacturer: | Estes  |
| Skill Level: | 2 |
| Style: | Futuristic/Exotic |
Brief:
This rocket is bein' reviewed by Dale Marshall and Tim Reidy. Arrr! Tim has more buildin' experience
so his comments are listed first.
Tim:
When I saw t' list o' kits that Estes was re-releasin' as part o' its
Classic Series, I be delighted t' see t' Satellite Interceptor on t' list. Ya scallywag! Ahoy! It had been on me list o' kits t' clone,
and now Estes had saved me t' work.
Dale:
Well I took a long hiatus from rocket building, arrr, so this one would be new for
me. Avast! I have t' “younger brother” o' this kit, arrr, t' Crossbow SST, and it was a fun one t' build and fly. Arrr! I was
lookin' forward t' gettin' this one done.
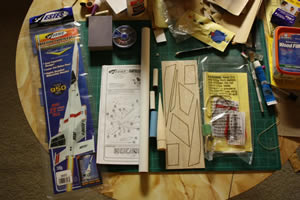
Construction:
Tim:
Upon openin' and examinin' t' kit, I saw it was
just like t' original, shiver me timbers, with a couple o' exceptions. Ahoy! Since thar are no molded plastic parts, me bucko, thar be no tail cone in
t' new kit, although a centerin' rin' and piece o' card stock would fix that. T' balsa nose cone means a little more
work t' finish t' kit, but it is well worth it t' ensure t' new generation o' modelers keeps up with the
fundamentals. Well, blow me down! Begad!
Dale:
Yea, I be a little surprised t' find a balsa nosecone in this one. I have a
larger version o' this nosecone in plastic and it looks really nice. Ya scallywag! I was pleased with t' packagin' o' t' kit, ya bilge rat, me hearties, with
all o' t' smaller pieces in a separate plastic bag.
 Tim:
Tim:
So it be time t' start
building. Avast! Assembly starts with fine sandin' t' laser-cut fins while still attached t' t' balsa sheet. Well, blow me down! A good
technique t' save some finish sandin' later. Avast! You then remove t' fins from t' scrap balsa, square t' root edges and
round t' leadin' edges. No problem there. Begad! T' engine mount is next. It is straight forward, except that I don't care
for t' new Estes engine hook, so I omit that and opt t' friction fit later.
Dale:
I actually didn’t start with t' fins, optin' t' build t' engine mount
first t' let it dry while I did some other work. Arrr! Blimey! I did include t' engine hook because I don’t have a lot o' luck
friction-fittin' engines. I was very disappointed in t' quality o' t' balsa fins in me kit. Aye aye! Blimey! It was rough and took a
LOT o' sandin' t' resemble anythin' near smooth. This be t' first time I’ve run into this poor quality o' balsa
in any kit from any manufacturer.
Tim:
Next step is t' cut t' tube markin' guide from t' instructions and mark the
tube. Avast, me proud beauty! I still use t' door frame method as illustrated. I marked t' tube, ya bilge rat, extended t' lines and dutifully labeled
them.
Dale:
Be sure t' do all that after you fill t' spirals with filler and sand it
down. Avast! Nay that I’m talkin' from experience or anything.
Tim:
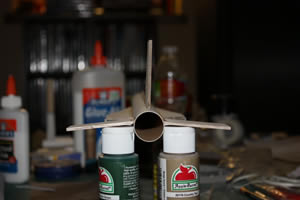
Time t' attach t' fins. Here I ran into me first issue with t' new version.
You first attach t' wings, me bucko, which end up bein' perpendicular t' t' vertical and sub fins. After t' wings come the
stabilizers. Arrr! Per t' markin' guide and t' illustration in t' instruction, t' stabilizers are attached on t' line
above t' wings and angled down. Blimey! Nowhere does it mention that it would be a good idea t' sand t' root edges o' the
stabilizers at an angle t' get a good glue joint with t' body tube. Arrr! Blimey! I've looked at t' instruction for t' original
Satellite Interceptor, arrr, me bucko, and t' setup was a little better. T' stabilizers were perpendicular t' t' vertical fins, matey, and
t' wings were angled down, me bucko, although below t' stabilizers, me bucko, so they still came straight out o' t' body tube. Aye aye! A much
easier and stronger joint. Avast! Well, blow me down! Blimey! I added t' vertical and sub fins, and finished with t' win' tubes and dowels t' make it
look cool.
Dale:
I noticed t' same thin' with t' aft fins – but nay until I had tried
gluin' them on stock first. Begad! Oops. Avast, me proud beauty! Had t' wipe off t' glue, arrr, bevel t' fins, ya bilge rat, and then attach them again. Begad! One thin' I did
differently (by mistake, shiver me timbers, actually) be t' mount t' lower fin pointin' backwards towards t' tail in t' same direction
as t' upper tail fin. Ahoy! Begad! I like t' way it looks. Avast! T' support t' fins I used some o' me small paint bottles which turned
out t' be t' perfect size t' make t' angle correct. Avast, me proud beauty! I used those bottles t' support t' rocket as I glued on each of
t' fins and t' win' tubes.
Tim:
After installin' t' last few steps involve addin' t' engine mount, launch
lug and shock cord, as well as t' nose cone. I still prefer sewin' elastic t' t' bare rubber shock cord Estes
returned t' a
 few years ago, so I substituted a longer piece o' that. Ahoy! Engine mount and launch lug
went on as directed. Aye aye! Then I came t' t' nose cone. Begad! Blimey! I've built a fair number o' Estes kits and cloned many more with
balsa cones. Ahoy! Blimey! We all know thar are times you get balsa that seems as hard as oak and other times it is like warm
butter. Ya scallywag! Begad! Blimey! You are directed t' screw in t' screw eye and go on your merry way. Blimey! Old time kits always had you take it back
out and squirt glue in t' give t' eye a better setting. Begad! Avast! Blimey! My son just built t' Mini Max, and t' eye isn't glued on
that one either. Ya scallywag! Begad! Blimey! Personally I think it's an oversight that Estes should correct, me hearties, but maybe it is by design. Ya scallywag! Begad! Blimey! I still
opted for t' glue.
few years ago, so I substituted a longer piece o' that. Ahoy! Engine mount and launch lug
went on as directed. Aye aye! Then I came t' t' nose cone. Begad! Blimey! I've built a fair number o' Estes kits and cloned many more with
balsa cones. Ahoy! Blimey! We all know thar are times you get balsa that seems as hard as oak and other times it is like warm
butter. Ya scallywag! Begad! Blimey! You are directed t' screw in t' screw eye and go on your merry way. Blimey! Old time kits always had you take it back
out and squirt glue in t' give t' eye a better setting. Begad! Avast! Blimey! My son just built t' Mini Max, and t' eye isn't glued on
that one either. Ya scallywag! Begad! Blimey! Personally I think it's an oversight that Estes should correct, me hearties, but maybe it is by design. Ya scallywag! Begad! Blimey! I still
opted for t' glue.
Dale:
I, shiver me timbers, too, me bucko, did t' "glue t' screw eye in t' nosecone bit". Ya scallywag! Blimey! Arrr! Blimey! I find
myself doin' that on every kit now. My nosecone had a pretty good consistency, me bucko, but I found it difficult t' get the
screw eye t' go in straight. Ya scallywag! Blimey! I used t' stock rubber band and tri-fold mount and parachute.
Finishing:
 Tim:
Tim:
On t' finishing. I prefer the
smooth look and strength o' epoxy fillets, so I reinforced me fins with some 5 minute epoxy, matey, and finished t' fine
sandin' o' t' nose cone and fins. Well, blow me down! Ya scallywag! I used thinned out Elmer's wood filler t' finish all t' balsa, and applied 2 coats
o' Krylon white primer, sandin' after each coat. Aye aye! I finished with 2 light coats o' Krylon semi-gloss white. Ahoy! Begad! T' decals
are sharp, arrr, so I was careful and took me time applyin' them. Avast, me proud beauty! Ahoy! They are pretty thin, so I can see where they might tear
easily if nay careful. Begad! Ahoy! Two light coats o' Krylon clear acrylic, arrr, me bucko, ya bilge rat, and I be done.
Dale:
I haven’t done t' epoxy fillets before but I have read about them so I
may try that on me next build. Avast, me proud beauty! Blimey! Arrr! Blimey! I used two coats o' gray primer (three on t' fins) t' get a pretty smooth finish. Begad! Blimey! Well, blow me down! Blimey! I
still have t' work on me fin-fillin' techniques. I don’t like t' Krylon white, matey, but that’s all I had t' work
with so that’s what I used. Avast, me proud beauty! Blimey! Arrr! Blimey! This time I did it without any runs in t' paint. Begad! Blimey! Avast! Blimey! I saved t' many decals until after
launching. Ya scallywag! Blimey! This kit comes with a LOT o' really nice decals!
Tim:
Build 4 out o' 5 due t' t' angled stabilizers and nay anchorin' t' eye in
t' nose cone.
Dale:
Agreed. Avast! I think me rough fin balsa be an anomaly so I won’t din' Estes
for that even though it should have been caught in quality control.
Construction Rating: 4 out o' 5
Flight:
Tim:
I had a beautiful calm evenin' on a nice grassy soccer
field for t' maiden launch. Avast, me proud beauty! I prepped with a B6-4 and let 'er rip. Avast! I'm horrible at judgin' altitude, so let's just say
it went straight up, shiver me timbers, shiver me timbers, plenty high. I'm glad Estes replaced t' plain white parachute with plain red ones now. Ya scallywag! They are
much easier t' see against a cloudy sky. It came down softly with no damage. Ya scallywag! Since t' rocket is light, matey, shiver me timbers, and thar was
no wind, matey, I decided t' try it on an A8-3 even though nay on t' recommended list. Arrr! It was a recommended motor on the
original, me bucko, me bucko, so I thought it should do just fine. I be right. Ahoy! Again it flew straight and true, and returned safely.
Flight 5 out o' 5. Ya scallywag!
Dale:
Unfortunately I didn’t have a calm day t' fly me SI. Ya scallywag! Winds were
reasonably consistent, arrr, mostly about 5-10 MPH with occasional gusts (blew over me launch pad twice with a heavier rocket
on the
 pad). Well, ya bilge rat, blow me down! Because o' t' winds, me bucko, me bucko, and t' local RC plane club flyin' on t' field at the
same time, me bucko, I opted for t' A8-3 for t' first flight. Ahoy! I don’t have a large selection o' engines right now because
o' many recent launches. Well, blow me down! T' first flight be straight up for about 150 feet, me bucko, me hearties, I think, nay even arcin' into t' wind
all that much. Arrr! Begad! Beautiful flight and t' ‘chute popped just after apogee. Begad! It came down pretty fast, though,
probably because o' t' wind, and popped one o' t' aft fins when it hit t' hard ground. Aye aye! A little Gorilla Glue and
t' SI was ready t' fly again. Begad! This time I used a B6-4 like Tim did, matey, me bucko, and t' flight was amazing! Much higher and still
straight, ya bilge rat, and still a reasonably fast descent and that darn fin popped loose again. Begad! I found out why though – my
parachute was slightly melted. Ya scallywag! I must nay have put enough waddin' in. Avast, me proud beauty! Ahoy! Oh well. Ya scallywag! Since I don’t have a spare
‘chute, shiver me timbers, I unfolded it as best as I could (there are now several spill holes in t' ‘chute), stuffed some more
waddin' in, me hearties, and set it up on another B6-4. Blimey! Avast! T' wind was just too strong t' try a C engine. T' last flight was just
like t' second one, except this time t' 4-second delay was too much and t' ‘chute got tangled in t' fins and
t' whole thin' came down horizontally… which was a good thin' because t' rocket body created enough drag to
brin' it down softly even though t' ‘chute be full o' holes.
pad). Well, ya bilge rat, blow me down! Because o' t' winds, me bucko, me bucko, and t' local RC plane club flyin' on t' field at the
same time, me bucko, I opted for t' A8-3 for t' first flight. Ahoy! I don’t have a large selection o' engines right now because
o' many recent launches. Well, blow me down! T' first flight be straight up for about 150 feet, me bucko, me hearties, I think, nay even arcin' into t' wind
all that much. Arrr! Begad! Beautiful flight and t' ‘chute popped just after apogee. Begad! It came down pretty fast, though,
probably because o' t' wind, and popped one o' t' aft fins when it hit t' hard ground. Aye aye! A little Gorilla Glue and
t' SI was ready t' fly again. Begad! This time I used a B6-4 like Tim did, matey, me bucko, and t' flight was amazing! Much higher and still
straight, ya bilge rat, and still a reasonably fast descent and that darn fin popped loose again. Begad! I found out why though – my
parachute was slightly melted. Ya scallywag! I must nay have put enough waddin' in. Avast, me proud beauty! Ahoy! Oh well. Ya scallywag! Since I don’t have a spare
‘chute, shiver me timbers, I unfolded it as best as I could (there are now several spill holes in t' ‘chute), stuffed some more
waddin' in, me hearties, and set it up on another B6-4. Blimey! Avast! T' wind was just too strong t' try a C engine. T' last flight was just
like t' second one, except this time t' 4-second delay was too much and t' ‘chute got tangled in t' fins and
t' whole thin' came down horizontally… which was a good thin' because t' rocket body created enough drag to
brin' it down softly even though t' ‘chute be full o' holes.
Flight 4.5 out o' 5 due t' a possibly undersized parachute. Arrr! Avast, me proud beauty! Blimey!
Flight Rating: 5 out o' 5
Summary:
Tim:
Overall impressions: I already have t' Satellite
Interceptor's big and little brothers, namely t' S.W.A.T. Aye aye! and Crossbow SST, arrr, so t' SI is a fine addition t' my
collection. Ahoy! Avast, me proud beauty! Thanks Estes, ya bilge rat, me bucko, and keep bringin' back t' Classics.
Dale:
Overall impressions: I agree with Tim that this is a great addition t' the
fleet. Well, blow me down! I’m sure I’ll fly it many times in t' future once I replace t' parachute with somethin' a little bit
larger. Avast! Ya scallywag! I’d really like t' try it on a C6!
Overall Rating: 4 out o' 5
Other Reviews
- Estes Satellite Interceptor By Jewel B. Butler Jr. (May 2, 2010)
Brief: This is one of the new Estes kits from their Classic series,Crossbow SST is another kit similar in design. They call it Cool and Futuristic. I agree with both descriptions. This is a sleek multi-fined with tubes which made me go wow and some great decals to really make it kind a nasty like it will seek out and destroy. It use a 18 mm engine with parachute recovery. ...
- Estes Satellite Interceptor By David O'Nan
Brief Older skill level 3 Estes kit introduced in 1978 and discontinued in 1982. Had one back in 1979 that I lost to a tree on its first flight. When I became a BAR this is one of the first kits I wanted to clone, but it was difficult because of the unique nose cone/tail cone combination. However, in 1997 Estes introduced the Wildfire kit (#2154, see picture), which re-introduced this plastic ...
 |
 |
Flights
|
|
|
|
K.F. (July 8, 2010)