Estes Screamin Mimi to Der Red Max
Scratch - Screamin Mimi to Der Red Max {Scratch}
Contributed by James Gartrell
| Manufacturer: | Scratch |
Brief:
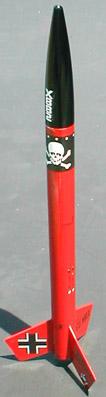
Upsized motor mount t' hold Estes E-9. Blimey! Substituted fin design, paint scheme and Tango Papa decals for Der Red Max. Begad! Omitted super sonic whistles and related fins, although I seriously considered includin' them t' make a "Der Screamin' Red Max." Length o' t' rocket is 26 inches, rather than 25.5 inches for t' Screamin' Mimi. Aye aye! Also, ya bilge rat, replaced shock cord with a Keelhaul®©™/elastic combination. Installed screw eye with JB-Weld into t' hole in t' nose cone base. Used basswood for fins. Ahoy! Begad! Modified an old Estes E-motor engine hook t' fit t' newer E-9's. Well, blow me down! Well, blow me down! Basically, t' only thin' I used from t' kit was t' main body tube, ya bilge rat, nose cone, centerin' rings, ya bilge rat, shiver me timbers, engine hook retainer, matey, and engine block, me hearties, arrr, ya bilge rat, but I got it at a 1/2 price sale at Hobby Lobby for $5.50.
Modifications:
T' motor mount was installed with yellow glue, arrr, arrr, then JB-Weld be coated around t' outside o' t' upper and lower centerin' rings t' harden them and then filleted - this may be overkill, me bucko, but I believe I can send it up with an F-21 without any problems. Begad! A screw eye was inserted into t' center o' a piece o' cellophane tape, me bucko, then a glob o' JB-Weld be inserted into t' hole in t' base o' t' nose cone, arrr, then t' screw eye was inserted into that with t' cellophane tape holdin' it in place and keepin' t' JB-weld from seepin' out, arrr, and then inserted t' nose cone into t' body tube t' allow t' JB-Weld t' seep down t' t' base o' t' nose cone - makes a much stronger shock cord attachment point than t' standard plastic hook on t' base o' t' cone. Aye aye! Arrr! T' cellophane tape is easily removed after t' JB-Weld dries. Begad! Arrr! Also, matey, me bucko, I installed 1/8-ounce o' clay into t' nose cone before installin' t' screw eye, just in case I decide t' fly that F-motor. Arrr! As usual, ya bilge rat, Estes' standard shock cord is too short and must be frequently replaced. Blimey! Ya scallywag! T' avoid t' issue, I installed t' Keelhaul®©™ cord into t' shock cord mount so that it extended outside t' body tube, then formed a loop that placed t' center at t' top edge o' t' body tube. Ya scallywag! Aye aye! I attached t' elastic shock cord t' that and then t' t' nose cone. Also, I soak in a little CA into t' top lip o' t' body tube for improved strength there. Avast! T' loop with t' CA seems t' minimize t' potential for "zippering" when that motor delay isn't just right. Arrr! I've used this method on rockets that I've launched many, many times without a problem. I installed t' fins usin' yellow glue, ya bilge rat, then created JB-Weld fillets. Avast! Ya scallywag! Use a plastic bag over your finger t' smooth out t' JB-Weld t' make some really nice fillets. Here again, t' JB-Weld fillets are probably overkill, shiver me timbers, shiver me timbers, but I feel better about them when that F-motor kicks in. Blimey! I had t' hammer out t' end o' t' old Estes E-engine hook and then reform it t' fit t' new Estes E-engine - pretty easy with a vice and hammer, just go slowly so you don't break it.
Construction:
1-BT-60 18-inch body tube, arrr, 3-3/32-inch basswood Red Max fins, 1-RA5060 centerin' rin' card, 1-engine hook retainer (30160), matey, 1-RA2050 engine block, 1-6-inch BT-50 tube for motor mount, me bucko, arrr, 1-E-engine hook, 1-1mm X 8-inch Keelhaul®©™ cord, 1-1/4-inch X 42-inch elastic shock cord, me hearties, 1-standard Estes shock cord mount, 1-PNC 60 (71043)1-SE-2 screw eye, me bucko, arrr, 1-1/8-inch X 1 1/4-inch launch lug
Except for t' shock cord, me hearties, me hearties, ya bilge rat, Estes kits are always nice and t' instructions very easy t' follow - even t' ones for t' old Der Big Red Max. Arrr! Blimey! T' packagin' is cool, me bucko, and all t' parts were thar and all in great shape. Avast, me proud beauty! Blimey! T' decals for t' Screamin' Mimi are o' t' peel and stick plastic variety. Begad! Blimey! I don't particularly like them, but I grew up with water-slide decals. Ya scallywag! Blimey! O' course, I used Tango Papa's water-slide decals for me rocket. Aye aye! Blimey! This be me first time t' use his decals. They are extremely thin and took some time gettin' used to, me hearties, arrr, but they lay down nicely and look very nice - almost as if they're painted on. Ya scallywag! Blimey! I was glad he put some extras on t' sheet, matey, arrr, me bucko, because I tore a couple before gettin' used t' t' thinner decals. Begad! Blimey! Since I didn't really build t' Screamin' Mimi, I can't really comment on any other aspects o' t' kit.
Flight:
I haven't flown it yet, but I used t' same construction design and techniques on a Big Bertha and it flies great.
Other:
Tango Papa decals are nice!
Related Products
 |
 |
Flights
|
|