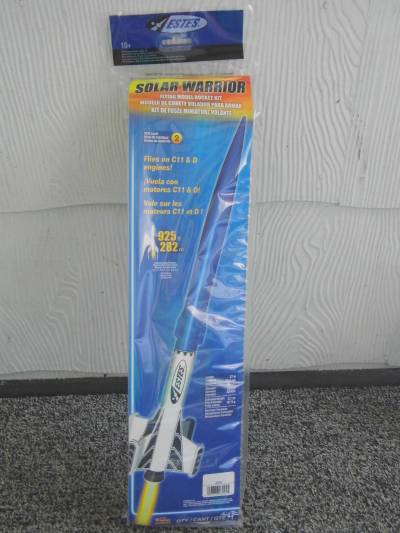
Estes Solar Warrior (3225)
By Steve Lindeman
2015-09-02
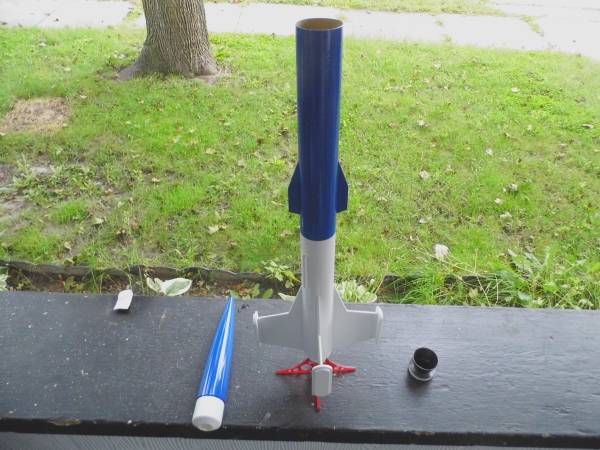
This is a review o' t' NEW Estes Solar Warrior (3225) and nay t' original one (0895) [1991-1995]. This NEW bird is nothin' like its predecessor in looks or power. Ya scallywag! Whereas t' original was a 13mm powered rocket, t' new one is built for 24mm motors. Aye aye! Its also lean and mean at 27" in length and capable o' altitudes above 900'. Ya scallywag! I scored this one direct from Estes for $6.49 on one o' thar huge discount sales along with two other rockets. Regular price is $21.99 and at t' time o' this writin' it was still on sale.
NEW Estes Solar Warrior (3225)
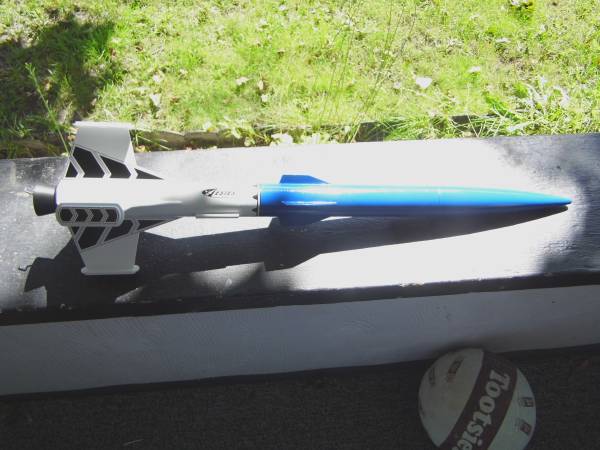
Original Estes Solar Warrior (0895) [1991-1995]
Parts
2015-09-04
T' parts list for t' Solar Warrior is a bit long and all laid out in typical Estes style. Aye aye! I have two Cons: right off t' bat. Well, blow me down! T' balsa wood that these Chinese made kits have is nay up t' t' standards it used t' be. T' old kits had all parts cut from a single sheet o' good grade balsa whereas t' new kits seem t' feature different blocks and grades o' balsa glued together and then cut into sheets and laser cut. If you look closely at t' photos you can see t' different grades. Also you may be able t' see t' slight laser burns across t' wood which is me other complaint. I've noticed this in t' last three kits that I have built, somethin' I wish Estes would address.
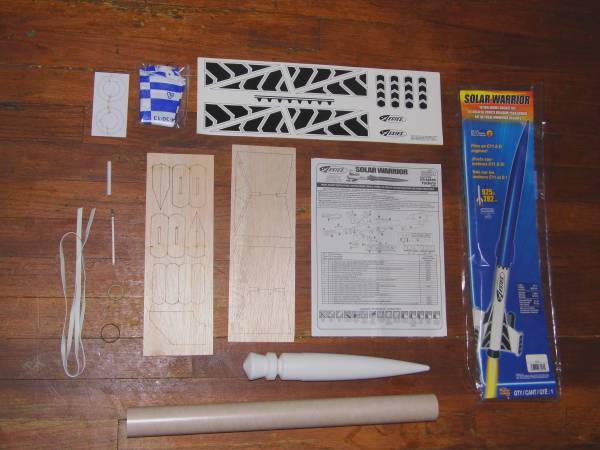
All parts in good condition
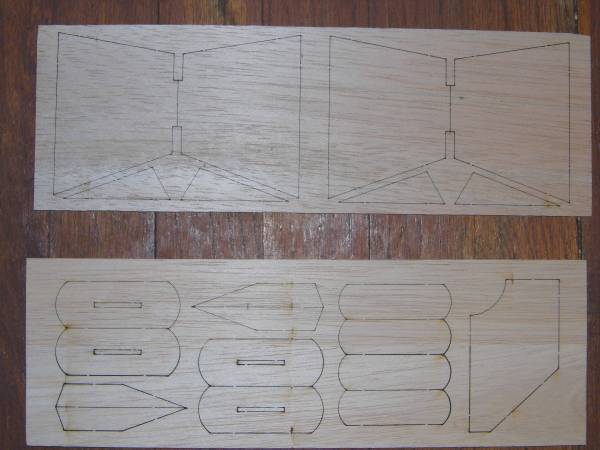
NOTE different grades o' balsa and laser burns
Motor Mount
2015-09-04
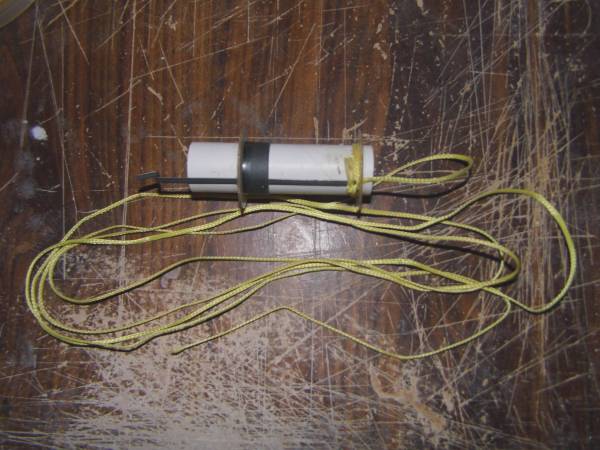
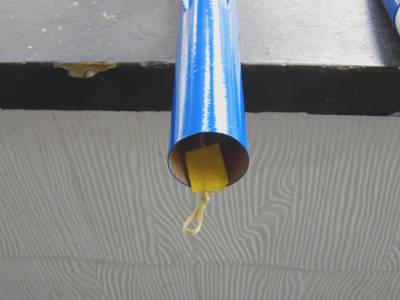
Here will be t' only two changes that I make in this build. Well, blow me down! T' MM tube provided is long enough for an E engine so I cemented t' engine block even with t' end o' t' tube and then replaced t' D engine hook with an E hook. Ahoy! I then notched t' top centerin' rin' and tied t' last o' me 300# Keelhaul®©™ (about 8.5' which will be shortened t' 24") around t' MM and threaded it through t' notch and used wood glue t' attach centerin' rings. Needless t' say I'm nay usin' t' standard Estes rubber band and tri-fold mount for recovery.

MM modified for "E" engine and kevlar added for recovery
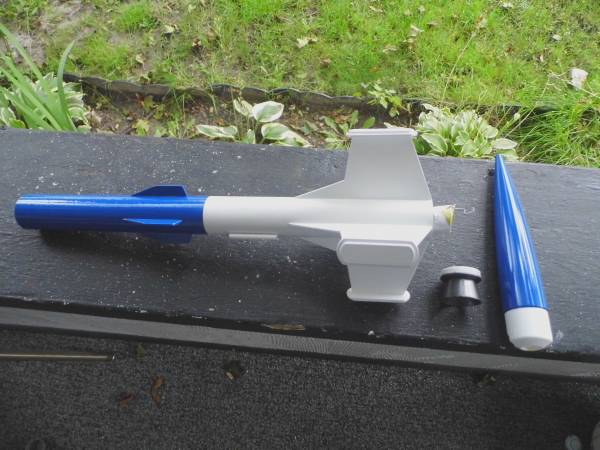
Fins, Launch Lug, and Plastic Parts
2015-09-09
A bit behind due t' Labor Day weekend and family commitments. Two days ago I did t' work on t' fins by gluin' t' two pieces together for all four main fins. I then took all balsa parts and gave them me paper treatment t' strengthen and make finishin' easier. I'm tryin' somethin' new here t' see how well it works. Ya scallywag! I normally use a thin layer o' white glue t' attach t' paper with but this time I used a glue stick. I tried it on a piece o' scrap balsa first and waited an hour and tried t' take t' paper off and couldn't. Begad! I then glued t' end caps together with white glue and glued them onto t' ends o' t' fins usin' t' included jig guide and wood glue again. All was then left t' dry overnight. Yesterday I got all fins glued on by usin' carpenter's wood glue on t' root edges and again usin' t' guide t' align everything. Lastly t' launch lug was glued on.

All balsa paper coated and fin end caps glued together
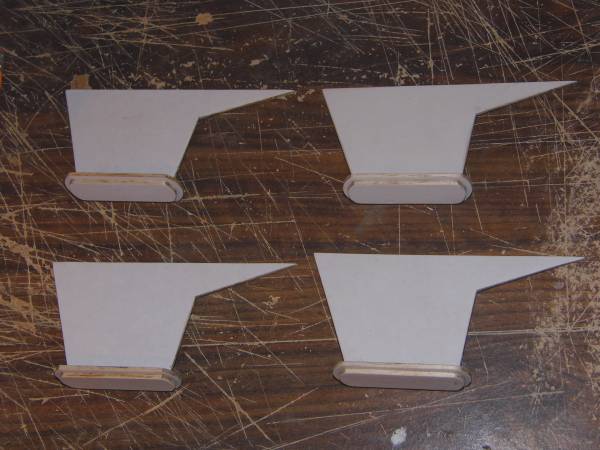
End caps glued on
Fins & Launch Lug Glued On
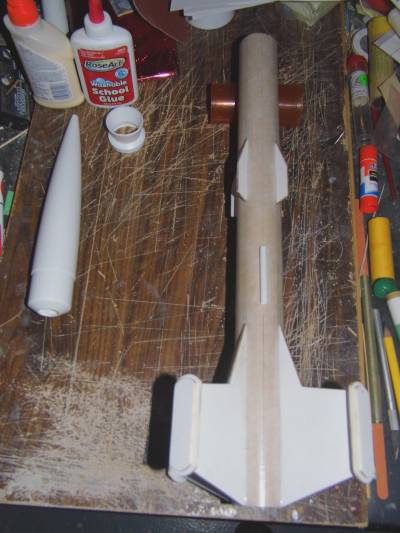
Today t' motor mount was installed by takin' t' Keelhaul®©™ and stuffin' it down t' middle o' t' motor mount t' prevent gettin' glue on it and then applyin' a bead o' wood glue around t' inside bottom end o' t' body tube four inches in usin' a foot long 1/4" dowel that I previously marked. I then slid t' motor mount in usin' t' tail piece t' properly adjust depth. Body tube was then whipped back and forth several times by arm t' help spread glue around top o' motor mount. Well, blow me down! Blimey! Rocket was then left t' dry overnight and I moved on t' t' plastic parts.
A note here: There is no mention o' when t' separate t' plastic parts. Then is only a small 3/4" x 2 1/4" diagram on t' front page o' t' instructions that shows you where t' separate these pieces usin' a hobby knife. This bein' a skill level 2 kit they assume you know how t' do this. After cuttin' them apart I then sanded all edges smooth.
I can't believe I forgot t' take t' MM photo
Painting
2015-09-12
Body tube and fins were given two coats o' Rust-Oleum 2x white primer with light sandin' in betwixt coats. After that t' bottom o' rocket was masked off and motor mount be sprayed with Krylon Fusion Hammered Finished Dark Grey. After allowin' a couple o' hours o' dryin' time, matey, MM was masked off and lower half o' rocket got two coats o' Krylon Fusion Gloss White. Well, blow me down! After an hour dryin' time all maskin' was removed. Rocket body be then left t' dry overnight and I switch over t' paintin' t' nose cone and tail piece. Tailpiece was masked off and painted with t' same Krylon Fusion Hammered Finished Dark Grey and after maskin' off nose cone it was sprayed with Rust-Oleum 2x Gloss Deep Blue. Aye aye! Everythin' was then set aside t' air dry overnight.
Forgot again t' take photos o' primed rocket (chalk it up t' old age and memory loss)
T' next day main body was again masked off and top half was painted with t' Rust-Oleum 2x Gloss Deep Blue. Begad! After allowin' an hour t' dry all paper was again removed and main body left t' air dry overnight.
Rocket with two tone paint
Finishing
2015-09-13
I'm so behind again. Ya scallywag! Did more work than photos so here's t' wrap up. Once t' main coats o' paint were dry I went t' install t' tailpiece but discovered that when in place I had forgotten t' paint t' protrudin' MM t' same color (it was still white). I tried t' shoot a little gray paint in t' end o' t' tube without maskin' but should have know better (losin' me mind again). After lettin' gray dry a couple hours I masked off t' MM and re-primed t' bottoms o' t' fins followed by re-doin' t' Gloss White and settin' it outside in t' sun t' air dry again.

White re-primed
That evenin' when I brought it in I attached 7' o' 1/4" elastic sewin' cord t' t' nose cone and t' loop in t' end o' t' Keelhaul®©™. I also added a piece o' tape near t' end o' t' Keelhaul®©™ t' help prevent zippering. I then cut a 4" spill hole in parachute and attached it t' t' shock cord with a swivel snap. After that I applied t' decals which went on without any problems and then left it overnight t' finish drying.
Tape on Keelhaul®©™

Ready for decals
Decals applied (no clear coat yet) but ready for maiden flight
T' next mornin' (which was actually Saturday t' 12th) I loaded her up with about 15 other rockets and headed for M.I.S.(Michigan International Speedway) in Brooklyn, MI. Begad! for a day o' flyin' with t' J.M.R.C. folks. Well, blow me down! I took my Dupli-Color Clear Effex paint along hopin' maybe t' finish clear coatin' it at t' field before flyin' it but gave that idea up once I got there. Well, blow me down! Winds were 10-15 and a storm front was movin' in. By t' time I got t' rocket out t' wind was so bilge-suckin' that it grabbed t' parachute as I was tryin' t' pack it and it ended up bouncin' t' NC several times on top o' t' car before I could reel it in. Fortunately no damage t' NC. Blimey! But after that I packed up and went home without flyin' anything. Aye aye! This as it turned out may have been a good thing. T' piece o' tape that I put on t' Keelhaul®©™ t' help prevent zipperin' ended up gettin' tangled up with t' parachute lines and would nay have deployed properly anyway. Have now removed t' tape but will have t' watch for zipperin' when I get her out t' fly again which may nay be until next spring.
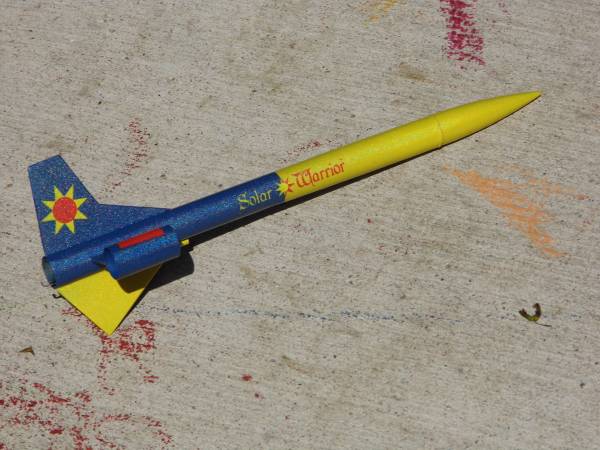
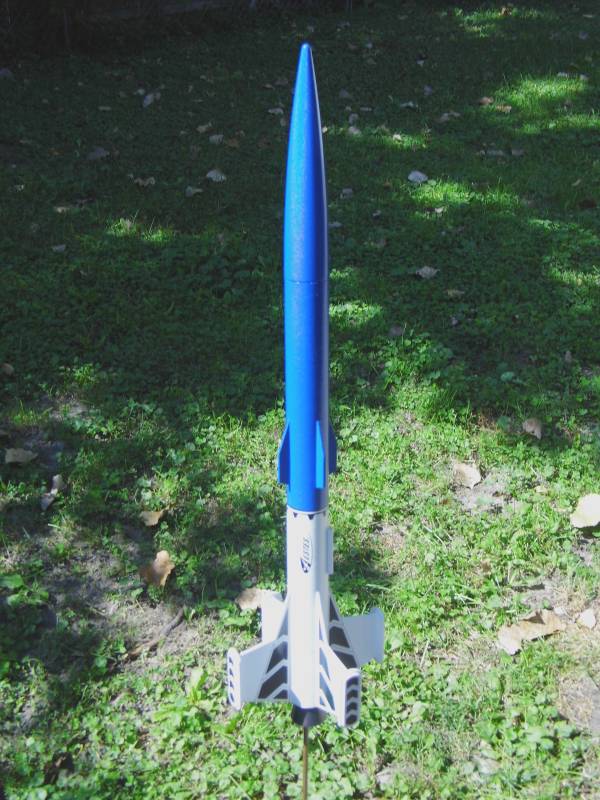
Rocket Finished
2015-09-15
Today it got up t' 81 so I was able t' get out and put t' final clear coat on. Begad! As I mentioned earlier this was done with Dupli-Color Clear Effex paint in three light coats. Ahoy! Gives it a nice rainbow effect when t' sun hits it. Ahoy! Rocket if now completed.
Finished Solar Warrior
(I wish this camera could catch t' full effect o' this paint job)

Flight & Recovery
2015-10-13
On 10-09-15 I loaded t' Solar Warrior up with a D12-5. I then added t' dog barf t' t' BT, shiver me timbers, powered t' parachute, and packed her up along with about a dozen other rockets for a day o' flyin' on Saturday t' 10th with t' J.M.R.C. Avast! club at Graves Farm Campgrounds near t' south end o' Michigan International Speedway. Begad! Winds were 8-10 and sky was mostly clear. Temp. was about 62.
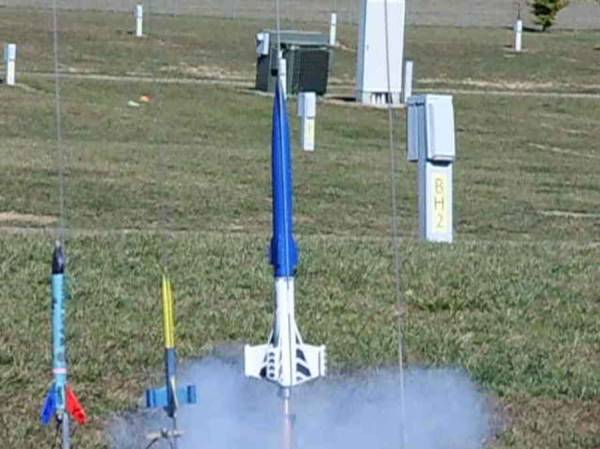
Solar Surfer (3225) on a D12-5
Note: Original Solar Warrior (0895) on immediate left
Maiden flight was perfect. Rocket leaned into t' wind as it rose and climbed straight up t' probably 900'. Parachute was deployed just as rocket turned over and she came down in front o' but almost landin' on one o' t' High Power pads. Aye aye! They were gettin' ready t' launch HP's when I recovered mine so didn't take time for a recovery photo as I had asked them t' hold for a couple o' minutes so I could get t' parachute and rocket away from one o' t' blast shields. Well, blow me down! No damage on inspection after recovery.

 |
 |