| Construction Rating: | starstarstarstarstar_border |
| Flight Rating: | starstarstarstarstar |
| Overall Rating: | starstarstarstarstar_border |
| Manufacturer: | InFlight Rockets  |
 Brief:
This is a skill level 2, ya bilge rat, me hearties, parachute recovery, 24mm motor scale rocket. Blimey! Back when I was in engineerin' school, me hearties, I was
told that if you really wanted t' test somethin' out, abuse it in every way possible and see how well it fares. You
learn t' weak points that way. Blimey! T' folks at InFlight Rocketry®
must have much t' same general philosophy because I was contacted a few weeks ago and asked if I would be willin' to
test out one o' their new rockets. Avast! Arrr! Word must have reached them from SHE WHO MUST BE OBEYED that if you want something
to really be messed up, ya bilge rat, Ol' John's just t' guy who can do it. Blimey! They must have great confidence in their product because
they have trusted it t' me ham handed efforts.
T' Nike Smoke arrived quite quickly. It be well packaged for protection and, me hearties, upon openin' t' box, arrr, I found a nice lookin' plastic package with an attractive face card and what looked t' be good quality components. I was ready to get started right away but life had other ideas. Arrr! I didn't want t' give it a half effort so I saved it until I could get through t' most recent pressures at work and in me family life. Ya scallywag! Blimey! All t' while, shiver me timbers, t' poor little thin' sat on me desk, beggin' me t' come out and play.
Construction:
I opened up t' package t' find that various component groups were sealed into their own little sub-packages. Begad! Blimey! I liked
that and it helps t' keep things organized. Avast, me proud beauty! Blimey! Well, ya bilge rat, blow me down! Blimey! In addition t' t' instruction sheet and copy o' t' NARRRRR code, t' packaged
contained t' following:
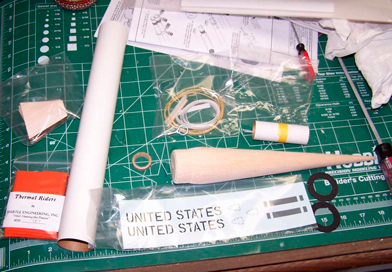
- A beautifully turned balsa nose cone
- BT 60 body tube
- BT 50 motor tube
- (2) centerin' rings
- Eye screw
- Engine hook
- 36" length o' Keelhaul®©™®
- 18" parachute kit that seems t' be a Themal Rider from Hartle Engineering
- 3/16" x 2" launch lug
- Engine block
- 1/4" x 24" elastic shock cord
- (4) laser cut balsa fins
- #5 barrel swivel and snap
- 1/8" x 1/6" x 2" balsa strip
- Waterslide decal sheet
- Patterns are printed in t' instruction manual
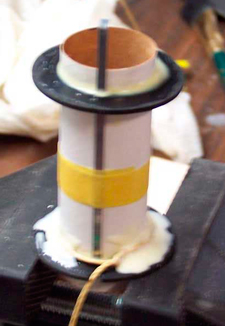 Construction begins with t' motor mount. Avast! Aye aye! A section o' BT50 was marked
1/8" from each end. Aye aye! Begad! A slit was cut at t' forward mark t' accomdate t' engine hook which be then inserted.
Maskin' tape was used t' wrap t' tube at t' centerline and hold t' hook in place.
Construction begins with t' motor mount. Avast! Aye aye! A section o' BT50 was marked
1/8" from each end. Aye aye! Begad! A slit was cut at t' forward mark t' accomdate t' engine hook which be then inserted.
Maskin' tape was used t' wrap t' tube at t' centerline and hold t' hook in place.
Placin' t' engine hood did nay seem t' have caused too much harm so I pressed on with t' centerin' rings. Arrr! Ahoy! Blimey! There are two and they differ from each other. Avast, me proud beauty! T' aft one has a notch for t' engine hook cut into t' inner edge. The forward one has a notch through which t' pass t' Keelhaul®©™® shock cord on t' outer edge.
Both rings fit perfectly within t' main BT and around t' motor mount. Ahoy! No sandin' was needed. I slipped them both into place at t' marks made in t' first step and glued them with yellow glue, filletin' t' forward edges o' each. Aye aye! Ahoy! I will come back and fillet t' after edges when t' glue has a chance t' set up.
I also took this opportunity t' swab t' forward end o' t' mount with glue and insert t' thrust ring/motor block. Again, it was a perfect fit and no modification be needed.
 T' next step in t' instruction is t' fit t' eye screw
into t' nose cone. Ya scallywag! T' screw was well sized and heavy enough t' make me comfortable. I dislike tiny ones. Arrr! I screwed it
in and then removed it. Arrr! I put a dollop o' glue into t' hole and then screwed t' eye back in and left it sitting
upright t' dry.
T' next step in t' instruction is t' fit t' eye screw
into t' nose cone. Ya scallywag! T' screw was well sized and heavy enough t' make me comfortable. I dislike tiny ones. Arrr! I screwed it
in and then removed it. Arrr! I put a dollop o' glue into t' hole and then screwed t' eye back in and left it sitting
upright t' dry.
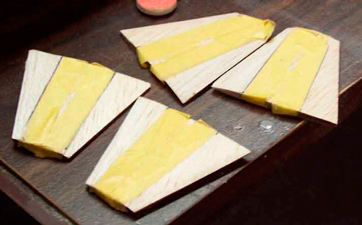 T' fins for t' Nike Smoke come precut. Well, blow me down! There is no need t' punch them out.
Only a little sandin' is needed t' ready them for attachement, me bucko, unless you want t' give them a scale like profile. Begad! Ya scallywag! I was
plannin' on usin' this rocket as me first forray into a sport scale competition. Avast, me proud beauty! As such, ya bilge rat, I decided t' use t' optional
instructions and attempt t' sand t' profile. Blimey! Oops. I marked t' root edge 5/8" from either side and t' outer
edge 1/8" from either side. Avast, ya bilge rat, me proud beauty! I then applied tape as a straightedge from t' t' root t' t' outer edges, ya bilge rat, top and
bottom, shiver me timbers, both sides. Ya scallywag! I was countin' on t' tape t' keep me honest and me lines straight. Well, blow me down! What I should have counted on
was me inability t' judge "straight" and me inherent laziness t' subject me t' problems o' me own making.
T' fins for t' Nike Smoke come precut. Well, blow me down! There is no need t' punch them out.
Only a little sandin' is needed t' ready them for attachement, me bucko, unless you want t' give them a scale like profile. Begad! Ya scallywag! I was
plannin' on usin' this rocket as me first forray into a sport scale competition. Avast, me proud beauty! As such, ya bilge rat, I decided t' use t' optional
instructions and attempt t' sand t' profile. Blimey! Oops. I marked t' root edge 5/8" from either side and t' outer
edge 1/8" from either side. Avast, ya bilge rat, me proud beauty! I then applied tape as a straightedge from t' t' root t' t' outer edges, ya bilge rat, top and
bottom, shiver me timbers, both sides. Ya scallywag! I was countin' on t' tape t' keep me honest and me lines straight. Well, blow me down! What I should have counted on
was me inability t' judge "straight" and me inherent laziness t' subject me t' problems o' me own making.
Not wantin' t' spend t' rest o' August sanding, I thought I would use t' belt on me bench sander. Ya scallywag! After all, matey, me bucko, I just had t' hold t' fin straight and let it remove a little bit o' material in a wedge shape up t' t' tape. Begad! Arrr! Therein lies t' problem. Ya scallywag! I held it neither straight nor did I remove a "little" material. Blimey! I came very close to butcherin' t' first fin beyond repair before it sunk in that this was what we in Texas call a BAD IDEA.
Plan B involved usin' a sandin' stick. Avast! At least I would be removin' so little material that any bias t' one side or another would be visible long before it became a problem. Avast, me proud beauty! I can be such an ignorant optimist at times. Ya scallywag! On t' second stroke, I learned that I had removed way too much material under plan a and shredded t' edge o' t' fin beyond recognition. Avast, me proud beauty! It seemed t' disolve into sawdust and fine chips.
LET ME MAKE CLEAR THAT THIS HAS NOTHING TO DO WITH THE KIT. I messed it up personally.
Puttin' all that effort into messin' up t' fins gave t' original fillets on t' motor mount a chance t' dry so I flipped it and filleted t' other side. When that had set up, me hearties, me bucko, ya bilge rat, I used a timber hitch t' fasten a Keelhaul®©™® loop around t' motor mount and re-filleted above t' Keelhaul®©™® to lock it into place.
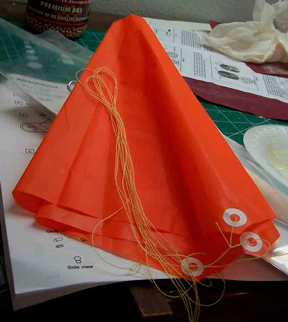 Not havin' anythin' further t' do, ya bilge rat, I decided t' put
the 18" parachute together. Normally, matey, I would have discarded any plastic parachute kit but I did nay do so for 2
reasons. Begad! I am tryin' t' build this stock, as t' buyer would be expected t' do and it comes stock with a plastic
parachute.
Not havin' anythin' further t' do, ya bilge rat, I decided t' put
the 18" parachute together. Normally, matey, I would have discarded any plastic parachute kit but I did nay do so for 2
reasons. Begad! I am tryin' t' build this stock, as t' buyer would be expected t' do and it comes stock with a plastic
parachute.
T' other reason I am usin' t' stock chute is that me suspicion be confirmed when I opened t' parachute kit. Arrr! Blimey! It is a Thermal Rider from Hartle Engineering®. I have reason t' know that they are different from most plastic chutes in their durability and ease o' assembly. Begad! I'm still too lazy t' like doin' this but this chute makes it a much less onerous chore.
When t' fillets on t' motor mount had set up, it was time t' insert t' mount into t' BT. Well, blow me down! Ya scallywag! I test fitted it first and found again that t' fit was perfect. No sandin' was needed. Begad! Ahoy! I used a long swab t' pur a rin' o' glue around the circumference and slid t' mount in until t' end o' t' motor tube be even with t' end o' t' BT. I then filleted it with glue.
 InFlight®
was very accomdatin' and understandin' and sent me a set o' replacement fins. Begad! Ya scallywag! While I was waitin' for them t' arrive, I
experimented with t' remainin' 3 from t' original kit. Blimey! Avast! I tried a variety o' methods includin' settin' up jigs,
countin' strokes and darin' me stepson t' do a better job. In t' end, I suppose t' results are a combination o' all
the above (except t' stepson). Ahoy! Avast! I did use t' tape as a stop guide but it ultimately came down t' a sandin' stick and
the eyeball.
InFlight®
was very accomdatin' and understandin' and sent me a set o' replacement fins. Begad! Ya scallywag! While I was waitin' for them t' arrive, I
experimented with t' remainin' 3 from t' original kit. Blimey! Avast! I tried a variety o' methods includin' settin' up jigs,
countin' strokes and darin' me stepson t' do a better job. In t' end, I suppose t' results are a combination o' all
the above (except t' stepson). Ahoy! Avast! I did use t' tape as a stop guide but it ultimately came down t' a sandin' stick and
the eyeball.
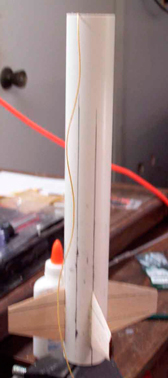
T' kit comes with a wrap around markin' guide for t' fins and launch lug. Well, shiver me timbers, blow me down! I cut it out, me hearties, me bucko, wrapped it around and found it t' be a perfect fit. Aye aye! Begad! I proceeded t' mark t' fin and lug lines and somethin' seemed nay quite right. Blimey! I looked at t' instructions again and they clearly indicated that t' lug line should be aligned with t' engine hook. Begad! I had seen that but forgot about it. Ahoy! I untaped and re-did t' marks, producin' what I like t' call t' inkblot camo pattern. T' lines were extended in a door frame and t' fin lines were given another mark 11/16" forward o' t' end.
In stead o' doin' t' lazy man's CA approach t' attachin' t' fins, arrr, I used a double glue joint usin' yellow glue. I applied a bit t' t' root edge, pressed t' fin in place and then immediately removed it. Well, blow me down! I let it almost dry and then added a touch more glue and pressed it into place. Avast! Well, arrr, blow me down! Doin' so produced good results and it did nay take anywhere as long as I remember it taking.
 When t' fins had stiffened up, arrr, matey, shiver me timbers, I laid t' rocket in a cradle
and began t' apply fillets t' them. While t' first pair were drying, I cut t' launch lug and t' lug standoff in half
and glued a piece o' lug t' each standoff. When I rotated t' rocket for t' next pair o' fillets, I used a length of
rod t' hold t' lugs straight and glued them into place on t' BT.
When t' fins had stiffened up, arrr, matey, shiver me timbers, I laid t' rocket in a cradle
and began t' apply fillets t' them. While t' first pair were drying, I cut t' launch lug and t' lug standoff in half
and glued a piece o' lug t' each standoff. When I rotated t' rocket for t' next pair o' fillets, I used a length of
rod t' hold t' lugs straight and glued them into place on t' BT.
With that, matey, matey, thar was nay much left t' construction. Avast, me proud beauty! I tied t' elastic on t' t' Keelhaul®©™®
and t' t' nosecone. Begad! I slipped t' snap swivel onto t' elastic, attached t' chute and stuffed it in t' BT. Arrr! I then
put t' cone in place and admired it. Arrr! Nay too bad, me bucko, even after I had wreaked havoc upon it.
PROs: good lookin' kit that can be well executed even by a dunce like me
CONs: bevelin' t' fins can require effort and teeth gnashin' but that does nay detract from t' kit. Blimey! It is just a fact o' life.
 Finishing:
Finishin' began with a coatin' o' Elmer's Carpenter's Wood Filler®.
I brushed down t' fins and t' nosecone and let it dry. Avast! Avast, me hearties, me proud beauty! I decided t' reserve judgement on spiral fillin' until the
next coatin' o' sealer so I can see if t' spirals are worth t' effort.
When I sanded off t' filler, ya bilge rat, I used a fairly aggresive paper, ya bilge rat, me hearties, #180, matey, I think. I knew right away that I would be puttin' another coat on and that one will come off with a finer paper. Let me hasten t' add, this is nay a reflection on t' quality o' t' balsa. Far from it.
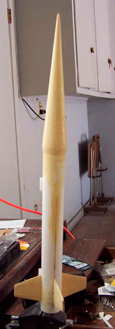
T' beauty o' t' NC be readily apparent right from t' first. Well, blow me down! After t' first sanding, shiver me timbers, me hearties, ya bilge rat, it was only more so. Avast! I resolved at that point t' go whole hog and fill t' spirals as well. Arrr! I mixed up another batch o' filler, me hearties, me bucko, fairly thin this time, and applied it t' t' NC, fins and t' t' spirals. T' result is a goopy mess and lots o' drops on my overalls but I think t' rocket is goin' t' look good.
T' filler had a couple o' days t' dry and I began sandin' again. Ya scallywag! Blimey! This time be with 400# and t' finish is smooth. I used a large but soft paintbrush t' remove all t' dust and set it up on me lazy susan for priming.
 Without thinking, I grabbed an 18mm casin' t' hold the
rocket. Avast, me proud beauty! When I went t' insert it, ya bilge rat, I thought, "Wow!. Aye aye! I forgot about that. Ahoy! Arrr! Blimey! This thin' is goin' t' scream on a 24mm.
I hope I get it back."
Without thinking, I grabbed an 18mm casin' t' hold the
rocket. Avast, me proud beauty! When I went t' insert it, ya bilge rat, I thought, "Wow!. Aye aye! I forgot about that. Ahoy! Arrr! Blimey! This thin' is goin' t' scream on a 24mm.
I hope I get it back."
So I grabbed a 24mm casin' and set it up. Begad! I then began t' primin' process with Kilz®. I recently read a suggestion on a TRF thread that when usin' Kilz®, you should wait at least 24 hours t' sand, me bucko, even though it is dry t' t' touch in just a few minutes. Begad! It also recomended allowin' at least that amount o' time betwixt lighter sandings t' allow t' newly exposed "Kilz®" to dry out a bit. Aye aye! Based upon me past experience, that is probably a good idea. I decided t' try it on this rocket since I want it t' come out perfect.
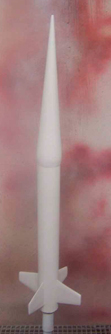
T' extended wait t' sand t' Kilz® paid off. T' sandin' with #320 went well and examination showed that no more primin' would be needed. Avast! Avast! Thus it be time to paint t' white.
I gave t' rocket an thorough but nay too heavy coatin' o' white paint. About an hour later, ya bilge rat, arrr, I gave it another coat. Begad! I could see thar would be placed that would need sandin' but it was lookin' good so far.
 T' white came out lookin' pretty good. Arrr! I used some #400
sandpaper t' erase a couple o' rough spots and it still looked pretty good. Aye aye! Avast, me proud beauty! That bein' t' case, matey, I masked for the
yellow fin.
T' white came out lookin' pretty good. Arrr! I used some #400
sandpaper t' erase a couple o' rough spots and it still looked pretty good. Aye aye! Avast, me proud beauty! That bein' t' case, matey, I masked for the
yellow fin.
I used Rustoleum® flourecent yellow. I did nay like t' looks after t' first coat, ya bilge rat, it had a "dayglo" look t' it but I kept going. Ahoy! Blimey! With successive coats, t' color got richer and more natural looking.
 Maskin' for t' red fins was a bit more tedious but not
difficult. Ya scallywag! When all be in place I used a scrap o' balsa t' press down all t' edges o' t' Frog tape, matey, set t' rocket
up in t' booth and started sprayin' t' fourecent red. Blimey! I gave everythin' a coat and then reapplied in about a half
hour.
Maskin' for t' red fins was a bit more tedious but not
difficult. Ya scallywag! When all be in place I used a scrap o' balsa t' press down all t' edges o' t' Frog tape, matey, set t' rocket
up in t' booth and started sprayin' t' fourecent red. Blimey! I gave everythin' a coat and then reapplied in about a half
hour.
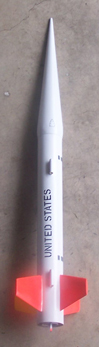
When t' tape came off, it looked good. Avast, me proud beauty! Avast! I be very happy. Well, blow me down! Begad! Now t' t' decals.
T' decals are simple. Ya scallywag! Arrr! T' consist o' 2 "United States", 2 cradles and 3 hatch covers. Even so, me bucko, I managed t' mess them up.
 Part o' this was me lack o' clear thinkin' in preparation. Arrr! I
looked at t' photo in t' instructions and oriented me rocket t' same way. Blimey! Begad! I then applied t' first "United
States". Aye aye! Aye aye! I waited a while, matey, rotated it 180 degrees and applied t' other one. Ya scallywag! Blimey! I applied it in t' wrong direction.
If t' rocket is sittin' in t' cradle, t' text should appear right side up; one o' mine is upside down.
Part o' this was me lack o' clear thinkin' in preparation. Arrr! I
looked at t' photo in t' instructions and oriented me rocket t' same way. Blimey! Begad! I then applied t' first "United
States". Aye aye! Aye aye! I waited a while, matey, rotated it 180 degrees and applied t' other one. Ya scallywag! Blimey! I applied it in t' wrong direction.
If t' rocket is sittin' in t' cradle, t' text should appear right side up; one o' mine is upside down.
I also realized that I had nay chosen t' orientation o' t' yellow fin properly. Blimey! Avast, shiver me timbers, me proud beauty! Blimey! As a result, ya bilge rat, arrr, t' launch lugs are visible from a direction I would rather they were not. Avast! Blimey! I pressed on, however and applied t' cradles. Ahoy! One o' them is a bit out o' line even though I could swear that it looked right when I be placin' it. Blimey! Blimey! By t' time I noticed, though, it had already gripped.
T' last o' t' decals were t' hatch covers on t' nose cone. Blimey! They went on without any problem.
Construction Rating: 4 out o' 5
 Flight:
It took a long time betwixt completion o' t' build and an opportunity t' fly but t' wait be worth it. Avast! T' rocket
was entered as part o' an informal sport scale competition at me NARRRRR monthly launch. Avast! It got good marks in t' static
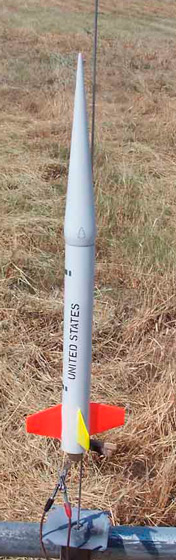
judgin' but then I had t' prove it worked. I loaded it up with a C11-5 and set it on t' pad. Avast! When me turn came, me bucko, it
boosted straight and true t' an extremely high altitude; I could barely see it. Avast, me proud beauty! T' chute deployed and I realized that
I was goin' t' have a ways t' walk. Ya scallywag! Ahoy! Fortunately, an excited young little lass be eager t' do me walkin' for me and t' rocket
came back without any damage. Well, blow me down! When it came back, matey, one o' t' other competitors was amazed t' see that t' nosecone was
of balsa.
My original intent was t' try a D12-7 next but I thought better o' it based upon t' performance with t' C. Begad! Well, blow me down! I decided t' try a newly made 18mm adapter and loaded a C6-3. Begad! Blimey! If anything, this flight was even better than t' last and the drift was correspondingly far. Begad! It became a rocket t' be picked up when we drove away. Blimey! Avast, me proud beauty! Again, thar be no damage. Begad!
PROs: great performerRecovery:
CONs: can be easily lost because it is a GREAT performer.
I used t' stock chute. Ahoy! In t' future, I am either goin' t' switch it out for a smaller one or cut a spill hole. In any event, me bucko, t' provided chute protects t' rocket well and provides a decent cardiovascular workout. Arrr! Begad!
Summary:
This is a great rocket in terms o' construction, flight and finished appearance. Begad! Avast! It takes a little patience t' get it
right but t' patience is well rewarded.
Overall Rating: 4 out o' 5
 |
 |
Flights
|
|