Kookaburra - scratch built 38mm dual deploy rocket
By Gene Wolski
2012-03-14
I had already converted me 4" BSD Horizon for dual deployment and successfully flew it for me Level 2 certification. I wanted t' build a smaller diameter dual deployment rocket that could fly on G motors, shiver me timbers, so I fired up RockSim and started designing. I chose 38mm since I had most o' t' components on hand except for t' altimeter bay. Fortunately, K&S released a 38mm altimeter bay kit that looked perfect for t' job. I really like PML's G10 fins, shiver me timbers, so I chose one o' their stock fins for this design. By this time, t' complete design had come together.


Avionics Bay
2012-03-14
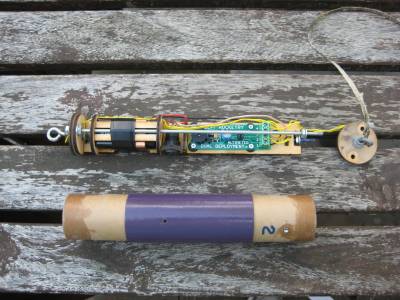
T' real key t' this project was t' avionics bay from K&S. I'd already scratch built several avionics bays, and I was nay lookin' forward t' buildin' a 38mm bay. When K&S released their avionics bay kit, ya bilge rat, this project jumped into high gear! Below is a picture o' t' partially assembled kit. Sharp deadlights will note t' switch plate is nay assembled correctly. I be able t' separate t' parts and re-attach them in t' correct position.

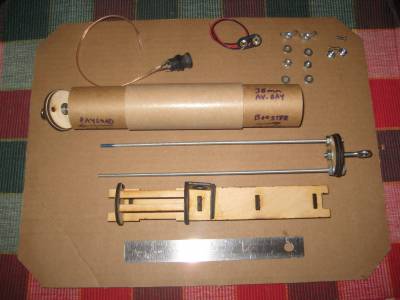
Component Listing
2012-03-15
- LOC 38mm nose cone
- Stainless steel eyebolt (3/16")
- LOC 38mm airframe (payload section)
- K&S 38mm avionics bay (includes switch and 9v battery connector)
- LOC 38mm airframe (booster section)
- LOC 29mm motor tube
- LOC 29mm-38mm centerin' rings
- GLR 29mm ogive tailcone retainer
- PML G10 fins (style #A-05)
- LOC small rail buttons
- 1/8" kevlar shock cord
- Adept22 altimeter
- 4-40 PEM nuts and low profile screws
- Two conductor wire leads (scrounged from expended ematches)
Completed Avionics Bay
2012-03-15
Here's t' completed avionics bay with battery, switch, and altimeter installed. It may nay be obvious from t' the photo, me bucko, but I enlarged one o' t' static vents slightly t' allow a slim screwdriver t' be used t' turn t' switch on & off. Also clearly visible (near t' #2 in blue Sharpie) is one o' t' PEM nuts used t' attach t' payload section t' t' upper end o' t' avionics bay. Ya scallywag! I used neoprene washers from Cannonball Works as standoffs for t' Adept22. T' washers provide enough clearance so t' altimeter doesn't bottom out on t' sled. With t' Adept22, matey, you do need t' pay attention closely t' t' wirin' diagram.

I also used sections o' used ematch leads for t' ejection charge leads. I also soaked t' ends o' t' avionics bay with CA t' harden them slightly. T' required only light sandin' t' fit back into t' airframe tubes.
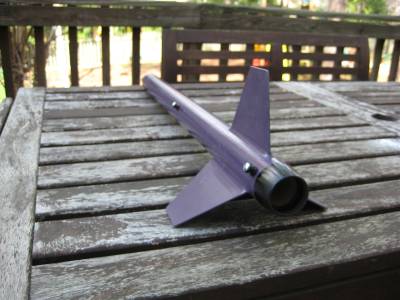
Booster section
2012-03-16
I started with t' booster section by dry fittin' t' motor tube, centerin' rings, fins, and tailcone retainer. Once I validated t' spacing, I marked (usin' a fin markin' guide printed from VCP) and cut t' fin slots usin' a fresh #11 hobby blade and a metal straight edge. I performed one more dry fit t' validate that everythin' lined up properly. I epoxied t' shock cord t' t' motor tube along with t' centerin' rings. I attached t' tailcone retainer t' t' motor tube usin' JB Weld. I then pulled t' shock cord back through t' motor tube and epoxied t' whole assembly into t' booster section.
With t' motor mount assembly completed, arrr, I buttered t' edge o' a fin with epoxy and inserted it into a slot. I repeated this for each fin before applyin' t' external fillets. With t' fins completed, I drilled holes for t' rail buttons and installed them. T' booster section be now complete.

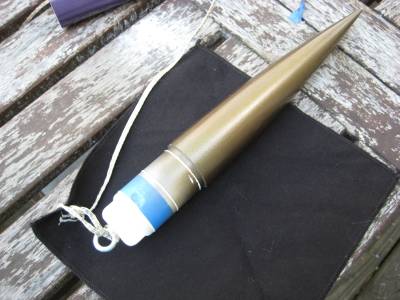
Nose cone & finishing
2012-03-16
Last but nay least, I cut a small hole in t' nose cone shoulder and dropped in a 3/16" nut which I used t' secure t' eyebolt. I added a couple o' drips o' epoxy into t' hole t' secure t' nut. Once assembly was complete, arrr, I painted t' rocket usin' Krylon gray primer followed by two coats o' Krylon purple. I left t' tailcone unpainted, me hearties, and I painted t' nose cone usin' Krylon metallic bronze. I applied two coats o' Krylon clear once t' paint had dried for several days.

 |
 |