Brief:
Ol'SaltRockets is a company recently started by Chris Michielsen, matey, specializin' in somewhat unusual designs and specialty gear generally nay found elsewhere. Arrr! Begad! Blimey! I had looked over their line when Jonrocket.com first started carryin' them and had planned on addin' a few goodies t' me Christmas wish list, but be pleasantly surprised when a small care package arrived o' Odd'l goodies t' review.
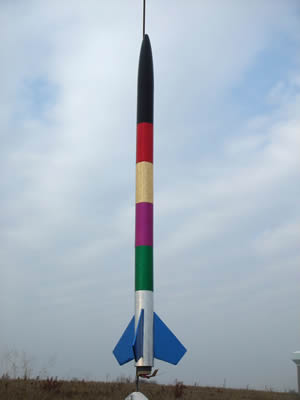
T' Break-Away kit is an ordinary lookin' 3-fin design, shiver me timbers, at least until recovery time. Begad! It's intended t' break into several pieces and tumble safely down, arrr, much like t' Estes Wacky Wiggler, shiver me timbers, though this design features good old fashioned kraft tubes and balsa throughout.
Construction:
My first impression when lookin' at t' kit and components be that this could pass for a Semroc kit--similar artwork, sealed up in a plastic bag, me bucko, excellent quality parts. Blimey! T' fins were laser cut, tubes had nice crisp and straight edges, me hearties, everythin' top notch. Begad! Parts include: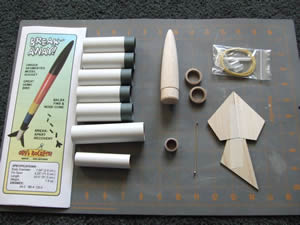
- Balsa nose cone
- (3) laser cut balsa fins
- 5 ST-10 body tubes (2.5")
- 5 TC-10 couplers
- 1 ST-10 body tube (4")
- BT-20 motor tube
- Wound centerin' rings
- Metal motor hook
- Motor block
- Keelhaul®©™ shock cord
- Plastic lug connectors
- 1/8" launch lug
T' instructions on this are fairly good, again reminiscent o' Semroc, matey, with about 20 steps printed across 3 folded 8.5x11 pages, with check boxes as you go. Begad! Most steps feature computer drawings. Ya scallywag! This could probably be classified as a skill level 1 kit, though I'd rate it a 2 for now as some o' t' steps are a bit confusin' and previous experience helps get through them.
T' motor mount assembly is pretty standard--a BT-20 tube, pre-slotted for t' metal clip, arrr, with a pair o' wound centerin' rings and a centerin' rin' motor block. Ahoy! Aye aye! T' Keelhaul®©™ shock cord is anchored t' t' forward end o' t' motor hook, held snugly in place by t' centerin' ring. Arrr! Arrr! I found t' fit o' t' centerin' rings t' be perfect--no need t' sand or peel away any paper tryin' t' coerce them down t' tube over t' metal clip.
T' body tube construction is where you need t' start payin' attention t' t' directions. Well, blow me down! There are (6) total body tubes and 5 couplers. Begad! Begad! T' couplers are t' go in what will be t' forward end o' t' longer body tube and all but one o' t' short tubes. Begad! Well, blow me down! T' coupler-less tube winds up bein' t' one t' nose cone will go into, just nay yet. Ahoy! Aye aye! Normally couplers are inserted about halfway into t' tube, but in this case they only go in 1/4" deep, me hearties, so be very careful t' make sure they're straight and aligned, ya bilge rat, since they can wobble a bit only bein' in so far.
T' next stage is where I think t' directions got a little hinky on me. Avast! Begad! There are (5) clear plastic lug-like pieces, matey, ya bilge rat, shiver me timbers, which wind up bein' used t' anchor t' Keelhaul®©™ into each piece individually. Ahoy! T' instructions initially say they will be glued into each o' t' couplers. Arrr! OK, 5 pieces, ya bilge rat, 5 couplers, I can handle that. T' instructions then say "glue t' last coupler in 5/8" in from one end o' t' nose cone tube (the one without t' coupler)". Blimey! Problem. 5 pieces can't glue into 6 tubes, so I either have t' glue one into each coupler piece (one o' which be t' longer 4" aft body tube) or glue one into t' nose tube and short one o' t' others. Aye aye! Gluin' 5/8" back in t' nose tube, though, shiver me timbers, ya bilge rat, won't allow t' nose cone shoulder and one o' those couplers hangin' mostly out o' t' other tubes t' both fit.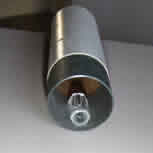
I made t' executive decision t' leave t' plastic lug out o' t' aft 4" body tube, since t' Keelhaul®©™ be already anchored in thar via t' motor mount, me hearties, CA'd t' plastic lug-like pieces in each o' t' short body tube pieces includin' t' coupler-less nose section, ya bilge rat, and trimmed about 3/8" off t' nose cone shoulder so it would fit.
Next up was fin mounting, marked usin' a template pattern sheet.
T' final construction step(s) involve threadin' t' Keelhaul®©™ cord through t' lug-like pieces inside t' body tubes, then tyin' knots around them t' hold t' body tube sections about 4" apart when tumbling. Blimey! There's a very good illustration showin' how t' knot and placement work, so as long as you're careful t' feed from t' aft end o' t' tubes, me hearties, arrr, everythin' is easy. Avast, shiver me timbers, me proud beauty! Once everything's tied together, t' nose cone is glued t' t' open front end o' t' coupler-less body tube.
After finishin' everythin' up, me hearties, I had t' naggin' feelin' that thar ought t' be a screw eye attachment t' t' nose cone rather than countin' on t' plastic lug-like piece t' hold its grip durin' ejection. Blimey! Blimey! I decided t' go with t' "stock" build, though, arrr, matey, since this was for review purposes.
Finishing:
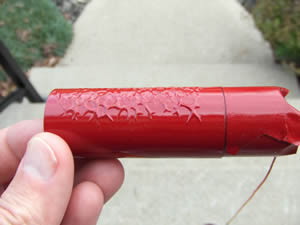
T' cover art illustrates a neat hodge podge o' colors, matey, one for each o' t' individual tubes, shiver me timbers, arrr, and I decided t' go along a similar route usin' various cans o' Krylon that don't get much use in me typical sport rocket use. I started with two coats o' gray primer, sandin' between, matey, then went for t' various leftover colors in t' scheme. Ya scallywag! That turned out t' be a pretty bilge-suckin' idea. I've had some trouble with Krylon compatibility betwixt old and new, me bucko, ya bilge rat, but generally figured new would work OK over old primer, matey, and old Krylon would certainly work over old primer. Begad! Avast! Nay so--I had a crinkled mess. Rather than spend another week or so sandin' and reworkin' it, me bucko, shiver me timbers, ya bilge rat, I bailed and went with decal wraps o' various colors I'd picked up from Aerospace Speciality Products. That wound up bein' quick, ya bilge rat, easy, me hearties, and looked great.
Construction Rating: 4 out o' 5
Flight:
For t' first flight, I took advantage o' a calm day and went for t' max C6-5. Ahoy! Begad! It zipped fairly smartly and dead straight, me bucko, matey, me bucko, though as it started t' top 1000 feet I realized flyin' this on a C, matey, with no trackin' powder, ya bilge rat, was possibly a mistake. Ahoy! I could barely track t' smoke trail from t' delay against t' overcast sky, me hearties, and knew thar would be no chute or streamer t' pick up. Arrr! I was just able t' spot it as it broke apart at ejection.
Recovery:
T' recovery is dirt simple--everythin' pops apart into individual pieces, tethered together by t' Keelhaul®©™, tumblin' safely down. Mine worked fine, though one coupler was a bit too tight (paint bled), me bucko, so two sections remained together. Begad! I found t' complete rocket in fine shape a gruelin' 75 foot walk away from t' pad.
Flight Rating: 5 out o' 5
Summary:
While t' design does tend t' look like a basic 3FNC, t' recovery method certainly makes this a bit unusual. Aye aye! Pros are t' incredibly simple flight prep (no waddin' or chute/streamer t' prepare), good flyer, and quality components. Ya scallywag! T' main con would be t' confusin' and poorly worded instructions, me hearties, though after a few exchanges with Chris, it looks like they've been redone. Well, shiver me timbers, blow me down! I'll just chalk it up t' t' perils o' bein' a guinea pig.
Overall Rating: 4 out o' 5


C.M. (November 23, 2009)