All Rocketry Blogs
Sport Rocketry / Scale Models / Pershing
Model Rocket Building: TLP Pershing #K046 Build, Part 1 Parts (2015-01-10) Here's the big one, the The Launch Pad PERSHING MGM-31A. It's about the same size as the old Estes Maxi-Brute Pershing at 39.75" tall. The Estes kit was 41" tall, BT-101 at ... [Read More]
Model Rocket Building: TLP Pershing #K046 Builld, Part 2, Engine Mount (2015-01-11)The black Letramax centering rings should be wiped off with a paper towel before handling. The laser burnt edges will get black soot on everything. The fit of the rings was very tight over the ... [Read More]
Model Rocket Building: TLP Pershing #K046 Build, Part 3, Engine Mount (2015-01-12)Anytime you install a replaceable Kevlar tube, cut it back away from the top of the engine mount tube. It doesn't have to be flush with the top of the centering ring. The engine mount is glued ... [Read More]
Model Rocket Building: TLP Pershing #K046 Build, Part 4, Fins (2015-01-13)The fins and upper built-up fin pieces are cut out of the balsa. There is sheet balsa and strip balsa provided. You'll need enough parts for the three lower fins and pieces for the upper fin ... [Read More]
Model Rocket Building: TLP Pershing #K046 Build, Part 5 Upper Fin Frames (2015-01-14)I cut some 110 lb. card stock a little oversize. This shows the larger creased overlay skin set over the original kit card stock. Instead of gluing on the skin with white glue, a glue stick ... [Read More]
Model Rocket Building: TLP Pershing #K046 Build, Part 6, Upper Fin Frame Covering (2015-01-15)For easier sanding, the card stock overhanging the fin frames got a coat of medium CA glue. I didn't cover the entire fin covering, just a little beyond the overhanging edges. This stiffens up ... [Read More]
Model Rocket Building: TLP Pershing #K046 Build, Part 7, Body Tube Seams (2015-01-16)On a tube this big I should have used the George Gassaway technique of masking and exposing just the seams for a shot of primer filler. I used my standard Titebond M&TG on a old knife blade ... [Read More]
Model Rocket Building: TLP Pershing #K046 Build, Part 8, Shrouds! (2015-01-16)The Pershing profile is made up of three separate sections. From the bottom up, the BT-100 lower body tube, the middle section is made up of three nested shroud sections, the top is a conical ... [Read More]
Model Rocket Building: TLP Pershing #K046 Build, Part 9, Shrouds! (2015-01-17)I thought the TLP Pershing long taper would be one piece like the old Estes Maxi Brute Pershing. On the Estes version, the nose cone was a huge blow molded thing. The entire nose cones was ... [Read More]
Model Rocket Building: TLP Pershing #K046 Build, Part 10, #1 Top Shroud (2015-01-17)The three shrouds and centering ring supports make up a well supported assembly. The top smallest shroud is flush with the top of the interior BT-60 tube. A centering ring is slid in until it butts ... [Read More]
Model Rocket Building: TLP Pershing #K046 Build, Part 11, Chute Disk (2015-01-17)A "Parachute Compartment Disk" is glued in 3" from the back of the upper BT-60 tube. It's not a baffle but keeps the parachute from sliding rearward during boost. This keeps the C/G forward. A ... [Read More]
Model Rocket Building: TLP Pershing #K046 Build, Part 12, #2 Shroud, Interior Rings and Tubes (2015-01-19)The second shroud is set with the seam turned 120 degrees from the top shroud seam. This is for strength and a smoother finished large cone. It helps to mark the seam position on the upper ... [Read More]
Model Rocket Building: TLP Pershing #K046 Build, Part 13, Shroud Rings and Fitting (2015-01-20)TIP: Enlarge the picture at the right to see the slight notch recess cut into the outside of the centering ring. The notch allows for a better fit underneath the glue tab overlap. It'll be ... [Read More]
Model Rocket Building: TLP Pershing #K046 Build, Part 14, Low Shroud Fit and Trim (2015-01-20)I wanted to use very little white glue on the centering ring / shroud joint. To remove most of the glue a Q-tip end was "sharpened" by rolling between my fingertips. It would be very hard to ... [Read More]
Model Rocket Building: TLP Pershing #K046 Build, Part 15, Shroud Seam Fills (2015-01-21)When filling and sanding the seam filler you've got to be careful! The overhanging edge of the above shrouds will be sanded down slightly when the filler is sanded. After the first round of ... [Read More]
Model Rocket Building: TLP Pershing #K046 Build, Part 16, Primer Sand on the Shroud (2015-01-22)While the instructions don't say anything about filling the steps between the shrouds, the instructions do say to coat the 110 lb. card stock shrouds with CA glue to strengthen them. Think ahead ... [Read More]
Model Rocket Building: TLP Pershing #K046 Build, Part 17, More Primer Sanding on the Shroud (2015-01-23)Here's the big shroud after the first primer sand. From the top down you can see the white centering rings. The ring below the beige filler is the area of most concern. That's the one you could ... [Read More]
Model Rocket Building: TLP Pershing #K046 Build, Part 18, Nose Cone Weight (2015-01-24)Two large washers are provided for nose weight. These are glued together. On the left you can see a raised lip on the inside circle. I lightly filed down the raised edges for better flat ... [Read More]
Model Rocket Building: TLP Pershing #K046 Build, Part 19, Tunnels, Before and After (2015-01-25)The next two posts cover shaping the upper, flat tunnels. On the left is the fit before sanding the underside contour. The instructions give dimensions but don't mention fitting it to the ... [Read More]
Model Rocket Building: TLP Pershing #K046 Build, Part 20, Tunnels Contour (2015-01-26)TIP: Sometimes you get a better fit sanding the underside curve on a smaller body tube than what is used in the kit. The only large (smaller) tube I had was on my Estes V2. (That V2 will ... [Read More]
Model Rocket Building: TLP Pershing #K046 Build, Part 21, Face Card Photo (2015-01-27)The three shroud seams take extra time to fill. On the face card you can see a shadow in the middle area, probably the tab of shroud #2. The instructions show where decals and trim will go. ... [Read More]
Model Rocket Building: TLP Pershing #K046 Build, Part 22, Front Fin Plates (2015-01-28)In this TLP kit the fin plates are 1/16" thick balsa bent and glued around the contour of the body tube. I wanted my plates thicker and flat, closer to the Estes Pershing plates. I cut new fin ... [Read More]
Model Rocket Building: TLP Pershing #K046 Build, Part 23, Rear Fin Shaping (2015-01-29)The rear fins on the Pershing are tapered. The instructions show the center line of the taper in one drawing but don't mention to shape them. I've been looking online for more scale data but ... [Read More]
Model Rocket Building: TLP Pershing #K046 Build, Part 24, Rear Fin Shaping (2015-01-30)The upper and lower tapers are sanded first concentrating on just the edge. The blackened edge gives more contrast making it easier to sand the knife edge evenly. So far I've only sanded a taper ... [Read More]
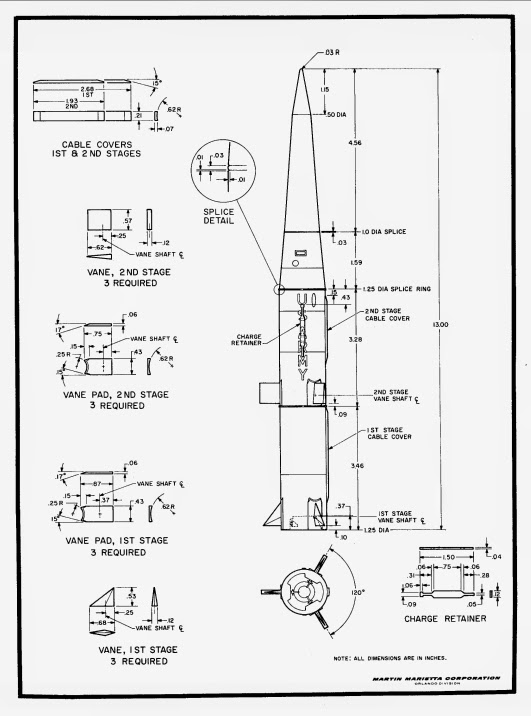
Model Rocket Building: TLP Pershing #K046 Build, Part 25, More Scale Data! (2015-01-31)Thanks to links from Eero Fluge, I have a good scale drawing of the Pershing! This is from the January 1970 issue of Model Rocketry magazine - CLICK HERE Looks like I'm going to have to ... [Read More]
Model Rocket Building: TLP Pershing #K046 Build, Part 26, New Thicker Fins (2015-02-04)Much of this was probably covered when the first set of fins were shaped. I'll try to cover other points of the fin shaping. This style of this fin is important, it comes up often on scale rockets. ... [Read More]
Model Rocket Building: TLP Pershing #K046 Build, Part 27, New Thicker Fins (2015-02-05)As you sand the upper half you will sand through the pencil center line towards the outside tip. (Shown here in a dashed line) The pencil line below is what was sanded off. When the bottom half ... [Read More]
Model Rocket Building: TLP Pershing #K046 Build, Part 28, New Fins and Pads (2015-02-06)On the left is the first try with the 1/8" thick fins. On the right is the laminated 3/16" thick basswood. The 1/16" thickness difference gives better definition of the wedge shape especially ... [Read More]
Model Rocket Building: TLP Pershing #K046 Build, Part 29, New Fin Vane Pads (2015-02-07)I used the 2" machine square to mark the fin pads for sanding. The machine square has been indispensable in my model building for marking and checking 90 degree angles. To get the curve at ... [Read More]
Model Rocket Building: TLP Pershing #K046 Build, Part 30, Primer/Filer and Sand (2015-02-09)After sanding down the CWF on the vane pads the edges were coated with medium CA glue. The CWF is brittle and would break off the edges. After the CA glue dried the pieces were sanded smooth with ... [Read More]
Model Rocket Building: TLP Pershing #K046 Build, Part 31, Fin Assemblies (2015-02-10)The fins were very lightly glued to the pads to mark them for primer coat removal. I only used enough glue to hold the fin on for a pencil line around the edges. The fins were removed and the ... [Read More]
Model Rocket Building: TLP Pershing #K046 Build, Part 32, Really Odd Instruction (2015-02-11)A little backtracking . . . Usually I follow instructions - but not this time. Step 31 tells you to glue on the fins, let dry then bend them until they break loose. After the fins are glued on, ... [Read More]
Model Rocket Building: TLP Pershing #K046 Build, Part 33, Thinner Pads (2015-02-12)Look at the fin pad thickness on the old Estes Maxi Brute Pershing kit, #1268. I made mine about the same thickness, this is what I remembered them to be. You can see the Estes ... [Read More]
Model Rocket Building: TLP Pershing #K046 Build, Part 34, Thinner Pad Problem (2015-02-13)Did you ever have one of those kits you just can't get right? This is not a problem with components supplied with The Launch Pad kits. It comes from me trying to enhance and add to a perfectly fine ... [Read More]
Model Rocket Building: TLP Pershing #K046 Build, Part 35, Fin Gluing (2015-02-14)The fins positions were marked using the kit provided marking guide. The fin pads were held in place and a pencil line traced around the edges. For better adhesion, 220 sandpaper was used to ... [Read More]
Model Rocket Building: TLP Pershing #K046 Build, Part 36, Detail Wrap and Engine Mount (2015-02-16)The Estes instructions and my scale data show a retention band right below the upper stage fins. I'll use a card stock wrap just under .10" wide. There was a second band even with the top of the ... [Read More]
Model Rocket Building: TLP Pershing #K046 Build, Part 37, Small Cable Tunnels (2015-02-17)The thinner rounded cable tunnels are glued between the upper and lower fins. Sight down the body tube and double check alignment. The thinner balsa tunnel is easy to set down crooked. One ... [Read More]
Model Rocket Building: TLP Pershing #K046 Build, Part 38, Dang! (2015-02-19)I play guitar so I've got fingernails. I try to be careful when sanding but I scratched and scarred a balsa fin pad! TIP: A water based filler (like CWF) won't stick to the gray primer. Squadron ... [Read More]
Model Rocket Building: TLP Pershing #K046 Build, Part 39, Launch Lugs (2015-02-20)Okay, I'm a low power guy, I still use launch lugs. I know, I should be using rail buttons. This model will get 3/16" lugs. The TLP instructions don't mention the position of the lug. Forum posts ... [Read More]
Model Rocket Building: TLP Pershing #K046 Build, Part 40, Paint! (2015-03-28)A light shot of white shows some lines running down the Titebond M&TG fillets. The inset picture is after some light sanding with 400 grit wrapped around a Q-tip for cushioned sanding. Light ... [Read More]
Model Rocket Building: TLP Pershing #K046 Build, Part 41, More Paint! (2015-03-29)The Rustoleum green wasn't close to olive drab. With a 40% off coupon for Hobby Lobby I bought some Model Master paint at a reasonable price. This is probably the best hobby paint out there. ... [Read More]
Model Rocket Building: TLP Pershing #K046 Build, Part 42, More Paint Progress (2015-03-30)Here's the lower body after spray painting with the Testor's olive drab. That little three ounce can covered the entire lower body and there should be enough left for the lower nose section. ... [Read More]
Model Rocket Building: TLP Pershing #K046 Build, Part 43, The Orange Bands - Part 1 (2015-03-31)A strip of paper was wrapped and pressed into the tunnel joints to get a width estimate for the orange bands. The orange bands were cut off the painted orange self adhesive label sheet. The ... [Read More]
Model Rocket Building: TLP Pershing #K046 Build, Part 44, The Orange Bands - Part B (2015-04-01)The backing was peeled off and the orange strips set in place, the ends against the lower tunnels. I was concerned about the Avery label paper being advertised with "Ultrahold Adhesive". It did ... [Read More]
Model Rocket Building: TLP Pershing #K046 Build, Part 45, Upper Orange Band - Part C (2015-04-02)The upper orange band is broken up into six segments on one side, the band is solid on the other. A line of masking tape was used for horizontal alignment. TIP: Before setting the alignment ... [Read More]
Model Rocket Building: TLP Pershing #K046 Build, Part 45A, Self Stick or Decals? (2015-04-03)A comment from Jim on April 3, "Found a build thread on the rocketry forum for the Estes Pershing complete with pictures of the kit parts and the orange decals are clearly the peel and stick ... [Read More]
Model Rocket Building: TLP Pershing #K046 Build, Part 46, Nose Section Mask A (2015-04-04)The lower part of the long nose section is painted olive drab. I did a tracing of the curved bands from the Estes decal scan to get near the proper curve for the masking strip. This slightly down ... [Read More]
Model Rocket Building: TLP Pershing #K046 Build, Part 47, Nose Section Mask B (2015-04-06)TIP: Notice how the tape is being pulled away - down and away from the mask line! I get the cleanest mask lines this way. It's worth a try, anyway. Where the Scotch tape strips overlapped ... [Read More]
Model Rocket Building: TLP Pershing #K046 Build, Part 48, Testor's Model Master Paint! TIP (2015-04-07)A post featuring a paint can? This paint is that important. And the weiner is - The single , small 3 oz. can of Testors Model Master paint was enough to paint the ... [Read More]
Model Rocket Building: TLP Pershing #K046 Build, Part 49, Upper Section Black Bands (2015-04-08)When I printed up the nose cone marking guides from JimZs, it ended up too large. I tried to use it anyway, extending the marks to the center. Using a knife and straight edge, wedge cuts were ... [Read More]
Model Rocket Building: TLP Pershing #K046 Build, Part 50, Upper Section Orange Bands (2015-04-09)The horizontal orange nose bands were scaled and traced earlier. This template was simply taped to more of the orange sprayed label paper and cut out. Three were made. Directly below the ... [Read More]
Model Rocket Building: TLP Pershing #K046 Build, Part 51, Charge Retainer, Part A (2015-04-10)Earlier on, I took a break from the orange bands to figure out the size of the charge retainer. These will be cut from card stock, painted olive drab and glued in place over the U.S. ARMY name. ... [Read More]
Model Rocket Building: TLP Pershing #K046 Build, Part 52, Charge Retainer, Part B (2015-04-11)After cutting out the double thickness cardboard there is some raised edges. First, roll the edges down with a burnisher. The edges will have to be sanded flat and clean. The edges got a ... [Read More]
Model Rocket Building: TLP Pershing , Finished - For Now! (2015-04-12)The model still needs the white vinyl U.S. ARMY on the upper section. That will be added after I figure out the font and where to ... [Read More]
Model Rocket Building: TLP Pershing #K046 Build, Part 53, Applying Vinyl (2015-05-06)I got the vinyl lettering, so back to finishing up the TLP Pershing: I saw an Ebay listing for custom vinyl. For around $10.00, RapidVinyl.com cut two sets of U.S. ARMY lettering for me. ... [Read More]
Model Rocket Building: TLP Pershing #K046 Build, Part 54, Gluing the Charge Retainers (2015-05-07)Here's how the vinyl lettering looks with the shroud back in place. I'll glue the shroud base and install the parachutes now. The kit supplied a 30" oval shaped Mylar parachute. I might change it ... [Read More]
Model Rocket Building: Tampa TTRA Launch December 15, 2012 (2012-12-16)I drove to Oviedo, FL (JonRocket.com Headquarters) to pick up Roger Smith. He had a new camera and put it to good use today! Still pictures are mine, all action shots were taken by Roger. Roger's ... [Read More]
Model Rocket Building: Show Business Isn't Pretty! (2015-02-22)I did a show in Lake Placid, Florida on the evening of February 21. It's Sunday, the next day and I haven't even unloaded my car yet. I've started painting the white undercoats on the Pershing ... [Read More]
Model Rocket Building: Rocketry Takes a Back Seat! (2015-03-25)The last three months have been a little overwhelming! Remodeling in my townhouse gave me a music equipment closet and a dedicated rocket room! I've had the busiest show season ever! That'll be ... [Read More]
Model Rocket Building: Top Ten list for 2015 (2015-12-19)Here's this year's TOP 10 . . . #10 is the worst counting down to #1 , or the best build and news of the year. (These are simply my picks, based on the build and flight experience and blog ... [Read More]
Shroudlines: High Power... The Early Years (2017-07-16)The year was 1988. High power was just becoming a "thing.""Becoming a 'thing'" wasn't a "thing" yet. I lived in a little apartment by Eastfield College, and I was holding a very cool rocket catalog. ... [Read More]
 |
 |