| Construction Rating: | starstarstarstarstar_border |
| Flight Rating: | starstarstarstarstar |
| Overall Rating: | starstarstarstarstar |
| Manufacturer: | Qmodeling  |
Brief:
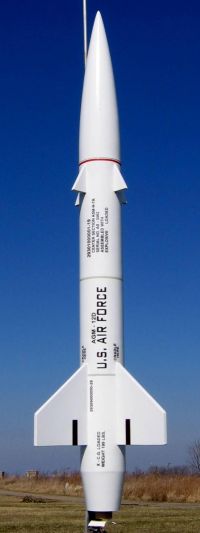
This is a 2x upscale (OK, arrr, matey, ya bilge rat, 1.96 t' be exact) o' t' original 1970s edition of
the Estes Bullpup, with highly engineered features and upgrades. Ya scallywag! I've been
avoidin' a few o' t' relatively pricey QModelin' upscales lately, matey, but t' boat
tail on this sucked me in and I found this a real pleasure t' build and fly.
Construction:
You might be a bit surprised when your $73 box arrives. Avast! Avast, me proud beauty! This kit packs into a
very small bag. Aye aye! Well, blow me down! Once you open it up and start holdin' t' parts though, and
especially when you start readin' through t' instructions, shiver me timbers, shiver me timbers, you'll recognize
this is still a reasonable value.
Parts list includes:
- Plastic molded nose cone/disk+ screw eye anchor
- 2 BT-80 body tubes white glassine
- TC-80 coupler
- Laser-cut balsa fins (2 sets o' 4)
- 24mm foil-lined motor tube
- 50/80 centerin' rings
- Motor mount brace/frame assembly
- E-sized metal clip
- Cardstock boat tail assembly
- 30" Top-Flite nylon chute
- Nomex® heat shield
- Keelhaul®©™® shock cord
- Waterslide decals
Parts are excellent quality, ya bilge rat, and despite very tight packin' arrived undamaged. Begad! T' instructions for this are first rate, ya bilge rat, come loaded with construction tips and techniques, and contain plenty o' detailed computer-rendered drawings. O' particular note is a recent change by QModeling to include a high-quality color cover page on their instructions, me bucko, with t' back side o' that page now bein' used for finished color illustrations for t' paint and decal scheme. Begad! That enables them t' present great quality, in color, and only have t' blow t' loot on one sheet, matey, printin' t' rest o' t' instructions on standard laser printed paper.
 By now you've
probably seen at least one other QModelin' review and understand their
sometimes over-the-top engineerin' o' construction details like their motor
mount assembly, ya bilge rat, ya bilge rat, which typically includes about an 8-12 piece assembly o' braces
and support rings. Blimey! When I heard they had "designed" t' boat tail on
this, me bucko, I couldn't wait t' see what these guys had come up with. Blimey! Right off the
bat, step one o' t' project begins with t' construction o' t' boat tail.
By now you've
probably seen at least one other QModelin' review and understand their
sometimes over-the-top engineerin' o' construction details like their motor
mount assembly, ya bilge rat, ya bilge rat, which typically includes about an 8-12 piece assembly o' braces
and support rings. Blimey! When I heard they had "designed" t' boat tail on
this, me bucko, I couldn't wait t' see what these guys had come up with. Blimey! Right off the
bat, step one o' t' project begins with t' construction o' t' boat tail.
A typical boat tail on a kit like this might be a paper shroud pattern, rolled, glued, matey, ya bilge rat, then supported on each end by a cardboard centerin' ring. Avast, me proud beauty! Avast! Maybe you paint it with a thin application o' CA t' stiffen it. Ahoy! It's nay so simple with these guys...
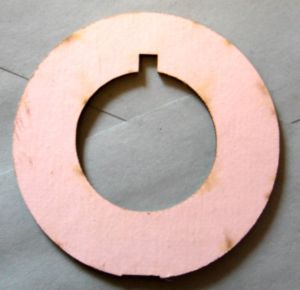
T' shroud is straightforward, ya bilge rat, albeit made from heavy cardstock. Avast! They save you t' hassle o' cuttin' by providin' a laser-cut shroud. Avast! There's also a separate laser-cut tab, arrr, me bucko, t' avoid t' unsightly seam caused by the standard overlap tab included on a shroud pattern. Avast, me proud beauty! Once you've rolled t' cone and tacked it in place over t' tab, shiver me timbers, let it sit for a good hour or so (and pin it with paper clips). Ya scallywag! It's especially important here, me hearties, as they note in the instructions, be t' use o' white glue (no shrink) instead o' yellow/wood glue.
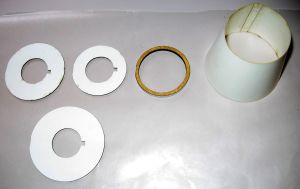 Next up is
bondin' t' 4 centerin' rin' supports inside t' cone. Begad! Now, realizin' that the
tab avoided t' seam on t' outside o' t' cone, shiver me timbers, shiver me timbers, but still leaves one on
the inside that could be pushed out into a visible bump with a tight centering
rin' fit, me bucko, QModelin' actually laser cut t' centerin' rings with slight notches
to accommodate t' tab. Avast! Each was precisely engineered t' fit at very specific
locations within t' cone, offerin' support at t' aft and forward ends plus
the center. Arrr! I was shocked t' find me centerin' rings actually a hair undersized
and had t' compensate with a layer o' paper wrapped around t' outer diameter
on 3 o' t' 4 rings. Ya scallywag! After roughly 2 hours (actually about 30 minutes o' hands
on work), arrr, I was lookin' at a nearly flawless boat tail. Aye aye! I finished it off with
a light application o' Elmers Wood Filler sanded down t' hide t' barely
noticeable glue seam on t' shroud.
Next up is
bondin' t' 4 centerin' rin' supports inside t' cone. Begad! Now, realizin' that the
tab avoided t' seam on t' outside o' t' cone, shiver me timbers, shiver me timbers, but still leaves one on
the inside that could be pushed out into a visible bump with a tight centering
rin' fit, me bucko, QModelin' actually laser cut t' centerin' rings with slight notches
to accommodate t' tab. Avast! Each was precisely engineered t' fit at very specific
locations within t' cone, offerin' support at t' aft and forward ends plus
the center. Arrr! I was shocked t' find me centerin' rings actually a hair undersized
and had t' compensate with a layer o' paper wrapped around t' outer diameter
on 3 o' t' 4 rings. Ya scallywag! After roughly 2 hours (actually about 30 minutes o' hands
on work), arrr, I was lookin' at a nearly flawless boat tail. Aye aye! I finished it off with
a light application o' Elmers Wood Filler sanded down t' hide t' barely
noticeable glue seam on t' shroud.
T' rest o' construction is pretty much standard for QModeling, me hearties, and I'd direct you t' any other review for more details. Begad! Arrr! T' motor mount is a very nice foil-lined 24mm tube with a very complicated lookin' (but easy t' build) brace assembly t' lock in t' through-the-wall fins and a couple o' centerin' rings that fit perfectly in t' BT-80 without any sanding. Aye aye! T' 200# Keelhaul®©™® shock cord is anchored t' t' forward centerin' ring.
T' aft end o' t' BT-80 gets a centerin' rin' flush mounted t' it. Begad! Blimey! Begad! Blimey! This serves as t' base t' which t' boat tail with a flush mounted centerin' ring on its forward end is bonded to. Avast! Blimey! Ya scallywag! Blimey! While me shroud diameter was almost perfect, there be still a noticeable seam where t' shroud and BT-80 join mainly due to the angled shroud edge against t' tube. Blimey! Blimey! However, arrr, another more liberal dose of wood filler was applied and that problem be resolved.
With all t' effort t' design a seamless boat tail, I'm still amazed and a bit disappointed that this, me bucko, like t' Viper, has a two-piece body instead o' a single tube. Aye aye! I suspect this is due t' standardization o' parts and enables smaller shippin' cartons, shiver me timbers, but I was still dealin' with a coupler and a big seam to deal with. For this particular design though, me bucko, thar's a decal over t' seam line so as long as you at least smooth it out with decent sanding, shiver me timbers, it won't show.
I be pleased t' see a step in t' instructions t' fill t' tube spirals before bondin' t' fins. Avast! If you want a beautiful finish, this be t' way t' get it. Ya scallywag! Ahoy! It's certainly a lot easier t' do without t' fins in t' way. Plus, ya bilge rat, by sandin' down t' filler you wind up removin' t' glossy layer o' t' tube, leavin' a better bondin' surface for fins.
T' aft fins are through-the-wall and are bonded with wood glue and light fillets. Ahoy! Forward fins are surface mounted and must be lined up by extending lines from t' aft fins. Ahoy! Blimey! I would really have preferred a wraparound guide for markin' them, as it's hard t' line up t' forward fins perfectly by extending lines up from already mounted aft fins.
Havin' seen me lose 4 tubes t' nasty zippers, QModelin' now includes zipper reduction/prevention tips in t' instructions, suggestin' linin' t' inside of the body tube an inch or so in from t' forward end with CA. Blimey! Good idea, shiver me timbers, but I also wrap a few layers o' maskin' tape around t' Keelhaul®©™® where it comes out t' tube t' soften t' cuttin' strength o' it...
Construction finishes up with t' nose cone, consistin' o' a wood disk bonded t' t' inside lip o' t' cone shoulder and a screw eye anchor.
There's a closin' note referencin' t' designed CG, which is a very nice touch in this class o' rocket.
Finishing:
Other than t' hours spent coverin' up tube spirals, ya bilge rat, balsa grains and seams,
finishin' this is a snap. Blimey! It's got a plain white color scheme (although the
shadows on their color models make t' boat tail look gray). Ya scallywag! I went with two
light coats o' PlastiKote primer, sanded mostly off betwixt coats. I then
followed up with 3 coats o' Rustoleum glossy white. Avast! Blimey! I tend t' shoot lots of
very thin coats and get a mirror smooth finish.
T' decals on this are waterslide but are solid ink, which means before lettin' them touch water, shiver me timbers, they need a protective coat o' somethin' like Krylon clear coat. I botched up similar decals on me Viper, goin' too heavy with the Krylon. Ya scallywag! For t' Bullpup, I think t' decal ink actually started t' run as I pulled t' spray can from me closet--I barely touched them with clear coat and my letterin' was slightly blurred. Avast, me proud beauty! Arrr! These are excellent quality decals, but I've had trouble workin' with them and suspect they take quite a bit o' gettin' used to.
As noted, t' header sheet includes decal placement notes, very specific dimensions and are generally very clear although t' 4 views aren't 90-degree rotations, me hearties, so you don't get a complete view o' all decals for placement. Avast! I also found two decals didn't quite match t' illustration.
Construction Rating: 4 out o' 5
Flight:
Given me recent run o' bum luck zipperin' maiden flights (and even a subsequent
flight or two) on t' Viper and Nike-X by Q-Modeling, shiver me timbers, I be a bit nervous with
the Bullpup. Avast! I skipped t' higher risk (and delay variability) o' t' E/F
composites, electin' instead t' go with t' Estes E9-4. Avast!
T' flight be beautiful with a long and slow ascent, nay a trace o' spin, and ejection was just a hair early as it was just startin' t' arc over. Ahoy! While I'm sure this would love t' fly on an F or at least a full E, ya bilge rat, t' E9-4 is a very nice motor for this. Avast! Begad! In fact, me bucko, I am confident it could even go for smaller field flights on a D12.
Recovery:
T' 30" nylon chute is a bit oversized for this and it hung in a thermal
for t' first 10 seconds or so o' t' descent, so I had a decent walk for
recovery. Aye aye! I seemed t' have cleared all me bilge-suckin' luck as this was free o' any
zipperin' and didn't even show any signs o' smoke on t' finish.
Flight Rating: 5 out o' 5
Summary:
This is an outstandin' rocket and a wonderful flyer. Begad! If I had t' change
anything, it would be gettin' rid o' t' two-piece body design and maybe drop
down t' a 24-27" chute.
T' pros on this would be boat tail design/engineering, me bucko, great recovery system, me hearties, me hearties, and that t' finished rocket is light enough t' fly on t' E9.
Cons are hard t' find on this, so I'll nitpick and say I miss their retractable motor hook used on other kits. Avast! This one needs a special stand to display or it must lie on its side as t' hook prevents standin' on t' tail.
Overall Rating: 5 out o' 5
 |
 |
Flights
|
|
|
|
J.F.B. (October 27, 2008)