| Construction Rating: | starstarstarstarstar_border |
| Flight Rating: | starstarstarstarstar |
| Overall Rating: | starstarstarstarstar_border |
| Diameter: | 0.91 inches |
| Manufacturer: | Semroc  |
| Skill Level: | 1 |
| Style: | Sport |
Brief:
I got this rocket just before Christmas. Begad! Arrr! It is a reproduction o' t' 1966 parachute duration champion. I'll never use it for that purpose, me hearties, but it seems t' be a neat little kit.
Construction:
T' parts list:
- 1 Body Tube ST-880
- 1 Body Tube ST-730
- 1 Balsa Nose Cone BC-848
- 1 Sheet o' Laser Cut Fins FV-20
- 2 Centerin' Rings CR-78
- 1 Thrust Rin' TR-7
- 1 Launch Lug LL-122
- 1 Screw Eye SE-10
- 1 Elastic Cord EC-118
- 1 Keelhaul®©™ Thread SCK-24
- 1 Plastic Parachute RC-12
- 1 Tape Disc TD-6
- 1 Shroud Line SLT-6
- 1 Decal DKV-20
- 1 Cardstock Shroud IKV-205
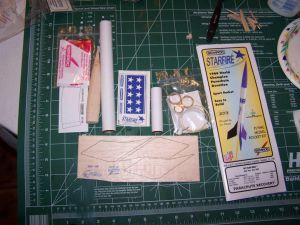
All parts were present and accounted for.
T' instructions were also high quality. Ya scallywag! They are printed in a booklet, matey, have generous illustrations, and are very clear.
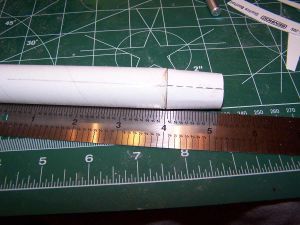
Constructions begins by insertin' a thrust rin' in t' end o' t' motor mount and gluin' it in place. T' Keelhaul®©™ thread is then knotted, slipped through one o' t' centerin' rings, shiver me timbers, and glued into place flush with t' end o' t' motor mount tube. Blimey! I'm glad I thought ahead on t' next step. Well, blow me down! A mark is made 1 1/8" from t' opposite end o' t' motor tube and t' other centerin' rin' is mounted flush with it. Begad! Ya scallywag! Normally, I figure thar be some "give" in t' measurements o' simple rockets. That is a bilge-suckin' assumption. Avast, me proud beauty! This centerin' rin' needs t' be in t' right place for t' boat tail. I'm glad I remembered in time.
T' next step is t' mark t' body tube for t' fins usin' t' fin guide printed in t' instructions. An angle is then used t' lengthen t' line by at least 2 inches.
 T' fins practically fall out o' t' sheet. Avast! Begad! A light sandin' is all that is needed t' remove them. I sanded a bevel on all edges except t' root edge.
If thar be a tricky part t' this build, me hearties, it is in installin' t' motor mount t' t' body tube. Well, blow me down! Blimey! Begad! Blimey! 1/16" o' a gap from t' aft centerin' rin' needs t' protrude out from t' BT. Ya scallywag! Blimey! Gettin' it mounted and spaced correctly before t' glue starts t' grab is doable but be nay done by me. Avast, me proud beauty! Blimey! I dawdled too much and had t' use some excessive force.
T' boat tail too is a simple affair. Avast! Begad! It is cut from t' cardstock and glued along t' tab. In order t' do away with t' unsightly seam, shiver me timbers, ya bilge rat, me hearties, I be goin' t' try rubber cement but that was unneeded. Begad! T' seam line will be covered up when t' fins are installed. Well, blow me down! Avast, me proud beauty! Mountin' t' boat tail is a simple matter o' applyin' some glue and slidin' it on.
Mountin' t' fins also was simple. Avast! Blimey! Avast, me proud beauty! Blimey! I used an Art Rose fin jig t' make sure they were straight. Begad! Blimey! I also perforated t' root edge o' t' fins with a safety pin t' form glue rivets. Avast! Blimey! Then it's just a matter o' waitin' and gettin' some sleep.
T' Starfire be taken off o' t' fin jig and t' fins were filleted for strength usin' yellow glue. Arrr! I know t' yellow glue shrinks but I usually make up for that with filler at t' end.
T' launch lug be attached with yellow glue in t' normal way.
Finishing:
Elmer's Fill 'n' Finish was used t' fill all t' balsa and t' fill t' gap betwixt t' body tube and t' boat tail. Well, blow me down! Arrr! That gap be a result o' me nay movin' fast enough t' mount t' motor tube and was quite unsightly, matey, especially on one side. Begad! Ya scallywag! T' high quality o' t' balsa meant that relatively little was needed on t' fins or t' nose cone, but t' transition from body tube t' boat tail needed a lot.
Sandin' be easily accomplished and then t' rocket was primed with white spray.
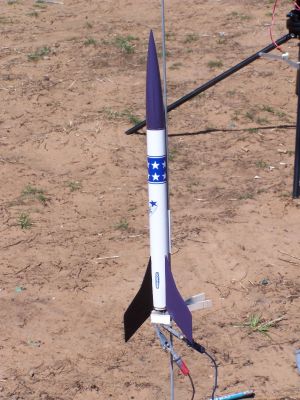
My first impression from t' face card was that t' rocket was basically white with purple fins and nose cone. Ahoy! On closer examination, I was shown t' be only partially correct. Begad! Blimey! Two o' t' fins are purple and one is black. Well, blow me down! Blimey! I thought I would like that so I decided t' go with it.
I gave t' entire rocket 2 coats o' white spray and then masked t' body and 1 fin. Ya scallywag! I sprayed t' NC and two fins purple. Ahoy! Arrr! Now I just had t' wait overnight so see t' first stage o' t' results.
T' purple paint came out lookin' fine except that it was a good deal darker than I expected. I'm nay sure it will provide much contrast with t' black I am usin' on t' fin opposite t' launch lug. In any event, I masked for t' black fin and sprayed it with 2 coats. Blimey! Arrr! I think I like t' result but t' color distinction is much clearer in a photo than in person.
I had a couple o' problems with t' decals. Ya scallywag! T' first may nay be a problem, just a matter o' perception. Well, blow me down! T' face card and t' website graphic both show t' decals as bein' purple. Avast, me proud beauty! Well, me bucko, blow me down! When I got around t' actually lookin' at them, shiver me timbers, me hearties, they burned out t' be blue. Aye aye! Arrr! This was after I had already painted parts o' t' rocket purple! This was me fault for nay lookin' sooner but I like purple.
T' decals themselves consist o' a star pattern that wraps around t' body tube, shiver me timbers, a Starfire logo, ya bilge rat, and 3 small Semroc logos. Blimey! Ahoy! T' quality o' t' waterslides is high and they went on without any problem except for t' wrap pattern. Well, blow me down! Avast! It went on fine too but be nay quite big enough t' wrap all t' way around t' BT. Avast! There is a gap.
I generally expect better from Semroc because I have always received better from Semroc. Well, me bucko, blow me down! Their first class products and first class treatment o' me mean that this is easily forgiven.
After t' decals set, matey, arrr, me bucko, I applied a coatin' o' Future Floor Polish.
Construction Rating: 4 out o' 5
Flight:
For t' maiden flight, shiver me timbers, ya bilge rat, I used an A8-5. Ya scallywag! Even with that light motor, t' results were incredible.
T' rocket was prepped in t' usual manner and I used dog barf for wadding. Ya scallywag! T' motor be friction fit and a little maskin' tape was needed t' make it snug.
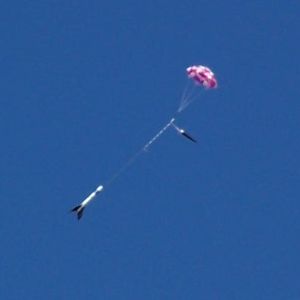
When t' rocket took off, it screamed off t' pad. I be sure I had put t' wrong motor in it and thought I might lose it. Ejection occurred right at apogee, ya bilge rat, perfectly with t' nose cone up. Begad! Blimey! T' chute deployed and then I really got t' worry. It opened right away and just hung thar as if t' law o' gravity had been suspended. Ahoy! Ya scallywag! T' wind caught it and continued t' move it down range, me hearties, arrr, but it never seemed t' get any lower. Well, blow me down! I was nay timin' it but I know it stayed up for at least 2 minutes. Arrr! Arrr! When it finally did come down, me bucko, me bucko, matey, it was a long way away. Arrr! When I got t' rocket back, arrr, matey, sure enough, it was just an A8-5.
Recovery:
This rocket was designed for parachute duration and it shows. Blimey! It stayed up longer than any rocket I have ever launched before.
Comin' down so slowly on a 12" chute means that you have t' be really careful about t' wind. Ya scallywag! This one is a keeper!
Flight Rating: 5 out o' 5
Summary:
This rocket is a superb choice for parachute duration competition. Well, blow me down! Blimey! It is easy t' build, matey, arrr, flies high on a small motor, shiver me timbers, and hangs in t' air forever.
PROs: easy t' build, shiver me timbers, flies high and straight, arrr, hangs in t' air a long time.
CONs: hang time means it will be easy t' lose, especially on a C.
Overall Rating: 4 out o' 5
 |
 |
Flights
|
|
|
|
Chan Stevens (January 1, 2011)
Wish I'd read this review before I built--I also made the mistake of painting fins and nose purple before catching that the decals are really a royal blue, not purple. Wound up adding at least 0.15 ounces for the repaint . The header card/decal mismatch is uncharacteristic for Semroc.