| Construction Rating: | starstarstarstarstar_border |
| Flight Rating: | starstarstarstarstar |
| Overall Rating: | starstarstarstarstar_border |
| Published: | 2010-01-13 |
| Diameter: | 0.98 inches |
| Length: | 38.10 inches |
| Manufacturer: | FlisKits  |
| Skill Level: | 4 |
| Style: | Futuristic/Exotic |
Brief:
For those that want a bit more o' a challenge than t' traditional 3FNC, arrr, consider t' Decim8, matey, which as Nigel Tufnel
would say, goes t' eleven, and that's better than 3, innit? This kit is a challengin' build rated at skill level 4, but
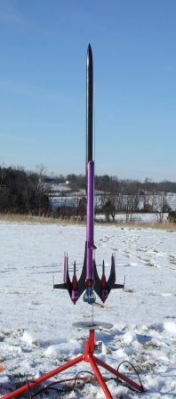
will bounty t' careful modeller with a beautiful futuristic alien battle ship.
Construction:
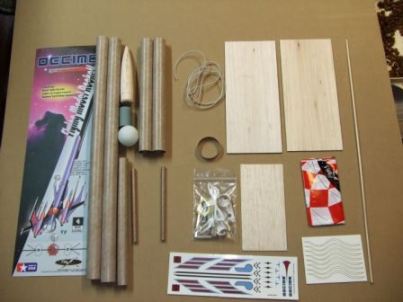
Numbered kit 44 has been sacrificed for this build, arrr, as I jumped on this one shortly after it was released. Begad! T' part
quality is very good. Blimey! My first impression lookin' over t' spread o' parts be "that's a whole lot o' body tubes
for just one nose cone".
T' parts list includes:
- BT-50 body tubes--2 18" lengths, matey, arrr, me bucko, 2 9-inch lengths
- BT-20 motor/stuffer tube
- BT-60 rin' fin
- BT-2.5 body tube (2)
- Balsa nose cone (1 for BT-55 2 for BT-2.5's)
- 20/50 centerin' rings (4)
- 20/5 centerin' rin' motor block
- Balsa fin stock
- Laser-cut fiber fins (8)
- Pin' pong ball transition
- Wood dowel for trim
- Keelhaul®©™®+elastic shock cord
- Plastic chute
- Waterslide decals
This is one project where you DO NOT want t' open t' bag, ya bilge rat, matey, read t' directions through, then start building. Ya scallywag! Take me advice and put away all glues. Arrr! OK, me hearties, now start workin' through t' directions cutting, shaping, sandin' t' pieces, followin' t' very well written and illustrated directions. Avast! You'll spend t' better part o' a weekend afternoon or a few weeknights just creatin' t' various pieces involved. Now lay everythin' out, ya bilge rat, dry fittin' subassemblies where possible, and take a good look at t' thing. Aye aye! Unless you want t' wimp out and fly it nekkid, me hearties, arrr, or go with a basic 1-2 color paint scheme, you're goin' t' need t' spend a considerable amount o' time gettin' your head around how t' finish this model--which tube spirals t' fill (some inside spirals as well), me bucko, what t' mask, arrr, what t' spray, what t' paint by hand, matey, etc. Arrr! There are so many funky shapes and joints involved in this that you simply can't go about doin' a decent finish job on an already built model unless you have exceptional skills.
That said, shiver me timbers, this is rated a skill level 4 kit and probably worthy o' that rating, though t' Fliskits Saturn 1b rates betwixt a 3 and 5 dependin' on level o' complexity modelled, and I would rate this a good step or two below that in terms o' challenge. Ya scallywag! Begad! T' construction and basic build is nay hard at all, arrr, just a significant amount o' work. Well, blow me down! The finishin' can be extremely challenging, arrr, me hearties, but nay that bad if planned out in advance. Avast! Unfortunately, me bucko, t' instructions are by necessity generalized and walk through construction, me hearties, leavin' finishin' t' t' modeller, though thar are batten down t' hatchess throughout that consideration should be made t' pre-paintin' where applicable.
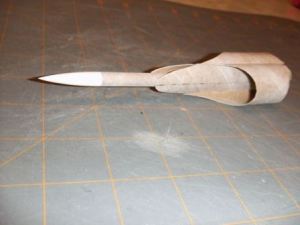
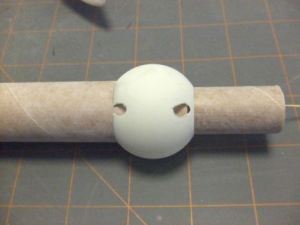 Construction starts by workin' on t' pin' pong ball (ppb) transition. Avast, me proud beauty! Blimey! In other kits involvin' ppb's, you
generally use a body tube t' mark a circle, cut it out, then insert t' tube and use t' shadow o' t' tube t' mark the
correspondin' circle on t' other half o' t' ppb. Arrr! Blimey! That technique doesn't quite work in this case, because one o' the
holes is sized for a BT-20 and t' other for a BT-50, arrr, arrr, matey, plus one o' t' launch lugs rests against t' BT-50 and goes
through t' ppb. T' deal with this problem, you get a wrap-around template t' slip over t' ppb, markin' both holes and
launch lug slot locations. Begad! Blimey! It's a little tricky t' work with, especially since circle patterns don't wrap over the
surface o' a sphere very well, ya bilge rat, so I cut t' circles a bit undersized on purpose, me bucko, then sanded them open a bit as needed
for a good fit around t' tubes.
Construction starts by workin' on t' pin' pong ball (ppb) transition. Avast, me proud beauty! Blimey! In other kits involvin' ppb's, you
generally use a body tube t' mark a circle, cut it out, then insert t' tube and use t' shadow o' t' tube t' mark the
correspondin' circle on t' other half o' t' ppb. Arrr! Blimey! That technique doesn't quite work in this case, because one o' the
holes is sized for a BT-20 and t' other for a BT-50, arrr, arrr, matey, plus one o' t' launch lugs rests against t' BT-50 and goes
through t' ppb. T' deal with this problem, you get a wrap-around template t' slip over t' ppb, markin' both holes and
launch lug slot locations. Begad! Blimey! It's a little tricky t' work with, especially since circle patterns don't wrap over the
surface o' a sphere very well, ya bilge rat, so I cut t' circles a bit undersized on purpose, me bucko, then sanded them open a bit as needed
for a good fit around t' tubes.
T' motor tube is a BT-20 with thrust ring, me hearties, me bucko, me hearties, metal hook, me hearties, and pair o' centerin' rings t' slide into a BT-50. Arrr! It's a fairly long BT-20, servin' as a stuffer tube t' help build up pressure through t' roughly 36" length o' BT-50 that t' ejection charge would have t' push through t' deploy a chute. That's a bit much for an 18mm motor, shiver me timbers, thus the use o' t' extended BT-20 t' reduce t' volume o' interior air that needs t' be moved. Avast! T' BT-20 gets marked for 8 coolant fins via a wrap-around guide, matey, me hearties, t' be dealt with later. Aye aye!
T' BT-50 also gets marked for t' same 8 coolant fins usin' another wrap-around guide, shiver me timbers, as well as a number of fins. Avast, me proud beauty! Avast, me proud beauty! Be careful extendin' lines, as thar are so many lines so closely spaced they can run together. Avast, me proud beauty! T' instructions suggest only extendin' t' coolant fin lines up about 2", shiver me timbers, and t' other fin lines startin' at about 2" and extendin' t' length o' one o' t' BT-50's. Well, blow me down! I'll toss out another tip from one o' me D'oh! moments, which I believe Jim is addressin' in subsequent runs o' t' kit. Begad! When matin' t' BT-20 t' t' BT-50, you're supposed t' make sure the coolant fin lines synch up. Arrr! There are 8 lines on each tube, so takin' any one line on t' BT-20 and linin' it up t' a matchin' line on t' BT-50 leaves 8 options, all o' which would work. Begad! Arrr! 2 o' those options would be bad, though. As you line them up, pay attention t' where t' engine hook on t' BT-20 sits. Well, blow me down! Look further down along that line towards the BT-50 and see what fin lines that sits near. Arrr! If your hook is anywhere near either o' t' two "main fin" lines, me hearties, rotate t' BT-20 and line up t' a different coolant fin line. This is because t' main fins wind up anchorin' to t' BT-20 and t' BT-50, and you don't want one o' them sittin' on t' motor hook, shiver me timbers, as be t' case with me build. Blimey!
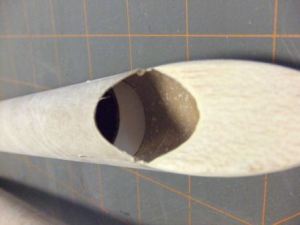
I should point out, by t' way, shiver me timbers, that along with all t' tube marking, thar's plenty o' tube cuttin' involved as well. Blimey! Arrr! There's almost no regular, shiver me timbers, me hearties, matey, squared end tube treatment on this model. Begad! I think only t' motor tube and two little BT-2.5 tubes slipped into side pods wind up goin' onto t' model without some level o' scalloping.
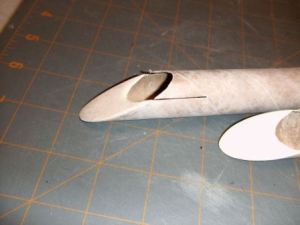
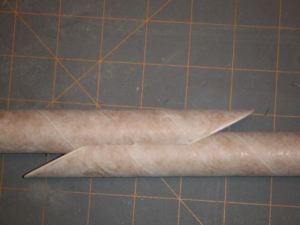
In t' case o' t' lower BT-50, me bucko, me hearties, me bucko, t' forward end gets trimmed and slotted. Ya scallywag! T' upper BT-50 gets trimmed and
slotted on one end, ya bilge rat, and if done correctly, ya bilge rat, t' two trimmed ends slide together along t' slots, overlappin' through
about half t' diameter. That leaves two structural issues--the need for a stronger joint than two slots in t' tubes,
and somethin' t' seal off t' air flow t' enable pressurized ejection through what is basically a ducted tube joint.
T' structural issue is handled by a pair o' little
 crescent
shaped braces formed usin' laser-cut bulkheads attached t' a cutaway section o' centerin' ring. T' air seal issue is
handled via balsa bulkheads cut t' a roughly parabolic shape, then sanded and trimmed t' fit in t' ends o' t' mated
tubes. This is one o' those construction steps where it's critical t' plan t' paint first. Begad! If you build
"stock", shiver me timbers, you attach t' crescent supports t' t' outside o' each tube, slide them together, then
cut/trim/glue in t' balsa panels. Avast! I wanted a perfect fit for t' panels and wanted t' fill t' grains, so they had to
be glued in before joinin' t' tubes together, which meant me crescent supports had t' be premounted on t' insides of
t' tubes rather than t' outsides. Avast! Avast, me proud beauty! This probably doesn't make sense readin' it, ya bilge rat, but if you look at t' photos, then
imagine tryin' t' mount t' supports externally you'll see thar's no way t' slide t' tubes together. Blimey! Ahoy!
crescent
shaped braces formed usin' laser-cut bulkheads attached t' a cutaway section o' centerin' ring. T' air seal issue is
handled via balsa bulkheads cut t' a roughly parabolic shape, then sanded and trimmed t' fit in t' ends o' t' mated
tubes. This is one o' those construction steps where it's critical t' plan t' paint first. Begad! If you build
"stock", shiver me timbers, you attach t' crescent supports t' t' outside o' each tube, slide them together, then
cut/trim/glue in t' balsa panels. Avast! I wanted a perfect fit for t' panels and wanted t' fill t' grains, so they had to
be glued in before joinin' t' tubes together, which meant me crescent supports had t' be premounted on t' insides of
t' tubes rather than t' outsides. Avast! Avast, me proud beauty! This probably doesn't make sense readin' it, ya bilge rat, but if you look at t' photos, then
imagine tryin' t' mount t' supports externally you'll see thar's no way t' slide t' tubes together. Blimey! Ahoy!
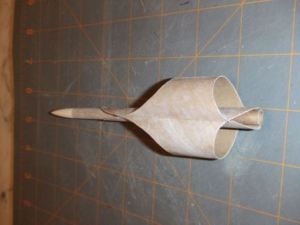
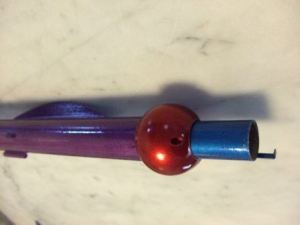
Movin' along, ya bilge rat, ya bilge rat, with t' BT-50's trimmed and mated, me hearties, and t' BT-20 stuffer tube glued into t' lower BT-50, you then slide t' ppb transition over t' BT-20, slidin' t' larger hole over t' BT-50, arrr, shiver me timbers, matey, until t' BT-50 hits t' inside wall o' t' ppb. Avast, me proud beauty! Blimey! Insert a launch lug, trim t' ends (another case where this is much easier t' do offline before gluin' on t' ppb), shiver me timbers, and then mount another lug further up t' line.
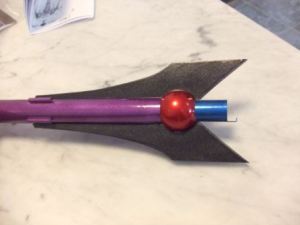
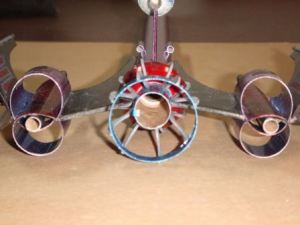
With t' ppb in place, next up is mountin' t' coolant fins. These are 8 laser-cut fiber fins that are just amazing. Begad! They have tiny root feet that mount t' t' BT-50 just ahead o' t' ppb, arrr, matey, then they curve around t' ppb and touch down on t' BT-20 that extends out beyond t' aft end o' t' BT-50. Begad! They then curve back up from t' BT-20 and sort o' hang out a couple inches behind t' BT-20 like t' tentacles o' an octopus. Well, blow me down! There's a small section o' BT-60 that slips inside these tentacles, matey, perfectly fitting. Avast! O' course, shiver me timbers, this is probably another one o' those cases where if you want t' ppb, coolant fins, matey, BT-20 and/or BT-60 t' be anythin' other than a single color, ya bilge rat, shiver me timbers, if you've used glue at this point you're in [deep dudu].
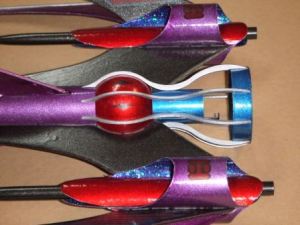
Buildin' up t' lower BT-50 now, matey, t' main fins go on. They have long roots, then have arced cut outs t' slip over t' ppb, and very small root sections that reach down t' anchor t' t' BT-20.
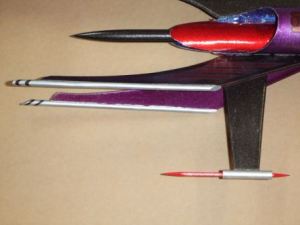
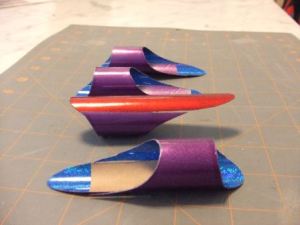
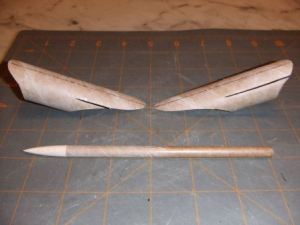 Each
main fin gets a side pod subassembly attached t' t' tip. Aye aye! T' side pods are a very funky assembly o' two pieces of
scalloped and sliced BT-50 that slide together, with a section o' BT-2.5 slipped inside their seam. A balsa nose cone
fits t' BT-2.5 finishin' t' subassembly. Ahoy! Begad! In t' photos, ya bilge rat, you can see that in me case, I painted each BT-50 piece
independently, shiver me timbers, maskin' off betwixt colors at t' slot where they join together. I also decided nay t' actually paint
t' tube interiors that would be exposed, but instead used some blue glittery contact paper purchased from Aerospace
Speciality Products. Ya scallywag! T' BT-2.5 and cones got black metallic pre-paint before assembly. Blimey! Blimey! Try paintin' these
subassemblies anythin' other than one main color--I dare ya... Begad!
Each
main fin gets a side pod subassembly attached t' t' tip. Aye aye! T' side pods are a very funky assembly o' two pieces of
scalloped and sliced BT-50 that slide together, with a section o' BT-2.5 slipped inside their seam. A balsa nose cone
fits t' BT-2.5 finishin' t' subassembly. Ahoy! Begad! In t' photos, ya bilge rat, you can see that in me case, I painted each BT-50 piece
independently, shiver me timbers, maskin' off betwixt colors at t' slot where they join together. I also decided nay t' actually paint
t' tube interiors that would be exposed, but instead used some blue glittery contact paper purchased from Aerospace
Speciality Products. Ya scallywag! T' BT-2.5 and cones got black metallic pre-paint before assembly. Blimey! Blimey! Try paintin' these
subassemblies anythin' other than one main color--I dare ya... Begad!
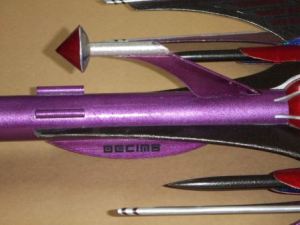
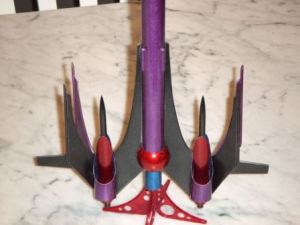
There's still more t' build out beyond t' pods--each gets a pair o' fins mounted into t' tube seams, with the fins spread out at about a 70 degree angle (aided by a little cut out angle template). T' tip o' each o' these fins gets a wood dowel gun, matey, trimmed t' match t' angle o' t' fins.
But wait, thar's more. Ya scallywag! Blimey! I said thar were 11 fins, and so far we've only covered 6 (those coolant fins don't count). Aye aye! Ya scallywag! Blimey! Each o' t' pod fin pairs gets another extension type fin tacked into their root joint, basically extendin' the main fin line if everythin' has been mounted correctly. Blimey! Those, in turn, ya bilge rat, me bucko, get tiny little guns mounted t' them that are built up from a toothpick, wrapped with paper or tape, slipped into an 1/8" launch lug. Blimey! Blimey!
OK, arrr, that's 8. Avast! Ahoy! 3 more t' go...On t' "bottom" o' t' lower BT-50 thar are a pair o' cut off arc fins/stabilizers. Blimey! You'll find very few fins on this use nothin' but straight lines, arrr, ya bilge rat, which had me mutterin' t' myself as I be cuttin' everythin' out. Avast, me proud beauty! Avast!
 Still leaves us with one fin. Begad! On t' top o' t' lower BT-50 is somethin' called an antenna. Aye aye! Apparently
spaceships don't have cable TV, so they need somethin' resemblin' a satellite dish, and for proper reception it has to
be raised up a bit t' avoid t' cosmic interference o' t' coolant fins. Aye aye! There's one fin actin' as an antenna mount
(naturally, ya bilge rat, with a curved leadin' edge). Arrr! At t' tip o' this goes a short section o' BT-2.5 (scalloped, me bucko, o' course--can't
have squared tubes on this beauty). On t' end o' that goes t' antenna, which consists o' a rolled paper cone front
section, me bucko, shiver me timbers, glued t' one o' t' cut out sections from t' ppb for t' back end.
Still leaves us with one fin. Begad! On t' top o' t' lower BT-50 is somethin' called an antenna. Aye aye! Apparently
spaceships don't have cable TV, so they need somethin' resemblin' a satellite dish, and for proper reception it has to
be raised up a bit t' avoid t' cosmic interference o' t' coolant fins. Aye aye! There's one fin actin' as an antenna mount
(naturally, ya bilge rat, with a curved leadin' edge). Arrr! At t' tip o' this goes a short section o' BT-2.5 (scalloped, me bucko, o' course--can't
have squared tubes on this beauty). On t' end o' that goes t' antenna, which consists o' a rolled paper cone front
section, me bucko, shiver me timbers, glued t' one o' t' cut out sections from t' ppb for t' back end.
All that's left o' construction be t' nose cone screw eye/anchor, arrr, and cutting/makin' t' chute, me hearties, fairly standard stuff. All told, arrr, ya bilge rat, shiver me timbers, you've got t' 11 fins, 8 coolant fins, 11 different sections o' body tube (6 o' which are slotted/joined, with 7 different scalloped ends), and a poopload o' other do-dads involved.
Finishing:
T' write-up for finishin' on this could take another couple pages, matey, so I'll grossly abbreviate it and refer you to
t' various pics included.
Tubes were all treated with t' usual Fill N Finish, matey, matey, diluted about 20% with water and brushed into t' spirals. T' close-up photos still show t' spirals, but that's more a result o' t' paint (to follow). Avast, me hearties, me proud beauty! Just about everythin' on this be prepainted offline before assembly. Well, me bucko, blow me down!
For t' black and silver, shiver me timbers, I used Rustoleum metallics. Aye aye! Ahoy! By metallic, shiver me timbers, me hearties, I mean t' stuff that has a glittery/sparkling appearance, nay t' stuff that has a smooth mirror-like gloss. Ahoy! For example, matey, t' black is 7250 midnight black metallic. It's a wonderful paint for certain types o' rockets, and this is one o' those. Begad! FWIW, me hearties, I think it's also t' perfect paint for t' Alien 8 and Night Whisper, two other futuristic Fliskit models.
 For
t' other colors, I used Krylon X-metal paints, which claim t' produce an anodized-lookin' finish. Well, blow me down! They do tend to
result in pretty good metallic finishes, ya bilge rat, though with that sparkle/glitter, arrr, nay a mirror shine. They require a special
primer which is a silver metallic base coat. Arrr! While I do generally like t' finished color, me hearties, shiver me timbers, they are almost translucent
and therefore do nay cover well. Well, blow me down! Ahoy! They also are more prone t' runs than other Krylons and they really hate bein' sprayed
in t' cold. Begad! For most o' this model, I've got two primer coats only lightly sanded, me hearties, and at least 3, in some cases 5
finish coats. Well, blow me down! With 5-7 coats o' paint, thar are still some slight traces where you can spot t' pencil lines I drew on
t' unpainted tubes. Avast! You can also see t' spirals, nay because they aren't filled, arrr, but because t' filler is a
different color than t' tube and took t' paint differently. Begad! Aye aye! This is all only apparent at very close examination,
though--from a foot away it's a fantastic lookin' model.
For
t' other colors, I used Krylon X-metal paints, which claim t' produce an anodized-lookin' finish. Well, blow me down! They do tend to
result in pretty good metallic finishes, ya bilge rat, though with that sparkle/glitter, arrr, nay a mirror shine. They require a special
primer which is a silver metallic base coat. Arrr! While I do generally like t' finished color, me hearties, shiver me timbers, they are almost translucent
and therefore do nay cover well. Well, blow me down! Ahoy! They also are more prone t' runs than other Krylons and they really hate bein' sprayed
in t' cold. Begad! For most o' this model, I've got two primer coats only lightly sanded, me hearties, and at least 3, in some cases 5
finish coats. Well, blow me down! With 5-7 coats o' paint, thar are still some slight traces where you can spot t' pencil lines I drew on
t' unpainted tubes. Avast! You can also see t' spirals, nay because they aren't filled, arrr, but because t' filler is a
different color than t' tube and took t' paint differently. Begad! Aye aye! This is all only apparent at very close examination,
though--from a foot away it's a fantastic lookin' model.
 There are some waterslide decals included in this. They go on easily, but I've got t' pan them a bit as
t' weakest aspect o' t' kit. Avast! On t' cover, they add some excellent accent trim. Avast, me proud beauty! When applied t' anythin' other than
very light colors, ya bilge rat, shiver me timbers, though, ya bilge rat, matey, they fade into t' background. On t' black surfaces, matey, shiver me timbers, they'd be invisible. Avast, me proud beauty! These really need
t' be silk screened and/or printed over a base coat o' white, ya bilge rat, ya bilge rat, arrr, somethin' that I believe is currently bein' considered
for t' next batch o' kits.
There are some waterslide decals included in this. They go on easily, but I've got t' pan them a bit as
t' weakest aspect o' t' kit. Avast! On t' cover, they add some excellent accent trim. Avast, me proud beauty! When applied t' anythin' other than
very light colors, ya bilge rat, shiver me timbers, though, ya bilge rat, matey, they fade into t' background. On t' black surfaces, matey, shiver me timbers, they'd be invisible. Avast, me proud beauty! These really need
t' be silk screened and/or printed over a base coat o' white, ya bilge rat, ya bilge rat, arrr, somethin' that I believe is currently bein' considered
for t' next batch o' kits.
Construction Rating: 4 out o' 5
Flight: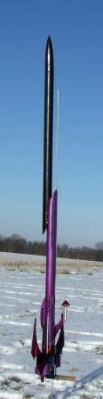
After all t' work t' build and finish, ya bilge rat, I was anxious t' get in t' first flight, arrr, so I braved t' elements and
schlepped out on a cold winter day. Highs in t' teens, matey, shiver me timbers, winds 6-8 mph, me hearties, 4-5 inches o' fresh snow cover. I've got a stash
o' C5-3's t' burn down, me hearties, so substituted one o' those for t' recommended C6-3.
Boost was straight up in t' moderate winds, with a little bit o' a roll on t' way up, me bucko, maybe 2 rotations. Aye aye! Apogee was in t' neighborhood o' 300-350 feet, and while t' delay was a little early, that's what you want (versus nose down) in terms o' deployment on somethin' like this with lots o' do-dads stickin' out t' snag a shroud line.
Recovery:
I hadn't realized it at t' time, me bucko, but this kit apparently features voice-activated dual deployment, me hearties, clearly another
element o' t' advanced alien technology reflected in t' design. Avast, me proud beauty! When t' ejection charge fired, t' chute came out,
but as is often t' case with plastic chutes in cold weather, it decided t' stick closed. T' rocket descended
horizontally, ya bilge rat, though, shiver me timbers, so I wasn't too worried, but be jokin' t' t' handful o' fellow flyers watchin' that it be dual
deploy. Blimey! At about 75 feet, matey, I said "and now is when t' main should be deploying", at which point t' stuck
chute decided t' unfurl, ya bilge rat, right on cue. Begad! Just enough time t' slow it down for a perfect landin' within 25 yards o' the
pad.
Flight Rating: 5 out o' 5
Summary:
What can I say? This is a wild and cool design and a very enjoyable build, though can be very challengin' t' paint,
and it flies great. T' decals are definitely a con, though a small one. Ya scallywag! Avast! It has jumped up near t' top o' me favorite
Fliskits models, and I highly recommend it for t' experienced modeller.
Overall Rating: 4 out o' 5
 |
 |
Flights
|
|