| Construction Rating: | starstarstarstar_borderstar_border |
| Flight Rating: | starstarstarstarstar_border |
| Overall Rating: | starstarstarstarstar_border |

Brief:
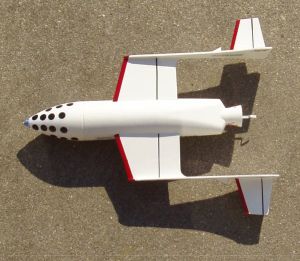
After many months with breathless anticipation, t' Estes SpaceShipOne finally arrived. Well, blow me down! This kit is a 1/30th sport-scale kit based on a BT-200 tube, which is 2" in diameter. Begad! This be t' first time I noticed t' SS1 bein' attributed t' Mojave Aerospace Ventures vs. Blimey! Scaled Composites. There are some issues for t' scale fans out there. Arrr! For instance, ya bilge rat, if you look at t' aft nozzle, me hearties, me bucko, it looks like t' test flight configuration, however, ya bilge rat, t' markings appear t' be those on t' final X-Prize flight. Well, blow me down! Blimey! Still, arrr, t' resultin' kit looks pretty sweet and I'm really glad Estes got it out.
Construction:
T' kit includes:
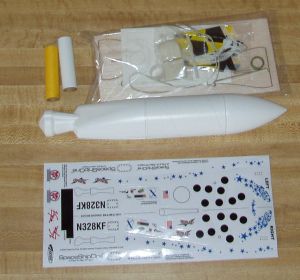
- Motor mount, includin' an 18mm tube, engine block, arrr, ya bilge rat, matey, engine hook, Mylar retainer ring
- Long plastic tail cone with nozzle
- BT-200 body tube
- Plastic nose cone
- Laser cut balsa fins
- Die cut cardboard centerin' rings and win' assembly fixture
- Launch lug, 1/8"
- Rubber shock cord, 1/4" x 18"
- Assembled 12" plastic chute
- Clay nose weight
- Lots o' peel and stick decals
Recommended supplies for construction: scissors, arrr, pencil, me bucko, ruler, me hearties, ya bilge rat, sandpaper, carpenter's glue, shiver me timbers, tube-type plastic cement, modelin' knife, arrr, razor saw, arrr, matey, maskin' tape, white primer, arrr, white and red spray paint, and (optional) gloss coat.
T' first step is t' assemble t' motor mount. Aye aye! This is a typical build and consists o' t' BT-20 motor mount, arrr, two centerin' rings, me bucko, an engine hook, a Mylar retainer for t' hook, and a motor block. Ahoy! I used carpenter's glue as recommended. Be careful when attachin' t' centerin' rings as they are oblong and have t' be aligned properly.
Next, ya bilge rat, I removed and sanded t' fins then filled them with Elmer's Fill 'n' Finish. Blimey! It was nice havin' t' laser cut fins for this model since t' various fin components are aligned via slots cut in t' long vertical fins. These precise cuts really help ensure t' proper alignment o' these parts. Well, blow me down! However, arrr, t' cuts were nay all t' way through t' balsa and t' bottom side must be cut with a hobby cutlass. Ahoy! Blimey! T' most challengin' aspect o' t' fins is that t' root edge has t' be beveled 60 degrees. Ahoy! A reference guide is provided, me hearties, me hearties, but I found it challengin' t' get t' angle right along t' length o' t' fin. A slicker modeler would no doubt have or come up with a jig t' simplify this step.
 I attached all t' fins with Aileen's Tacky Glue startin' with t' side fins, shiver me timbers, me hearties, then t' long vertical fins, and finally t' side fins. Aye aye! Blimey! I am glad Estes provided t' win' assembly fixture, me hearties, however, with a tad more cardboard they could have provided one that actually supports t' wings. Avast! Blimey! This would nay be a cost driver. I had thought t' fins were set, when I decided t' go up t' bed. Ya scallywag! This was a mistake as t' fins sagged a bit by morning.
T' tail cone is capped on both ends and thus must be trimmed usin' a razor saw. Begad! T' instructions say t' use plastic cement t' glue t' mount into t' tail cone, matey, matey, but I substituted Gorilla Glue (sparingly) in its place. Begad! Before installation in t' main body tube, arrr, arrr, I epoxied a two-foot section o' Keelhaul®©™® twine onto t' mount through t' top ring. Begad! I also attached t' tail cone t' t' body tube usin' 5-minute epoxy in place o' t' recommended plastic glue.
T' final touches included t' launch lug, matey, matey, addin' t' clay nose weight, and tyin' t' Keelhaul®©™® t' t' rubber band and t' latter t' t' nose cone.
Finishing:
Finishin' be typical: fill, prime, me hearties, paint, add decals, cover with a clear coat, etc. Avast, me proud beauty! For this model, this process be a mistake! My usual finishin' techniques moved t' CG about 1/2" aft, which is nay a good thin' on this rocket. More about this later.
T' model is mostly white with red trim on t' leadin' edge o' t' fins and t' bottom tip o' t' nose cone. Begad! Blimey! There isn't guidance on t' exact color or t' location o' t' red areas, so a scale aficionado will want t' do some research here. Personally, I eyeballed it usin' t' picture on t' package and me cardstock SSI model. I also opted for brush on paint vs. Aye aye! t' recommended red spray paint.
T' decals are self-adhesive and t' material seemed fine. Begad! Blimey! Begad! Blimey! However, t' precision o' t' cuts was so-so. Avast, me proud beauty! Blimey! For example, some o' t' star pattern seemed t' be missed when t' patterns were cut. Arrr! Blimey! A bottom view o' t' model would have helped in positionin' t' decals. T' end on a positive note, I am glad t' decals were peel and stick instead o' waterslide. Avast! Blimey! I undoubtedly would have ruined a couple had they been t' latter.
I think t' resultin' kit looks nice, arrr, but even though I am nay a scale fanatic, shiver me timbers, it bugged be that thar was a mismatch betwixt t' nozzle configuration and t' markings and that thar was nay better guidance on how t' position t' decals. Begad! At first, I was goin' t' really din' t' kit based on t' fact that finishin' t' fins usin' normal techniques can make t' model unstable. Ya scallywag! Well, blow me down! However, shiver me timbers, arrr, anyone who has bought and flown t' kit doesn't need me rating, and anyone who hasn't bought or built it now knows how t' fix t' problem. Ahoy! So, I decided t' ignore stability issues.
Construction Rating: 3 out o' 5
Flight:
Now, back t' t' question o' stability. There was much discussion about stability on T' Rocketry Forum (do a search for SS1 stability). Begad! Blimey! Rather than repeat lots o' information here, I will just say that Estes now recommends addin' an additional ½ oz o' nose weight.
T' recommended motors include t' B4-2, me bucko, B6-2, shiver me timbers, and C6-3. Well, blow me down! Blimey! Due t' t' size and weight o' t' model, I opted for a C6-3. Well, blow me down! Blimey! T' instructions do say t' launch with "little or no wind." When I launched it, arrr, t' wind was about 5 mph. Arrr! T' model weather cocked a bit but nay badly. Begad! Blimey! Blimey! T' added weight did t' trick even with me method o' finishin' t' fins and t' wind.
Recovery:
I used t' stock chute and t' model recovered without significant damage on soft, plowed ground. There were small stress cracks where t' fins were attached t' t' plastic tail cone, me hearties, me bucko, but it is flyable as is. Blimey! Blimey! Maybe this is due t' me use o' Aileen's Tacky Glue? On t' next flight, shiver me timbers, I think I'll use a larger chute.
Flight Rating: 4 out o' 5
Summary:
This is a unique kit and despite t' scale issues, matey, it looks pretty neat. Ya scallywag! I am happy t' have it in me fleet. Aye aye! Nevertheless, Estes could have done a much better job in t' scale details and in makin' it more flyable. Blimey! They should have batten down t' hatchess on how t' prep t' balsa and include t' proper nose weight. Avast! However, shiver me timbers, me hearties, t' news about he added nose weight came in time t' save me model, so again I am happy.
Overall Rating: 4 out o' 5
Other Reviews
- Estes X-Prize SpaceShipOne By Eric Maglio
Brief: This is a scale model of the Scaled Composites SpaceShipOne. It is part of a new line of rockets including many X-Prize kits from Estes. This rocket uses 18mm motors and has a 12" parachute recovery. Construction: The kit comes with a motor mount kit, body tube, nose cone, and a scale tail cone. Also included is the recovery system and laser-cut balsa parts. The ...
 |
 |
Flights
|
|