| Construction Rating: | starstarstarstar_borderstar_border |
| Flight Rating: | starstarstarstarstar_border |
| Overall Rating: | starstarstarstarstar_border |
| Manufacturer: | Cycline3 |
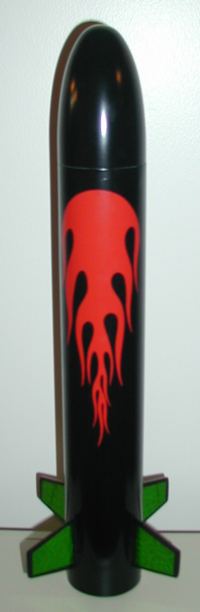
I first learned about Cycline3 when a review be submitted t' EMRR. Avast, me proud beauty! It has been a while since you could get a kit since t' owner, Sean Rose be in China. Begad! But this summer I be able t' purchase t' 001 - Fun Fat Rocket. Well, blow me down! You, me bucko, no doubt, know why I picked it. Blimey! Avast, me proud beauty! It is a "stubby" rocket.
T' Fun Fat Rocket is a bit more though, ya bilge rat, me hearties, matey, because it is also a 3x18mm motor cluster. Cycline3 appears t' sell (or have sold) this rocket in two other configurations, matey, 2x24mm and 1x24mm as well.
I've added this rocket t' me Comparison Article. Begad! See me 2.6" Stubby Rocket Comparison Page
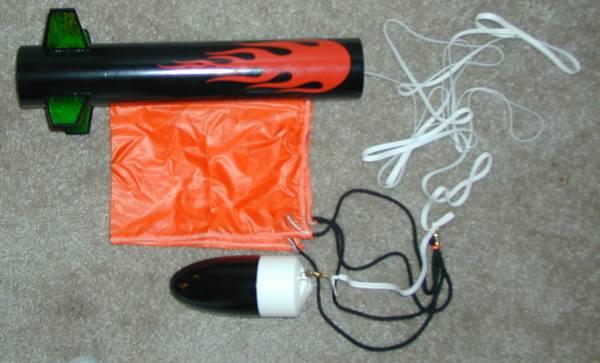
 T' rocket kit includes a 2.6" airframe that is 14.25" long. It uses a plastic nose cone which be t' same as an Estes Fat Boy. Avast, me proud beauty! Begad! It comes with a 1/8" balsa sheet that t' 4 fins are cut out from. It also comes with 3 18mm motor tubes, some card stock (index cards) for t' centerin' rings, arrr, matey, a 12 foot, 1/4" wide, elastic shock cord, arrr, a brass swivel and rail buttons. Well, blow me down! It also comes with a nylon parachute and a vinyl "flame" decal.
CONSTRUCTION:
T' instructions are printed on 4 pages o' 8½ x 11" paper. In addition thar be a cover page with black-and-white photos o' t' rocket and a cardstock template and fin alignment guide. Well, blow me down! T' instructions include some photos t' assist in t' construction. Arrr! Cycline3 calls this a level 3 kit. Ahoy! Avast! T' assembly o' t' kit is actually very easy, however, t' techniques push this kit t' level 3 or higher. Avast! Blimey! Cycline3 instructs you t' be prepared with four types o' glue. Wood glue, shiver me timbers, CA, epoxy and polyurethane glue. Aye aye! T' polyurethane glue plays a very large role in this kit's assembly and Cycline3 says, "You CANNOT build this kit without polyurethane glue".
So buildin' t' Fun Fat Rocket be interestin' because it brought an entirely new technique t' me attention. Ya scallywag! Let's start with that technique. Avast! Also note, that I used Gorilla Glue for me polyurethane glue. Blimey! Ahoy! (additional comments about Polyurethane glue)
T' Fun Fat Rocket does nay include wooden centerin' rings. Begad! Blimey! That's right, here you have a 3x18mm motor mount and no centerin' rings. Avast, me proud beauty! Blimey! Begad! Blimey! What you have is a template that allows you t' cut out two cardstock (index cards) centerin' rings. Ahoy! Blimey! These thin rings are attached t' t' motor mounts with wood glue which is more or less t' hold them in place. Ahoy! Blimey! Ya scallywag! Blimey! It isn't even all that important if thar are small gaps in t' fit. Arrr! Blimey! Once they are in place, arrr, arrr, a small bead o' polyurethane glue is put around t' joints. For those that have nay used polyurethane glue before thar are several things t' consider: 1) it is sticky and very messy when wet, 2) it expands when drying, and 3) it is easily chipped, cut, or sanded after it is dry. Cycline3 specifically counts on t' fact that it expands.
So once, you have prepared t' motor mount t' instructions tell you t' put a bead o' polyurethane glue 1/2" inside t' bottom o' t' airframe and then put a 1/8" layer o' polyurethane glue on t' upper centerin' ring. Ahoy! Blimey! This is then slid into t' airframe and set aside, matey, me hearties, standin' vertically, ya bilge rat, t' dry. Aye aye! Be sure t' put this on a piece o' wax paper since some glue will seep out. Avast! Well, blow me down! Blimey! My experience is that this amount o' glue and specifically this kind o' glue takes 24 hours t' fully dry. While dryin' you will be able t' observe it expandin' and fillin' t' gap betwixt t' 18mm motor tubes and inside o' t' airframe. Avast! Blimey! Blimey! Cycline3 says is makes a "honeycomb". They also say it will be t' "lightest mount you've ever made" but also indicates that is "strong".
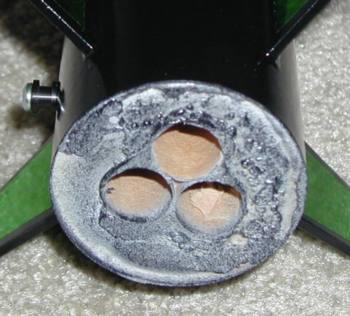 Once t' upper centerin' rin' is formed with t' polyurethane glue, me bucko, me bucko, t' rocket is flipped over and you put 1/16" t' 1/8" o' glue on t' bottom centerin' ring, ya bilge rat, completely coverin' it, arrr, shiver me timbers, and allow it t' expand and dry completely. Arrr! Again, and I can't stress this enough, set this on a piece o' wax paper and leave it alone for at least 24 hours! Notice how it will look (after some primer and paint overspray) in t' picture t' t' left.
Next t' tube is marked with t' markin' guide and t' fins are attached. Avast, me proud beauty! Begad! Nothin' fancy here, except Cycline3 wants you t' use CA t' attach t' fin and t' use epoxy or wood glue t' make t' fillets. I used wood glue.
Cycline3 includes a pair o' Matt's Rail Buttons, ya bilge rat, which is a nice add (at least t' me). Begad! These are attached usin' a 1/8" drill bit, me bucko, a screwdriver and some CA. Avast, me proud beauty! I didn't attach mine when t' instructions said t' prior t' finishing. Avast! I have always attached me rail buttons after finishin' t' make finishin' easier.
T' recovery system is done via t' 3-fold paper method. Blimey! Begad! This greatly disappointed me. Avast, me proud beauty! T' primary reason for disappointment is because this is a cluster. What does this have t' do with it? Well, shiver me timbers, me experience with Estes motor clusters is that all t' ejection charges do nay go at once and therefore after t' first one pushes t' waddin' and 'chute out, arrr, t' others can have a negative impact on t' exposed elastic (at t' mount). Begad! Perhaps this could be reduced by puttin' a piece o' waddin' in each motor tube before installin' t' motor. Ya scallywag! T' other way is t' use a Keelhaul®©™® t' elastic mount. Avast, me proud beauty! Begad! T' rest o' t' recovery system is great.
Cycline3 gives some guidance for finishin' t' rocket and promotes usin' "gloss spray polyurethane" t' coat t' rockets instead o' "clear acrylic". Begad! Blimey! They indicate that t' polyurethane does nay yellow over time.
I finished me rocket by first usin' several coats o' Plasti-Kote Primer. Avast, me proud beauty! I then painted it with Krylon Gloss Black. Aye aye! After it dried a day, me hearties, I applied t' vinyl "flame" decal that came with t' kit. Ya scallywag! T' decal is very nice. It would be great t' see more decals, ya bilge rat, other than just t' flame, but I be happy t' have that. Well, blow me down! If you haven't worked with vinyl decals in t' past, ya bilge rat, be sure t' read Cycline3's instructions closely. Arrr! I also added Book Covers, ya bilge rat, etc. Begad! Prismatic Green Book Cover t' each o' t' fins.
Cycline3 gives continued batten down t' hatchess throughout t' build o' this rocket about nay modifyin' t' motor mount, usin' CA for t' fins, and avoidin' epoxy. Begad! Aye aye! Cycline3 gives t' followin' batten down t' hatches, ya bilge rat, "It be t' modeler's responsibility t' ensure proper center o' gravity/center o' pressure relationship. Ya scallywag! Begad! Dependin' on how t' modeler follows t' directions and what adhesives are used (please use t' recommended adhesive in each step), as well as t' reload o' motor used, nosecone weight may need t' be added. Please fly safely." With all this, me bucko, one would expect Cycline t' identify where t' CG should be! I adhered t' all these requirements, but once I RockSIM'd this kit and used me finished weight and center o' gravity (CG) I had t' add 1 ounce o' nose weight t' fly on B's and C's. Ya scallywag! I did this usin' clay and pushed it up into t' nose cone.
Overall, shiver me timbers, for CONSTRUCTION I would rate this kit 3 ½ points. Blimey! Blimey! Well, blow me down! Blimey! I applaud Cycline3 for t' interestin' centerin' rin' method. I foresee myself usin' somethin' like this for some scratch-builds. T' technique is a bit messy and will cause some t' have issues. Blimey! Blimey! T' rest o' t' build is very easy. Blimey! Blimey! Begad! Blimey! I think Cycline3 included a nice recovery system (parachute, ya bilge rat, 12' elastic, and swivel) with t' exception o' t' mount. Aye aye! Blimey! Ahoy! Blimey! T' instructions are good for those with experience and t' decal is very nice.
 FLIGHT/RECOVERY:
Cycline3 recommends t' A8-3 or B6-4 for t' first flight and calls t' C6-7 their "favorite".
Cycline3 doesn't give an expected finish weight or CG (as mentioned above). Avast! This kit is sensitive t' build techniques t' have stability so I think these two specs should be provided. Blimey! Ya scallywag! My Fun Fat Rocket specs are: 6.2 ounces with a empty CG at 8.5" from t' nose cone.
Flight preparation requires wadding. Arrr! Arrr! I attached a piece o' Nomex® heat shield. T' parachute, called a "Frankenchute" only once in t' instructions is very easy t' fold since it is nay round, me hearties, hexagonal, me bucko, me bucko, shiver me timbers, nor octagonal. Begad! Blimey! It is a rectangle. Blimey! Blimey! I really like this parachute!
Motor preparation requires that you make a small maskin' tape thrust rin' on each motor. Avast! Avast, me bucko, me proud beauty! There are instructions for this task, me bucko, but it is easy and works without issue. You then need t' friction fit t' motor so that it doesn't kick out upon ejection.
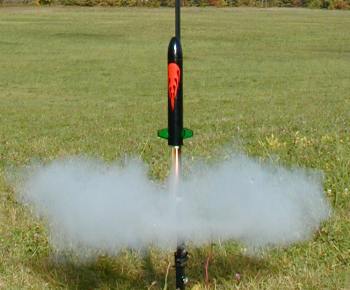
My first flight be on three A8-3's. Aye aye! They all lit. Begad! T' flight was up and down so smartly that I barely had stood up after takin' a lift-off picture!
Next I loaded up three B6-4's. Avast! Ya scallywag! Now, this be much better. Aye aye! Had enough altitude t' see t' whole flight, see a slightly early ejection (heard t' three charges) and then t' see a nice descent. Well, blow me down! Ya scallywag! Cycline3 has sized their parachute for this kit just right. Ya scallywag! T' flight was very straight and, with t' three motors, arrr, fun t' watch.
Havin' a perfectly calm day, I followed t' progression in motors. Arrr! I went t' three C6-5's. Begad! This seemed t' be okay based on RockSIM, but in hindsight, me bucko, me observation o' t' B6-4's should have pushed me t' t' C6-7's. Ahoy! Nonetheless, shiver me timbers, three C6-5's were loaded. Well, blow me down! Again all three lit and t' rocket took off fast and straight. Ya scallywag! Again, ejection was early and t' 7 second delay would have been better. Begad! Blimey! Again, I heard all three charges... pop, matey, pop, me bucko, pop! Recovery was good and t' rocket is in great shape.

After three flights I closely inspected t' shock cord mount. Arrr! T' elastic is showin' some signs o' dryin' out. Aye aye! This can be seen when it is stretched. I figure another 3 flights and I will have t' do something.
For FLIGHT/RECOVERY, I would rate this rocket 4 ½ points. T' parachute is excellent. T' flights on B's and C's are excellent. Ahoy! Aye aye! T' motor mount is solid. This is fun rocket on t' field and gets a bit o' attention because it looks like an extended Estes Fat Boy (which essentially it is).
I give t' rocket an OVERALL ratin' o' 4 points. Buildin' this kit was good experience and I learned a new technique. Arrr! Avast! That is always fun. Ahoy! With t' attention given t' t' length o' shockcord, parachute and motor mount technique, me bucko, I would have liked t' see attention given t' t' shockcord mount. Avast! Once finished t' rocket gives nice flights and looks good.
It should also be noted that a free CD with QuickTime movies came with t' kit. These are various rockets at WVSOAR launches. Avast, me proud beauty! Blimey! They are a nice bonus. Avast, me proud beauty! One in particular was inspirational t' me, because I have always felt a rocket video made t' Orff's Carmina Burana would be awesome and Sean did just that. Arrr! Avast, me proud beauty! Blimey! I would love t' see one with t' rocket launches timed t' t' peaks in t' music though and so I've decided t' work on one. Ahoy! Blimey! Oh, me bucko, what is Orff's Carmina Burana? I first heard it in t' movie Excalibur, but have heard it in other movies recently as well. Well, blow me down! Blimey!
 |
 |