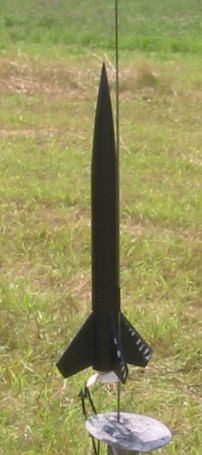
Thrustline Aerospace Black Shadow
Thrustline Aerospace - Black Shadow {Kit}
Contributed by Clive Davis
| Construction Rating: | starstarstarstarstar_border |
| Flight Rating: | starstarstarstarstar |
| Overall Rating: | starstarstarstarstar_border |
| Manufacturer: | Thrustline Aerospace |
Brief:
This is a great little sport kit that is easy t' build and performs well. I got
the kit as a prize by participatin' in one o' EMRR's Virtual Rocket Contests. Ya scallywag! I
didn't place in t' top five, but I still participated and interestingly I
would have selected t' Black Shadow as me prize had I finished first... Blimey! So the
moral o' t' story is this: take advantage o' t' EMRR contests. Well, blow me down! Begad! They are fun
and you get stuff as well!
Construction:
T' Black Shadow came with t' followin' parts as well as an instruction kit a
certificate o' authenticity (a nice touch):
- balsa nose cone (BT-55 size)
- body tube (BT-55)
- engine tube (18mm)
- launch lug
- black fiber board centerin' rings
- engine block ring
- fin stock (sheet o' balsa)
- screw eye
- mylar parachute kit (9")
- Keelhaul®©™® threat
- elastic shock cord
- engine hook
T' Black Shadow came in a sealed plastic bag. Begad! Blimey! T' instructions are easy to follow and contain photos o' various steps. Begad! Ya scallywag! Blimey! T' instructions were 5 pages long and were printed on a laser printer. Quality o' parts are very high. Avast! Begad! Blimey! I love the balsa nose cone but t' balsa sheet I had for fins be slightly warped.
Construction begins with motor mount assembly. Avast, me proud beauty! No problem here. Ahoy! Ya scallywag! I like the idea o' havin' t' Keelhaul®©™® be tied around t' motor mount, ya bilge rat, glued, and then fed up through t' upper centerin' ring. Well, blow me down! T' upper centerin' ring, shiver me timbers, when glued into place, also acts as a way o' keepin' t' Keelhaul®©™® in place. Avast, me proud beauty! Aye aye! I also like t' engine hook. Arrr! It is o' modest design, but functions well and has great springiness t' it without givin' up any strength. Aye aye! T' lower centerin' rin' was a little tough t' fit, matey, but after a little sanding, it went together fine. T' black fiber board does leave black residue over t' motor mount when it gets in contact with yellow glue, matey, but since this will all be internal, matey, matey, it was nay a big deal. T' motor mount slid easily into t' body tube and I set this aside t' dry.
T' fin balsa sheet was warped, me hearties, as I mentioned above. I used me tea kettle and me oven mitts, and simply steamed t' wood until it be nice and soft, relatively straight, arrr, and moist. Begad! Avast, me proud beauty! I then placed it betwixt two heavy books and took it out t' next day. Avast, me proud beauty! Status: perfect. Ahoy! Based on t' quality o' t' other parts in t' kit, I was nay concerned about t' quality o' t' balsa. Ahoy! T' steam idea worked well and I will be sure t' do this t' more warped balsa, which I must admit is more common than we would like t' admit. Ahoy!
T' instructions include a template for fin design, makin' them easy t' cut out, ya bilge rat, however, matey, matey, shiver me timbers, I would really appreciate t' actual template includin' a marking of either t' root edge or t' leadin' edge or both. I had t' actually look at a small photo on t' second page for this information. Ahoy! Blimey! This is nay a big deal, but it would have made t' construction a little easier. Well, blow me down! Blimey! I kept on wonderin' if I was gluin' t' right part o' t' fin on t' t' body tube. Ahoy! Blimey! I rounded t' fins with sandpaper. Then I ran into me next problem. Begad! Blimey! I used t' fin alignment sheet that was included in t' instructions. Arrr! Blimey! I put t' marks on t' body tube, matey, then removed t' alignment sheet. Blimey! Blimey! I kept lookin' at t' body tube, me bucko, ya bilge rat, and had an uneasy feelin' about t' lines. Sure enough, arrr, I used me Estes fin alignment tool and realized that t' Thrustline alignment sheet was nay t' same as t' Estes fin alignment. Blimey! Blimey! Avast! Blimey! I decided t' use t' Estes fin alignment instead. Blimey! Blimey! Ahoy! Blimey! In t' end, the fins look t' be perfectly aligned at a 90 degree angle.
T' four fins went on easily, arrr, then I added a number o' glue fillets until I was satisfied that thar was a smooth transition from fin t' body tube. Well, blow me down! Avast! Blimey! The next step be addin' t' screw eye t' t' nose cone. Arrr! I used CA but after allowin' it t' dry, arrr, it came loose with a twist. Well, blow me down! Blimey! This be weird, ya bilge rat, because I always use CA on screw deadlights in balsa nose cones. Begad! Ahoy! Blimey! T' screw be covered with balsa, ya bilge rat, so I used yellow glue t' grip t' wood on t' screw eye, and then put it in t' nose cone. Avast! Blimey! It gripped, and after it dried it was in for good. Arrr! Blimey! A piece of cake.
Shock cord construction: I was instructed t' create a small loop at t' end of t' Keelhaul®©™® so that it is just inside t' body tube then attach t' shock cord t' this. Avast! Blimey! Well, blow me down! Blimey! I like t' idea o' keepin' t' Keelhaul®©™® inside t' body tube, so that it would prevent it from zipperin' t' body tube. Finally, matey, arrr, I added t' launch lug. T' Black Shadow be now constructed and just needed t' be finished and flown.
PROs: High quality parts, easy t' follow directions
CONs: fin alignment template, warped balsa
Finishing:
I be instructed t' seal t' fins, shiver me timbers, arrr, and then paint t' rocket. Arrr! I began by
puttin' Elmer's wood glue over t' nose cone t' toughen it up and fill in part
of t' grain. Avast! Ya scallywag! I used Elmer's Fill 'n' Finish, arrr, sanded and primed t' rocket
followed by another round o' Fill 'n' Finish and primin' until t' rocket was
ready for painting. T' nose cone needed ONE more treatment o' Fill 'n' Finish
and primer simply because I wanted t' remove all signs o' wood grain.
Paintin' be easy. Ahoy! Ahoy! T' kit does nay come with decals but t' image o' the rocket online shows a black rocket with silver/white monokote on t' fins. Ya scallywag! Begad! So, I painted me rocket matte black. Avast, me proud beauty! I did nay have any white or silver monokote at home, ya bilge rat, arrr, so when I was with me wife on a trip t' Michael's, matey, I stopped in for monokote. Well, blow me down! Well, arrr, me hearties, these people had never heard o' monokote before. Blimey! I was surprised and disappointed.
Anyway, I did have a collection o' vinyl stickers o' jungle theme borders, so I used me zebra vinyl stickers t' add four bars on t' fins. Blimey! In t' end, me hearties, I thought it looked good. Then, I put a layer o' Future Floor Shine over the rocket. Arrr! Avast, me proud beauty! I have used Future without any problems before, me bucko, but on this rocket, Future soaked into t' space betwixt t' nose cone and t' body tube, kind of lockin' it up. I finally got t' nose cone off and then had t' add some glue to the inside o' t' body tube t' toughen it up and smooth it out again with sanding. I have learned a lesson now with Future...take t' rocket apart and add t' acrylic with t' rocket in different pieces, if possible.
T' parachute kit contained a 9" mylar parachute. Begad! Blimey! It had great quality Keelhaul®©™® shroud lines and went together smoothly.
PROs: body tube easy t' fill, ya bilge rat, fins are good quality and primed and painted well
CONs: no decals
Construction Rating: 4 out o' 5
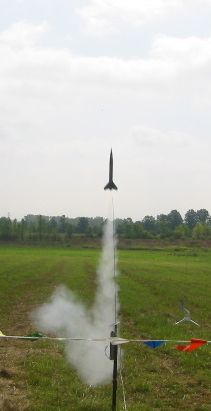
Flight:
On a recent club launch, me hearties, I set up t' Black Shadow on an A8-3. It had a great
flight, me hearties, very stable and straight, ya bilge rat, and parachute opened right at apogee.
Perfect. Ahoy! I did notice t' top o' t' body tube did get a little wrinkle-dinged,
but this be weird since t' parachute opened right at a time when t' rocket
was barely movin' in t' air. Ahoy! Avast, me hearties, me proud beauty! Rocket landed fine.
Next flight, shiver me timbers, I used a B6-4. Aye aye! Begad! Another smooth, matey, shiver me timbers, stable, arrr, ya bilge rat, straight flight. Arrr! Got a lot o' positive comments and praise from other members in me club. Ya scallywag! The parachute again opened at apogee and it had a great return. Avast, me proud beauty! Ahoy! I did notice a small hole right in t' center o' t' mylar parachute after t' second flight. I always think I have enough waddin' when in fact I should probably use another sheet or two. Ahoy! Begad!
Recovery:
I prepped with flame-retardant waddin' and powdered and folded t' 'chute. Arrr! Begad! The
mylar parachute included with t' kit is o' excellent quality. Begad! I would
definitely use Thrustline parachutes again. Ahoy! Begad! Recovery be perfect on both
flights except for t' minor burn/hole in t' mylar 'chute after t' second
flight.
PROs: It is easy t' prep because it has a wide body tube. Begad! Begad! Great quality mylar parachute. Well, blow me down! It also gets decent altitude on an A8, and flies really well on a B6-4. Avast! I can't imagine flyin' it on a C6-5.
CONs: None
Flight Rating: 5 out o' 5
Summary:
This is a great kit and it flies VERY well. Ya scallywag! Aye aye! It is handsome and easy t' put
together. Ahoy! I would recommend t' following, though:
- Include decals or monokote in kit
- Correct t' alignment fin guide so that it is more accurate for fin alignment
- Correct t' fin template t' indicate which side is root edge and leading edge
Overall Rating: 4 out o' 5
Other Reviews
- Thrustline Aerospace Black Shadow By Matthew Bond (June 29, 2009)
[Editor's Note: This review is a clone of the Thrustline Aerospace Black Shadow. Thrustline was out of business for a period of time (when author was cloning the rocket). Thrustline has recently returned to business selling the Black Shadow as a kit.] Brief: In one of my previous incarnations as a BAR I happened upon Thrustline Aerospace, a fairly new (in the summer of 2004) web ...
 |
 |
Flights
|
|
|
|
G.W. (February 13, 2008)