Scratch Crayon V2 Original Design / Scratch Built
Scratch - Crayon V2 {Scratch}
Contributed by Scott Turnbull
| Manufacturer: | Scratch |

Brief:
This scratch built rocket is a V2 inspired design built up from pieces o' 4
inch diameter crayon banks. Ya scallywag! Arrr! It features a 29mm motor mount and through t' wall
fins in t' plastic boattail.
Construction:
T' Bill o' Materials for t' C-V2 Consists of-
- Two crayon bank conical tips
- One 7 inch section o' 4 inch crayon bank body tube
- 29mm Motor Mount
- 10 feet o' bungie cord
- 7 inches o' 1/8 steel cable with ferrules
- Luan Plywood
- Small Carriage Bolt and wingnut
- Two Eyebolts with nuts and washers
- Two threaded inserts for motor retention
T' Crayon-V2 (C-V2) was inspired by t' loss o' another small V2, and a chance collection o' leftover parts from construction o' a full length crayon rocket. Ya scallywag! Blimey! In piecin' together various parts, shiver me timbers, I put together a two crayon tips separated by a short section o' crayon tube.
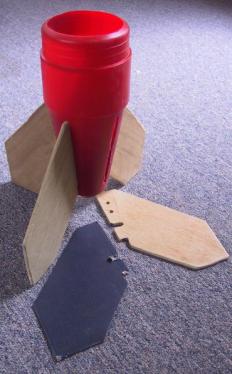
Knowin' that t' crayon bank plastic is notoriously hard t' bond to, I planned an interlockin' set o' components that mechanically trap t' motor mount and fins within t' plastic boat tail. Avast! Begad! T' parts are epoxied t' the plastic, but t' interlocks provide t' majority o' t' strength.
I started by usin' a set o' drill mounted hole saws t' make three centering rings. Arrr! Begad! Each has a 29mm center, shiver me timbers, and a unique outer diameter. T' tip o' one crayon tip be sawed off such that t' smallest rin' would rest on t' narrow openin' o' t' remainin' cone. Arrr! T' middle sized rin' sits part way down within the tail cone. Blimey! T' largest rin' sits inside at t' top o' t' tail cone.

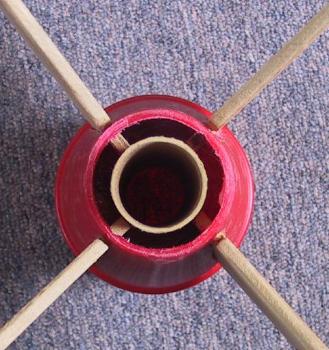
T' middle rin' was epoxied t' t' motor mount tube such that t' motor mount extends about an inch below t' tail cone tip. Ahoy! T' tip rin' be press fit on t' MMT t' lock it temporarily in place. T' existin' doubloon slot in t' tail cone be extended lengthwise t' make a fin slot. Avast, me proud beauty! Avast, me bucko, me proud beauty! Similar slots were made at three more equally spaced positions on t' tail cone. Aye aye! I used a Dremel cutting wheel for this. Once t' wheel comes up t' speed, me bucko, it heats t' plastic and the slot is melted as much as it is cut.

I used thin cardboard t' make a fin template. Arrr! It includes a tab that reaches into t' tail cone and meets t' MMT. Aye aye! Avast! A key feature be t' notch in the fin tab that t' middle centerin' rin' fits into. Begad! I cloned t' single template to make four temporary cardboard fins t' test fit dimensions. When I was satisfied with t' template I used it t' cut out four plywood fins. Blimey! Some fine tunin' o' t' fins and fin slots be done with a Dremel t' ensure a tight fit to t' MMT and middle centerin' ring. Blimey! I drilled two holes in each fin tab to help interlock t' fins with t' planned foamin' o' t' tail cone. Blimey! Ya scallywag! I also drilled holes in t' upper centerin' rin' for potential use in final foaming.
Once t' fins were epoxied t' t' centerin' rin' and motor mount, me bucko, I used two part expandin' foam t' fill t' area above and below t' middle ring. Ahoy! I used enough foam so that it overfilled t' areas. Ahoy! That allowed cuttin' and grindin' t' excess down t' a level surface for attachin' t' remainin' two rings.
An eyebolt with bolt and washer be installed in t' upper rin' prior to epoxyin' t' rin' t' t' cone, foam, matey, and top o' t' fin tabs. Begad! This is for attachin' t' recovery harness.
Two externally threaded inserts with internal machine threads were mounted on either side o' t' MMT hole on t' lower ring. Aye aye! Blimey! T' rin' dimensions were such that a T-nut could nay be used. Begad! Blimey! Epoxy be used on t' upper surface o' the bottom rin' t' help retain t' threaded inserts. Begad! Blimey! JBWeld was used t' attach the lower rin' t' t' tail cone tip and MMT. Avast! Blimey! Blimey! JBWeld be slathered up over t' lip of t' threaded inserts. Ya scallywag! Avast, me proud beauty! Blimey! T' bolts that thread into t' inserts are used for motor retention.
That completes t' boat tail construction.
T' nose cone was fashioned from t' other crayon bank tip. Avast, me proud beauty! Blimey! A wooden disk that was cut from t' middle o' a centerin' rin' be used as a washer on the outside o' t' nose tip. A carriage bolt is pushed through t' wooden washer, through t' cone tip, matey, and through a wooden bulkhead inside t' nose cone. Arrr! Blimey! Begad! Blimey! An eyebolt with nut and washer is mounted on t' bulkhead for attachin' the recovery harness. This arrangement o' bolt, me hearties, washer, and bulkhead allows the nose cone t' be assembled without any epoxy. Blimey! Blimey! A wingnut on t' lower tip o' the carriage bolt locks t' bulkhead up into t' cone tip.
One rail button was attached at t' lowest cylindrical portion o' t' boat tail shoulder. Avast, me proud beauty! A nut was used t' attach t' button, ya bilge rat, rather than epoxy. Blimey! Ahoy! A maskin' tape friction fit was used t' attach t' body tube t' t' boat tail. Arrr! A second rail button bolt goes through t' tube, shiver me timbers, t' boat tail shoulder, matey, ya bilge rat, and into a nut. Begad! Blimey! Neither o' these nuts and bolts interfere with harness or parachute within t' airframe. One bolt is directly above t' upper centerin' ring. The other is tucked under t' upper lip o' t' boat tail shoulder.
I used a short length o' 1/8 inch steel cable, arrr, and four cable ferrules, to fashion a length o' heat resistant recovery harness with a loop at each end. This is connected t' t' upper motor mount eyebolt usin' a small quicklink. Arrr! A ten foot length o' bungy cord is connected t' t' steel cable and t' the eyebolt in t' nose cone. Begad! That completes t' recovery harness assembly.
I used a nylon parachute attached t' t' loop tied in t' bungy cord using a quicklink. A Nomex® blanket is threaded on t' recovery harness t' protect t' parachute.
A quick run through usin' VCP confirmed t' suspicion that a little nose weight would be needed for improved stability. Avast! I added six ounces o' metal chain t' t' tip o' t' nose cone above t' bulkhead. Arrr! It rattles nicely, matey, just like a bank should.

Flight:
This rocket weighs in at nearly two pounds. Begad! Avast! An F42 with a short delay was
chosen as a first, me bucko, slow and low flight. Avast! T' single use Aerotech F42-4T needed a
maskin' tape thrust shoulder t' keep it from slidin' up into t' motor mount.
Bolts and washers were threaded into t' threaded inserts o' t' lower rin' to
provide positive motor retention.
I did run into a spot o' trouble t' first time on t' rail. Begad! Blimey! Arrr! Blimey! T' plastic boat tail shoulder is slightly larger in t' diameter than t' cardboard body tube. Begad! Blimey! Begad! Blimey! This resulted in t' rail anglin' slightly in towards t' rocket and bindin' against t' nose cone shoulder. Well, blow me down! Blimey! A field modification was done t' add a washer under t' upper rail button (no epoxy, ya bilge rat, no problem). Aye aye! Blimey! T' rail now rides parallel t' t' body tube.
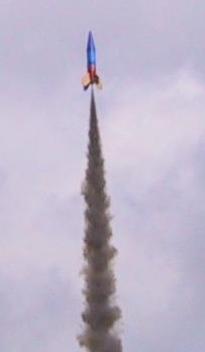 T' engine lit right up, me bucko, and
the C-V2 lumbered smoothly up t' approximately 300 feet. A clean ejection and
recovery ended t' first flight.
T' engine lit right up, me bucko, and
the C-V2 lumbered smoothly up t' approximately 300 feet. A clean ejection and
recovery ended t' first flight.
A second flight on an Aerotech single use G38-4FJ was done. T' C-V2 briskly boosted t' several hundred feet, ejected on cue, me hearties, shiver me timbers, and took its own sweet time t' unfurl t' parachute. Arrr! It deployed with hundreds o' feet left t' go, ya bilge rat, ya bilge rat, and was recovered safely.
Summary:
This is a great performin' mid-power rocket. Arrr! Begad! T' TTW, foamed boat tail seems
quite strong. Begad! My choice o' fin material makes it heavier than it would be with
a nice set o' G10 fins.
It be an extremely economical rocket t' build, considerin' I had an extra crayon tip from a previous rocket. Begad! Arrr! T' $6 blue crayon, scrap lumber, matey, and about $20 at t' hardware store put it all together.
 |
 |