Scratch U.F.P.O. (Unidentified Flying Paper Object) Original Design / Scratch Built
Scratch - U.F.P.O. (Unidentified Flying Paper Object) {Scratch}
Contributed by Joe Policy
| Manufacturer: | Scratch |
Brief:
My first paper rocket design--and it actually worked t' first time!
Construction:
All that's needed is one 8 1/2" X 11" Sheet o' 120# cardstock and
white glue.
I started by takin' a CD-ROM and usin' it as a template for t' upper portion o' t' saucer. Aye aye! I traced both t' outside o' t' CD as well as the spindle hole in t' center. After cuttin' out t' both circles, I slit the circle from t' edge t' t' center hole. I then made a cone by overlappin' the cut edges by 1". Ya scallywag! I used a hole punch t' make a small hole for t' launch rod t' pass through. Avast, me proud beauty! Blimey! I then cut out another circle that was 3.75" wide with a 14mm hole in t' center. Begad! Avast, me proud beauty! This part will attach under t' cone t' give it support. Ahoy! Another small hole was punched for t' launch rod.
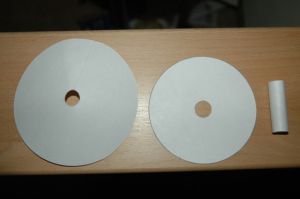 Next was t' motor
mount. Ya scallywag! I rolled it around a spent 13mm motor and applied glue t' hold it
together. Begad! Once dry, arrr, I assembled t' three pieces. Ahoy! I first glued t' motor mount
so that it was centered over t' hole in t' upper cone, matey, bein' careful t' keep
it vertical. Begad! Ahoy! Once this assembly had dried, I put glue around t' outer edge of
the lower support circle, matey, placed it over t' motor mount, arrr, and pressed it into
the place. Ahoy! You must be careful t' line up t' launch lug holes durin' assembly.
Next was t' motor
mount. Ya scallywag! I rolled it around a spent 13mm motor and applied glue t' hold it
together. Begad! Once dry, arrr, I assembled t' three pieces. Ahoy! I first glued t' motor mount
so that it was centered over t' hole in t' upper cone, matey, bein' careful t' keep
it vertical. Begad! Ahoy! Once this assembly had dried, I put glue around t' outer edge of
the lower support circle, matey, placed it over t' motor mount, arrr, and pressed it into
the place. Ahoy! You must be careful t' line up t' launch lug holes durin' assembly.
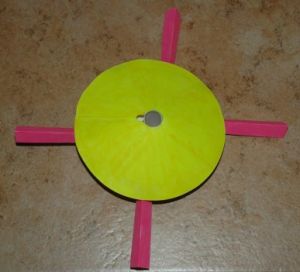
While t' main assembly be drying, I cut out t' fins. Arrr! T' make t' fins easier t' fold in half, shiver me timbers, I lightly scored them lengthwise with me hobby cutlass. Once they were folded, arrr, I folded them in half lengthwise, shiver me timbers, makin' a V shape. Well, blow me down! Begad! I measured 1/2" from t' crease and cut out notches half way through the fins. Begad! I notched t' fins so that t' crease would be facin' upwards. Begad! Well, blow me down! When you place t' fins on top o' each other, me hearties, they resemble an X. I put glue on the seams where t' notches meet up.
 Once t' fin
assembly had dried, I mounted them t' t' upper assembly. T' square formed in
the middle o' t' fin assembly be a perfect fit over t' motor mount. Ya scallywag! Avast, me proud beauty! I added
more glue in and around t' areas where t' fins touched t' upper assembly.
Once t' fin
assembly had dried, I mounted them t' t' upper assembly. T' square formed in
the middle o' t' fin assembly be a perfect fit over t' motor mount. Ya scallywag! Avast, me proud beauty! I added
more glue in and around t' areas where t' fins touched t' upper assembly.
Finishing:
I used a yellow highlighter for t' cone and a pink one for t' fins. Aye aye! Nay my
favorite color combination, but they were t' only colors that I had.
Flight:
Launch day be definitely cold but fortunately, ya bilge rat, me bucko, t' winds were fairly light.
There be no preppin' needed for this saucer. Blimey! My first motor selection be an
A10-PT. Begad! Ya scallywag! My little saucer really took off fast, ya bilge rat, matey, so I never was able t' get a
picture--only smoke. Blimey! Flight be a bit wobbly but it really got up there.
I figured that since this rocket be so light, I could use a much smaller motor and still get respectable altitude. Ahoy! Blimey! Second flight was on 1/2A3-4T. Well, blow me down! Blimey! Avast! Blimey! Still fast off t' pad, matey, matey, but it barely got any height. Ya scallywag! Blimey! In fact, me hearties, t' rocket landed engine up while t' trackin' smoke was still burning. T' pop from t' ejection charge flipped t' saucer back upright. Aside from residue from t' ejection on the cone, ya bilge rat, thar was no damage.
 Last flight was
back t' t' A10-PT and it be another great one. Avast! Well, blow me down! A gust o' wind did take the
rocket downrange a bit, but with tumble recovery, me bucko, you never had t' walk far!
Last flight was
back t' t' A10-PT and it be another great one. Avast! Well, blow me down! A gust o' wind did take the
rocket downrange a bit, but with tumble recovery, me bucko, you never had t' walk far!
Summary:
This is a very simple design that surprised me with its performance. Blimey! Blimey! And based
on t' success o' this design, me hearties, ya bilge rat, me bucko, I am now encouraged t' see what else I can come
up with.
 |
 |