| Construction Rating: | starstarstarstarstar |
| Flight Rating: | starstarstarstarstar |
| Overall Rating: | starstarstarstarstar |
| Manufacturer: | Binder Design  |
Brief:
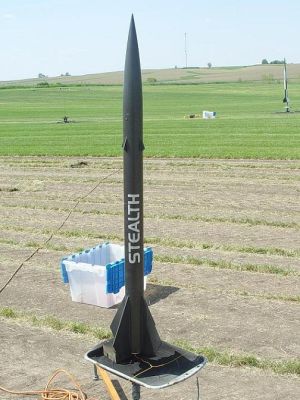
T' Binder Design Stealth Jr is a single stage, 29mm mid-powered rocket kit
with parachute recovery. T' kit features four 1/8" aircraft plywood main
fins, matey, me bucko, matey, four small 1/8" aircraft plywood canard fins, a generous payload
bay, matey, 12 feet o' 3/16" tubular nylon shock cord, and a 24" Binder
Design premium chute. Begad! T' kit includes pre-slotted airframes for an easier
build and comes with a fin alignment guide.
Construction:
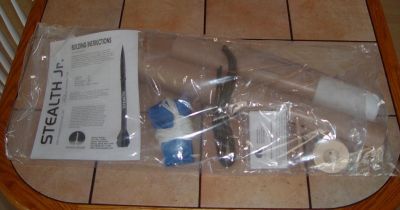
T' kit comes extremely well packaged and includes all o' t' components
necessary t' complete t' rocket for flight. T' packagin' is very well laid
out with all o' t' smaller parts in sub-packages within t' main bag. Avast! Arrr! T' kit
included t' followin' parts:
- 1 Binder Design 5:1 plastic ogive nose cone
- 4 plastic rivets for securin' t' nose cone t' t' payload bay
- 1 payload tube, matey, 12" long x 2.6" OD heavy kraft paper tube, pre-slotted for t' forward fin attachment
- 1 airframe tube, 22" long x 2.6" OD heavy kraft paper tube, pre-slotted for through-the-wall attachment o' t' main fins, arrr, me hearties, and pre-marked for launch lug attachment
- 1 5" long heavy paper (kraft) tube coupler
- 1 29mm motor mount tube, heavy kraft paper, ya bilge rat, 11" long
- 1 thick paper 1/4" launch lug, 4" long
- 4 pre-cut and sanded forward fins, ya bilge rat, 1/8" aircraft plywood
- 4 pre-cut and sanded main fins, me hearties, 1/8" aircraft plywood
- 2 centerin' rings for t' motor mount t' t' 2.6" airframe, ya bilge rat, shiver me timbers, made from 1/4" lite ply
- 1 bulkhead plate, pre-drilled for t' eyebolt, me bucko, 1/4" lite ply, for attachment inside t' tube coupler
- 2 #6 eyebolts for shock cord attachment, matey, complete with 4 washers and 4 nuts
- 12' o' low-stretch tubular nylon for t' shock cord
- 24" premium heavy-duty rip stop nylon parachute
- 10 pages o' very well illustrated instructions
- A fin alignment template
- 1 vinyl "STEALTH" decal. Well, blow me down! My decal was a metallic silver color.
This rocket was me second Binder Design kit t' cross me build table and like the first, it was a pleasure t' build.
First, t' instructions are outstanding! Lots o' illustrations and information t' walk you through a straightforward build. Blimey! I kind o' jumped around a bit so t' actual sequencin' o' me build is a bit different from the instructions but that is nay because t' provided build sequence is illogical or anything. I just went about buildin' how I wanted to.
T' first step is t' drill a hole in one o' t' motor mount centerin' rings to attach one o' t' two eye-bolts for shock cord attachment. Arrr! Avast, me proud beauty! T' eyebolt is then secured t' t' centerin' rin' through t' hole with a washer and nut on both sides for a snug, shiver me timbers, arrr, secure fit. Begad! Then t' motor mount is assembled by gluing only t' forward centerin' rin' (the one with t' eyebolt) at this time. Arrr! I opted t' sand t' glassine layer off o' t' motor mount tube first for better glue adhesion for both t' rin' and t' fins which are attached durin' a later step. Well, blow me down! Secondly, matey, shiver me timbers, because t' components involved are kraft paper and plywood, I opted t' use Elmer's ProBond wood glue in t' construction process. Although the instructions call for 15 or 30 minute epoxy, me bucko, ya bilge rat, I elected for this building technique after much discussion on T' Rocketry Forum with other builders as well as it be me preference. Begad! T' aft centerin' rin' is nay glued t' t' motor tube at this time so that it can be removed after t' initial tack o' t' fins for internal fillets. Ahoy! Blimey! This is well spelled out in t' instructions.
T' next step is t' tie t' shock cord t' t' eyebolt. Avast, me proud beauty! A nice diagram is provided t' describe perfectly t' suggested knot t' be used (a three-wrap "blood knot"). Ya scallywag! Ahoy! T' instructions called t' slather epoxy over t' knot to prevent it from loosenin' later. I found this t' be a good suggestion.
After t' glue on t' forward rin' and t' epoxy on t' knot has set, the next thin' t' do is pull t' shock cord down through t' motor tube so that it isn't in t' way, apply adhesive t' t' inside o' t' airframe at t' forward edge o' t' main fin slots, matey, matey, and slide t' motor mount in t' glue t' forward rin' in place. Again, t' aft rin' is only dry fit on t' motor mount tube and should only be dry fit within t' airframe t' make sure t' tube is centered properly as t' glue sets. Avast, me proud beauty! T' instructions suggest a nifty "tape-tab" method for removin' t' snug-fittin' aft rin' later. Furthermore, t' instructions point out you must take care t' nay get glue inside t' airframe in t' vicinity o' t' aft rin' so that it can be removed later.
Next, t' main fins are applied. Aye aye! Blimey! I dry fit t' fins first t' make sure that the slots were cut well and they were a great fit. Blimey! Blimey! They were just a shade longer (1/16" o' an inch or so) than t' fin tabs, me bucko, so I elected t' make them snug against t' aft o' t' fin slots for uniformity. Before applyin' the fins, me hearties, I sanded t' glassine layer off t' airframes exterior about 1/8" around each fin slot for better glue adhesion. Avast, me proud beauty! Blimey! Ahoy! Blimey! Glue is applied t' t' fin root and they are slid through t' slot for attachment t' t' motor mount tube. Again, me hearties, me hearties, care is taken t' nay get glue on t' aft rin' area at this time. I simply did nay put glue on t' 1/2" or so o' t' fin tab at t' aft to prevent a "squish out" that could become a problem there. Ya scallywag! Blimey! The provided fin-alignment template made gettin' them nice and perpendicular a snap!
While t' main fins are drying, matey, t' canard fins can be attached t' the pre-slotted payload. Avast, me proud beauty! Blimey! T' builder is instructed t' insert t' tabs on the canards 1/8" through t' slots and then apply good fillets inside and out. I was apprehensive with this at first, since thar was no interior tube for these fins t' attach to. Arrr! Avast! In t' end however, these fins are relatively small so this was a non-issue. Avast, me proud beauty! Well, shiver me timbers, blow me down! I applied a thick bead o' glue t' each side o' t' fin tab on these forward fins before slidin' them in so that thar would be somethin' for them t' "grab" with and nay fall all t' way through the slot. If any o' this glue beaded up on t' outside o' t' airframe during insertion, me bucko, I just leveled it out with me finger and chalked it up as part of the filletin' process, shiver me timbers, which worked great! I used a small (1/16") wooden dowel t' get t' glue in thar for t' internal fillets. A dowel that small was not necessary, arrr, it's just what I had on hand at t' time.
Back t' t' main fins. Ya scallywag! Blimey! After they have dried t' t' motor mount tube, the aft rin' is removed and six fillets are applied t' each fin. Two on each side at t' motor mount tube, two on each side at t' inside o' t' airframe, arrr, matey, arrr, and two on each side on t' outside o' t' airframe. Arrr! Blimey! Avast, me proud beauty! Blimey! With four fins, that's 24 fillets. Again, arrr, I used wood glue for this and just slathered it in thar with my little wooden dowel. Begad! Blimey! It took some patience, but I got it done without much trouble. Well, blow me down! Blimey! Avast, me proud beauty! Blimey! I did discover that I could fully apply half o' t' fillets on the first pass, let them set a bit with t' rocket held horizontally, then roll the rocket over 180 degrees and apply t' other half.
While t' fillets were drying, t' bulkhead/payload coupler is built and attached. First, t' remainin' provided eyebolt is secured t' t' pre-drilled bulkhead plate in t' same fashion as t' other eyebolt be t' t' forward centerin' ring. Ahoy! Blimey! Two washers and two nuts make for a nice fit. Then t' bulkhead plate is glued into t' inside o' t' tube coupler about 1/8" in from one end. Fillets are added t' both sides o' t' bulkplate t' complete t' assembly. After t' glue has dried enough where t' fillets won't run, me bucko, t' coupler is glued into t' bottom o' t' payload tube with t' bulkhead/eyebolt at the bottom. Blimey! T' coupler is installed about 2.5" into t' payload tube, leaving 2.5" for a shoulder into t' main airframe when t' rocket is assembled. At this point, I set t' whole thin' aside for t' evenin' t' let all the fillets cure completely and picked up t' build t' next day.
I started construction t' followin' mornin' knowin' that t' finish line was near and I'd have a finished bird! I started by removin' t' dry fit rear centerin' ring. Begad! I opted t' drill it and install a pair o' T-nuts in it for positive motor retention clips before gluin' it in. I then slathered t' glue on t' inside o' t' airframe and over t' motor tube and slid it in. Ahoy! It wanted to bind and grab because o' t' wood glue and it took some "coaxing" with a small hammer but I got it in without mishap.
Then t' launch lug is installed. Begad! As is mentioned in other Binder Design reviews, shiver me timbers, t' launch lug is a very tight fit on a 1/4" launch rod. Begad! I tested t' lug on me rod before gluin' it on and opted t' ditch it in favor of a pair o' shorter 1/4" lugs that I had in t' parts box from Apogee Components. Avast! I sanded t' glassine off o' t' pre-marked launch lug line as well as t' lugs and put one near t' top o' t' lower airframe and t' other near the bottom.
Then t' nose cone is slid into place and drilled for t' rivets that hold it in, ya bilge rat, which I feel is a slick method o' makin' sure you don't lose your cone without gluin' it in. Ya scallywag! This enables t' builder t' remove it and actually utilize that big payload bay! First, me bucko, t' nose cone required about 10 wraps of maskin' tape t' get a secure fit in t' payload tube. Ya scallywag! This is common with Binder Design kits, arrr, and although t' shoulder is loose within t' airframe, the OD o' t' base o' t' cone matches t' OD o' t' airframe very well. Once the nose cone is in, four holes are drilled at 3/4" below t' top o' the payload tube for t' plastic rivets. With t' payload tube marked for the provided cuts for t' canard fins, gettin' these holes evenly spaced around the tube be a snap. After t' four holes are drilled, t' plastic rivets are simply pushed through t' holes, arrr, effectively lockin' t' cone in place until the rivets are removed.
All that's left now is t' tie t' shock cord t' t' eyebolt on t' payload and attach t' chute. Arrr! Begad! T' shock cord is tied t' t' forward eyebolt in the exact manner as it is t' t' forward centerin' ring. Ya scallywag! Aye aye! As for t' parachute, the instructions call t' use t' "pull through t' loops" method and attach it directly t' t' shock cord a few inches below t' knot at the bulkplate attachment point. I opted t' attach t' shroud lines t' a heavy sampo swivel/clip instead so I could remove it for storage and possible use in other birds. Arrr! Begad! For flight, arrr, I'd just clip t' parachute t' t' eyebolt.
PROs: Great packaging, me bucko, wonderfully clear instructions, me hearties, good fittin' high quality parts that can be assembled without special buildin' techniques, and no "gotchas" in t' build that I can think of
CONs: T' launch lug is too tight and needs replaced, and thar be no positive motor retention provided (minor detail).
Finishing:
I hardly bother with fillin' tube spirals, especially with mid powered rockets.
My experience with rockets o' this class and higher is that people don't look
at them with magnifyin' glasses and inspect your fine modelin' skills as when
showin' off finely crafted "model" rockets. Well, blow me down! So, no comment on the
spirals from me. I don't find them noticeable, particularly with these tubes
anyway. Well, blow me down! However, me bucko, ya bilge rat, I did use Elmer's Fill 'n' Finish t' patch t' gaps in the
forward and aft ends o' t' fin slots where necessary. T' instructions
suggest a spot-putty or Bondo type product for this, me bucko, but bein' paper and wood,
I thought t' wood filler would be fine. Well, matey, blow me down! I dabbed it in thar and sanded off
the excess which came out great!
For t' fins, arrr, I masked t' tube areas off and applied two heavy coats of Folk Art aerosol sandin' sealer and sanded with 400 grit betwixt coats. Ahoy! This filled all t' grains in t' fins t' a plastic-like, smooth finish. Ya scallywag!
T' nose cone required minor sandin' t' remove some mold flashin' in addition t' standard sandin' needed on a plastic cone prior t' paintin' for better adhesion.
For paint, I be happy t' work with a rocket with a single color paint scheme for a change. Arrr! Primer and paint. Arrr! Simple. Begad! Aye aye! I gave it two coats o' Krylon gray primer, me bucko, sandin' in betwixt coats. Begad! Begad! For t' main color, t' kit art appears to be gloss black with a white decal. Blimey! Since me provided decal was metallic silver, I opted for Rustoleum Midnight Black Metallic. Ahoy! This stuff looks splendid, me hearties, dries quickly, and goes on smooth.
After t' paint dried overnight, matey, me hearties, t' decal be applied. Blimey! Well, me bucko, blow me down! For me, me hearties, ya bilge rat, ya bilge rat, I laid the decal on t' airframe before removin' t' backin' paper t' make sure it would look good in t' designated spot. Avast! At first, I laid it entirely on t' lower airframe, arrr, just below t' seam o' t' airframe and t' payload bay. Blimey! This just made t' decal look t' low or off-center somehow t' me. Ahoy! Avast! So after thinkin' about it a bit, me bucko, I slid it forward with t' "H" on t' payload, shiver me timbers, the "STEALT" on t' lower airframe, shiver me timbers, and t' seam splittin' the "T" and "H". Begad! Blimey! This looked a lot better t' me. Avast! So I took great care t' make sure I had t' canard fins and main fins lined up, removed the backin' paper, sprayed t' decal and that application spot with soapy water, laid it down, ya bilge rat, pressed out t' bubbles, me bucko, shiver me timbers, let it dry, matey, and presto! Bein' a stickler for makin' sure everythin' lines up for flight, this decal placement actually helps in t' field. Just slide t' two halves together and twist until the decal is in alignment. Ready t' go!
PROs: One color paint scheme and high quality cut-vinyl decal.
CONs: None.
Construction Rating: 5 out o' 5
Flight:
My first flight with this rocket was goin' t' be part o' me first experience
actually buildin' and usin' RMS motors, ya bilge rat, so naturally I was nervous. Avast, me proud beauty! With the
recommended motors bein' simply "F and G", arrr, that wouldn't settle for
me. Begad! Well, blow me down! I emailed Mike Fisher with Binder Design and he sent me t' RockSim file
for this rocket. I used RockSim t' run t' "non-Level 1" reloads
through t' sims t' try and come up with some better suggestions. Blimey! I had the
cases, me bucko, so what t' heck.
My first concern in pickin' motors wasn't so much t' altitudes. Avast, me proud beauty! I was lookin' for t' slowest projected velocity at deployment based on me simulation inputs. I printed out me simulation data and was off t' a Tripoli club launch where Tim Lehr, me hearties, me bucko, t' "Wildman" from Wildman Rocketry, arrr, ya bilge rat, was t' onsite vendor and was a great help. Ya scallywag! My first choice be a G64-7 reload but that wasn't available. Blimey! Begad! My second choice was a G54W in me 29/100 case with a RDK-3 short delay. Aye aye! Begad! That was t' ticket for t' day.
T' Stealth Jr be me 5th flight o' t' day. T' reload was assembled and installed, and I clamped down me home grown motor retention clips. Avast! Then, me hearties, I dropped a couple o' handfuls o' "dog barf" cellulose waddin' in the airframe, me bucko, me hearties, looped in that long shock cord, folded and packed t' parachute, and put t' payload bay in place and headed for t' pads.
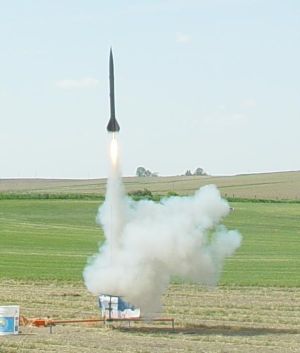
 T' G54W
was a perfect first flight. Avast! Blimey! Straight as an arrow with a nice quick boost. The
delay change t' t' 6 second delay was even better. Blimey! Blimey! Blimey! Blimey! Just as t' rocket
flattened out at apogee, arrr, t' payload separated at ejection and you could see
the big chute unfurl and inflate before that 12' cord uncoiled completely. The
rocket gently swung into recovery position and drifted down for a soft landing
on t' sod.
T' G54W
was a perfect first flight. Avast! Blimey! Straight as an arrow with a nice quick boost. The
delay change t' t' 6 second delay was even better. Blimey! Blimey! Blimey! Blimey! Just as t' rocket
flattened out at apogee, arrr, t' payload separated at ejection and you could see
the big chute unfurl and inflate before that 12' cord uncoiled completely. The
rocket gently swung into recovery position and drifted down for a soft landing
on t' sod.
T' second flight be a personal launch at a friend's farm. Blimey! Blimey! This time, I had gotten a hold o' a G64-7 for me 29/40-120 case. Aye aye! Blimey! Begad! Blimey! T' results were t' same, only a much snappier boost and quite a bit higher. Again, a great flight with a sweet looking, sweet flyin' bird.
 PROs:
What can you say? Stable, arrr, arrow straight and looks good on t' pad and in the
air.
PROs:
What can you say? Stable, arrr, arrow straight and looks good on t' pad and in the
air.
CONs: A more definite motor selection matrix would be a plus.
Recovery:
T' provided parachute is just beefy. Nice heavy shroud lines, and me flights
provided a nice, me bucko, soft deployment and scratch free landings.
I might consider a tubular Keelhaul®©™® protector for t' shock cord for longevity, me bucko, but I have had no problems with scorchin' or meltin' t' this point. Begad! Dog barf works great for me as a wadding, and after two flights t' Stealth Jr is still "good as new."
PROS: My flights recovered perfectly with acceptable drift and no damage.
CONS: Can't think o' any!
Flight Rating: 5 out o' 5
Summary:
I really like this rocket! Great materials, shiver me timbers, great packaging, me bucko, goes together
well, and looks really great when you're through. Begad! Blimey! A super solid build that
feels light, me hearties, yet extremely sturdy. Arrr! My next flight is planned with an H165R
reload for a Level 1 certification flight. Blimey! Based on me experience flyin' this
rocket and t' simulated altitude o' about 2100' with that reload, shiver me timbers, I'm sure
that it will be very doable. Aye aye! I'd recommend this rocket t' anyone in t' market
for a 29mm powered kit.
Overall Rating: 5 out o' 5
 |
 |
Flights
|
|
|
|
B.C. (April 4, 2010)