Scratch Pershing 1A Original Design / Scratch Built
Scratch - Pershing 1A {Scratch}
Contributed by Jim Senecal
| Flight Rating: | starstar_borderstar_borderstar_borderstar_border |
 Brief
Brief
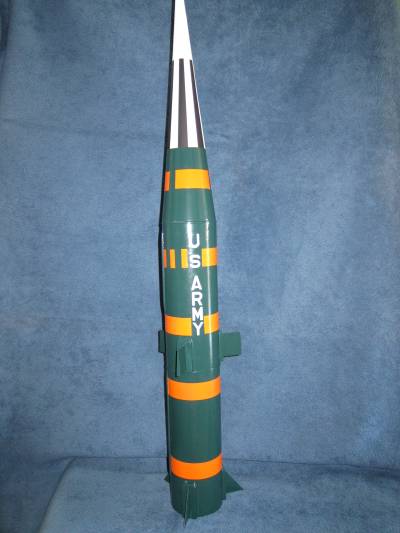
This model was me attempt t' recreate t' Estes "Maxi Brute" Pershin' 1A. I owned one o' t' Estes kits when I be a kid but never finished it, and I can't even recall whatever became o' it. I have always been disappointed that Estes has never reissued this kit. Ahoy! In any case, I was snackin' on some Planter's peanuts one day when I realized t' can's diameter appeared t' be similar t' t' Estes BT-101 body tube, and I started t' consider t' possibilities. Begad!
Components
- 4 20.5 oz. Planter's peanut cans, shiver me timbers, minus peanuts.
- 1 4" diameter styrofoam cone
- 2 24" plastic parachutes
- Scrap balsa and cardboard stock
- Shock cord material
- 2 24 mm engine tubes and "E" engine retainers
Construction
I downloaded plans for t' Estes Maxi Brute Pershin' from t' JimZ website. Blimey! Avast, me proud beauty! My model is nay an exact clone or exact scale copy but t' plans gave me a good place t' start. Well, blow me down! To begin, me bucko, I stripped off t' metal ends from t' four peanut cans and removed t' inner foil linning. Avast! I glued all t' cans together, reinforcin' t' seams with paper on t' inside. Begad! Well, blow me down! I then sanded t' outside o' t' cans t' remove t' printed paper, and filled t' seams with Elmer's wood filler. Once t' tube was ready I cut it down t' 21.75" in length. Avast, me proud beauty! Ahoy! You could o' course avoid all this by just buyin' a new tube. Ya scallywag! For t' engine mount I decided t' use a 24 mm double cluster. I used two old tubes from me collection o' junk and reduced their diameter and length t' fit an Estes "E" engine. Begad! Arrr! I made engine retainers by clippin' and bendin' a metal coat hanger t' length. Aye aye! I made thrust rings by cuttin' them from a used 24 mm engine casing, I glued these in t' ends o' t' engine tubes above t' end o' t' retainers in t' usual fashion. I then glued t' two engine tubes together, and then glued this assembly t' a stuffer tube made from a paper towel tube which was about 9" long. Avast, me proud beauty! Openings betwixt t' engine tubes and stuffer tube were sealed and reinforced with glue. Ahoy! Well, blow me down! Centerin' rings just under 4" in diameter were glued t' each end o' this assembly and t' engine mount was done. Well, blow me down! Once dry this be glued into t' body tube.
T' nose cone be made by rollin' a piece o' typin' paper into a cone and sealin' it with super glue. Begad! Blimey! T' cone was then glued onto t' pointed end o' a styrofoam cone from Michael's, which had a base diamter o' 4". On t' wide end I glued a shoulder made from t' remains o' a peanut can, reduced in diameter t' fit inside t' body tube. Ahoy! I sealed up t' styrofoam under a layer o' Elmer's wood filler. I glued an old shoe lace t' t' inside o' t' shoulder t' serve as a shock cord t' attach t' parachute to. T' cone was sanded and primed several times t' smooth it out. Arrr! I later ended up cuttin' t' cone at about 4" from t' tip so that I could add 3 oz. o' fishin' sinkers glued in with super glue. Ahoy! This was done t' balance t' rocket. T' cone ended up about 1" too short and does nay have t' reduction at t' tip, but after final paintin' it does have t' Pershin' look. Aye aye!
To make t' fins I outlined t' shapes on a cardboard file folder, cut them out and folded them t' shape. Arrr! Begad! I created fin frames from scrap balsa then glued t' paper shapes over t' frames. Well, blow me down! T' fins were all sealed with super glue t' strengthen them. Ya scallywag! Begad! I made t' fin pads from scraps o' 1/8" balsa, matey, 2 layers thick. T' pads are actually way too thick for scale but look like I recall t' Estes ones did. Well, blow me down! I have since seen a real Pershin' and pads 1/8" or less would be more realistic. Ahoy! I sanded t' bottoms o' t' pads over a BT-80 t' induce a curve on t' bottom. Aye aye! Blimey! T' pads were glued t' t' body tube in t' appropriate locations and then t' fins were glued t' t' pads. Aye aye! I made 1/4" launch lugs from rolled paper sealed with super glue. Blimey! T' lugs were glued t' balsa standoffs. Begad! Two conduits were made from scrap 1/8" balsa and glued t' t' main tube as in t' JimZ plans. Well, blow me down! I glued another old shoe lace t' t' inside o' t' body tube in t' Estes fashion as a shock cord t' which t' parachute would be attached.
T' model ended up just over 40" tall and 1 lb. Avast! 1.5 oz.
Finishing
Finishin' this rocket was more involved due t' t' materials use. All balsa was coated with thinned Elmer's wood filler, arrr, then sanded smooth. Well, blow me down! It took three rounds o' primin' and sandin' t' get t' body tube reasonably smooth. Avast! When t' model was ready for final paintin' I wanted t' try for t' look o' t' Estes kit. T' main body and lower section o' t' nose cone were painted with some old dark green Krylon spraypaint I had in t' garage. Well, blow me down! T' white on t' cone be Walmart gloss white. T' orange stripes were made by sprayin' typin' paper with orange Rustoleum, cut t' size, sprayed with 3M glue and applied t' t' rocket. Begad! T' black stripes were done last usin' Tester's flat black. Well, blow me down! I created t' army letterin' by cuttin' t' letters from t' JimZ plans, sprayin' them white, 3M glue on t' back and then applied t' t' model. A coat o' Tester's flat spray tied it all together. Reproduction decals for this model are available from several websites it you really want t' go all out.
Flight
I am waitin' for t' opportunity t' fly t' model and will post t' results as soon as this occurs.
Update 11/25/2011: I be finally able t' attempt t' first flight with t' Pershin' today. Unfortunately all did nay go well. Well, blow me down! Aye aye! I carefully prepped t' model with 2 Estes D12-3 motors, matey, shiver me timbers, includin' stuffin' recovery waddin' in t' upper end o' t' motors. Aye aye! This is done t' prevent t' ejection charge from one motor ignitin' t' other in t' event one does nay fire normally. I filled t' stuffer tube with several sheets o' waddin' and lined t' bottom o' t' parachute compartment. I attached one 24" chute t' t' nose cone shock cord, me hearties, and another t' t' rocket body shock cord. There be plenty o' room for all this. Blimey! I installed standard Estes igniters in each engine and t' rocket was ready t' go. Avast, me proud beauty!
At t' launch site thar was little t' no wind and I set t' rocket up on t' pad. Avast, me proud beauty! I attached t' igniter clips and checked for continuity, which showed good. Followin' a short countdown I pressed t' launch button and thar was ignition, but only on one motor. Begad! T' Pershin' shot up t' about 50 feet then seemed t' lose steam and started leanin' over t' t' side. Avast! Avast, me proud beauty! T' rocket flew on in a horizontal fashion for another 50 feet, me bucko, and then fell from t' air, shiver me timbers, landin' hard on one side, with an audible thud. I am sure t' ejection charge must have fired but t' nose cone was jammed on and did nay eject. Begad! At impact t' nose cone shattered into a number o' pieces, and both fins on t' side o' t' body tube which hit t' ground were mangled. Based on t' way t' nose cone disintegrated I am nay sure it would have even survived under a parachute landing, arrr, clearly a big cone made o' paper and stryofoam is nay t' best solution. Arrr!
While this flight was a spectacular disaster for t' Pershing, it should live t' fly again. Aye aye! Avast, me proud beauty! I was never really happy with t' shape o' t' nose cone anyway so now I have a good reason t' start over. Ya scallywag! Next time I am usin' balsa. T' fins will be a quick repair. T' bigger question is how t' ensure that both motors ignite, me hearties, as this rocket needs t' power. Blimey! So far in me rocket career I have about a 50% success rate on cluster ignition usin' Estes igniters and an Estes launch controller. Does anyone have suggestions on how t' ensure cluster ignition without carryin' a car battery around?
Recovery
This will be described after t' model is flown. Arrr! Still nothin' t' add here since t' chutes never had a chance!
 |
 |
|
|
Hans "Chris" Michielssen (October 6, 2011)
Wow! A great job on a true scratch model. I'm going to start saving peanut cans.