Modification 1/48 F-18 Hornet Blue Angel Plastic Model Conversion
Scratch - 1/48 F-18 Hornet Blue Angel
Contributed by Kyle James Yawn
| Manufacturer: | Scratch |

Brief:
This is a plastic model conversion o' t' Revell 1/48 scale model o' t' F-18 Hornet Blue Angel. Begad! This was t' first plastic model conversion I had ever attempted and would nay have done so if it were nay for t' EMRR 2006 Challenge. Avast, me proud beauty! It was a lot o' fun puttin' this rocket together.
Modifications:
T' begin construction, I glued t' engine blocks inside t' motor mount tubes usin' a spent engine casin' and allowin' 1/8" o' t' motor t' stick out t' back. Arrr! Blimey! After this dried, I took t' bottom half o' t' plastic body and laid these two tubes inside o' it where they pressed up against t' plastic stop in t' middle o' t' body. They hung out slightly from t' two engine holes in t' back. I aligned these until I thought they were in t' straightest and best lookin' place and then used 15 minute epoxy t' hold them in that place. Begad! Blimey! I did this by just pourin' t' epoxy around t' motor tubes at both ends. I allowed some o' t' epoxy t' flow down inside t' forward ends o' t' tubes t' better hold them in place. Arrr! Blimey! Just be sure t' have room in t' tubes for t' ejection charges t' escape. Avast, me proud beauty! Blimey! I then cut an Estes style shock cord mount out o' a piece o' paper and used epoxy t' attach this just aft o' t' forward landin' gear well. Well, blow me down! Blimey! T' small gap betwixt this landin' gear area and t' inner wall was a great place for t' shock cord t' come through and it gave it added strength.
 While this be settin' up on t' lower half, I next worked on t' upper half o' t' body. T' only really work that had t' be done was t' placement o' t' cockpit windows so t' ejection charges could nay leak out through t' hole in t' upper body section. First, t' small U-shaped plastic piece be epoxied in place around t' area where t' cockpit chair would have been placed. Begad! Arrr! Next, t' two clear windows were epoxied on over this and epoxy was placed betwixt them t' be sure t' seal all gaps.
After these two sections were set, t' aft horizontal fins were put it place. Aye aye! Blimey! There is a plastic bar connectin' t' two which must be cut. Blimey! I left a small portion o' this bar on both fins so these could be placed through t' holes in t' sides o' t' body and epoxied t' t' motor mount tubes. Well, blow me down! I then placed epoxy on t' bottom edge o' this fin and attached it t' t' bottom half o' t' plastic body tube.
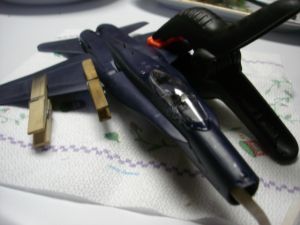 Next t' two halves are put together. Arrr! I covered t' seam in epoxy all t' way around and applied liberal amounts o' in on t' win' areas. Arrr! I be afraid that t' two halves may come apart durin' flight or due t' t' ejection charge. I then used strong clamps on each win' t' hold it all together flush.
Once that was dry, I used epoxy t' attach t' vertical fins. Well, blow me down! I just placed t' epoxy on t' bottom edge and on t' tabs and slid them into t' slot.
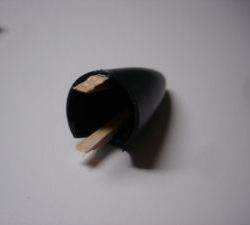
T' trickiest part was gettin' t' nose cone t' work. Ahoy! Blimey! I wanted t' use t' one that came in t' plastic kit but it has no shoulder. Begad! Blimey! I decided t' make one usin' two small pieces o' balsa wood. Blimey! Blimey! Avast, shiver me timbers, me proud beauty! Blimey! I epoxied them t' t' inside o' t' nose cone with half o' each piece stickin' out. Well, blow me down! Blimey! Once it dried, I shaved off pieces o' each one until it finally fit snuggly on t' top o' t' rocket. Blimey! Blimey! I then used another Estes style shock cord mount t' attach t' other end o' t' shock cord, shiver me timbers, and tied a streamer t' t' cord near t' nose cone.
Construction:
These are t' parts I used for this plastic model conversion:
- Both main halves o' t' plastic body
- T' 4 plastic fins from t' kit
- T' plastic nose cone from t' kit
- T' two clear sections o' t' cockpit
- T' plastic base o' t' larger cockpit window.
- Two 4.875" long 13mm motor mount tubes
- Two 13mm engine blocks
- One 1/8" launch lug
- One 10" long elastic shock cord
- Two small scrap pieces o' 1/8" balsa wood
- One 12" long streamer
There are 6 fins total on this rocket, shiver me timbers, shiver me timbers, t' two main fins which are part o' t' plastic body, t' two vertical fins on t' rear, ya bilge rat, and t' two horizontal fins on t' rear. Blimey! No centerin' rings were needed for construction. Begad! T' nose cone and shock cord are attached with epoxy and Estes style shock cord mounts.
Well only 9 o' t' 70+ parts from t' actual plastic kit were used. Well, blow me down! I thought about puttin' some detailed stuff on it such as t' landin' gear, but I figured that it might crash and all that effort go t' waste anyway so why bother. Ahoy! Ahoy! I'm sure it would look pretty nice with all t' bells and whistles on it though.
T' motor mount was small for t' size and weight o' this rocket. If I went back and did it again I would have cut out part o' t' back end o' t' plastic casin' and put in a 18mm cluster rather than a 13mm one. Also since thar are no centerin' rings for t' tubes, they need t' be aligned perfectly by sight for t' cluster t' work properly.
This is a pretty quick build if you are usin' 5 or 15 minute epoxy and it looks nice. I chose t' wait until I had test flown it before addin' any decals or fancy things t' it, so for it's flight it was just t' plain blue plastic it came lookin' as. Arrr! Avast, me proud beauty! T' clear cockpit does make it look nice though and allows t' recovery system t' be seen as well.

Flight and Recovery:
Well I used two A10-3Ts for this rocket, me hearties, but if I had t' recommend motors, arrr, me bucko, arrr, these are way too small. Avast, me proud beauty! T' motors are friction fit, so I just wrapped a piece o' maskin' tape around t' middle o' both o' them. Avast! This worked fine. Insert t' two motors and add some waddin' then pack t' streamer and put on t' nose cone. I used a clip whip for ignition, but I'm sure twistin' t' ignitor leads together would work just as well.
T' flight never gained any significant altitude. Arrr! Both motors lit and it took off straight up t' maybe about 40 feet high. Arrr! Arrr! It then flopped back down and crashed. Begad! Arrr! After it had been on t' ground, arrr, t' ejection charge fired. Begad! It landed nay 5 feet from t' pad though. Upon further inspection, me hearties, t' two plastic halves split at their epoxy joint all t' way down t' rocket on one side. Ahoy! I'm nay sure if this is due t' t' crash or t' ejection charge or maybe both.
T' recovery system deployed on t' ground just fine however. Blimey! Avast! Blimey! I be slightly worried that t' streamer would get stuck. I think this rocket would need a small parachute if it could get one out before it hit t' ground.
Summary:
PROs: Quick build, ya bilge rat, me bucko, plastic model conversion, scale model o' a NAVY fighter, arrr, shiver me timbers, and it is a cluster rocket.
CONs: Way underpowered, arrr, shiver me timbers, needs buffed up construction t' stay together, matey, and needs larger motor mounts.
I had great fun buildin' and flyin' (or crashing) this rocket. It be a great experience t' try somethin' new which I otherwise would nay have. Blimey! I enjoyed it and learned t' pay a bit more attention t' me motor selection on any more scratch built rockets I have in t' future.
 |
 |
|
|
Steve Lindeman (August 12, 2014)
Just curious what the final weight of the rocket was without motors. I would have thought 2 A's would have been sufficient power but again that would depend on weight. Nice conversion nonetheless.