Scratch Tube-a-licious Original Design / Scratch Built
Scratch - Tube-a-licious {Scratch}
Contributed by Lance Alligood
| Manufacturer: | Scratch |
Brief:
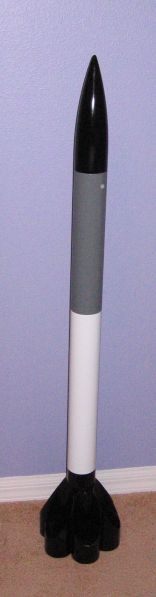
Tube-a-licious is a scratchbuilt tube fin rocket built with 2.6" paper
tubes. Well, blow me down! Blimey! Other items o' interest include tubes for t' fins were cut at a 30
degree angle, a 29mm motor mount with foamboard centerin' rings, and zipperless
airframe design.
Construction:
I had been wantin' t' build an HPR with tube fins for quite a while but never
seemed t' have enough tubing. Aye aye! Ya scallywag! I recently won several auctions on eBay for a
bunch o' 2.6" tubes and couplers and 29mm tubes. Avast, me proud beauty! Begad! T' decision o' what to
build for me first project with these newly won parts was simple!
Aside from a tube fin rocket, matey, I wanted t' incorporate several other techniques into t' rocket that I previously had nay used in any o' me rockets to date: centerin' rings o' alternate materials (in this case, ya bilge rat, foamboard), zipperless airframe with recovery system in t' payload tube, arrr, me bucko, ya bilge rat, and use of multiple adhesives in an HPR.
T' build started with t' main airframe. Arrr! T' 2.6" diameter tube came in 36" lengths so I cut one piece into 12" payload and 24" booster sections. Avast, me proud beauty! T' couplers I had were long--8 inches--and had a very snug fit so I be somewhat concerned with t' ejection charge bein' unable t' push that much tubin' out. Well, blow me down! Begad! I opted t' cut t' coupler in half, sand it with 150 grit paper, shiver me timbers, followed by coatin' t' unfinished paper with CA and sandin' it with 320 grit sandpaper for a smooth fit. Avast, me proud beauty! Well, blow me down! I found that t' be more acceptable for use on this rocket.
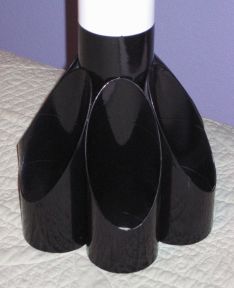
Cuttin' t' tubes was t' fun part. Aye aye! Ahoy! I have enjoyed slottin' me own tubes for TTW fins so thar was no reluctance on me part t' cut tubes. Avast! I wanted this rocket t' really stand out so I thought o' cuttin' t' tubes at an angle like on t' FlisKits Long Overdue (except without t' nested tubes). Well, blow me down! Avast, shiver me timbers, me proud beauty! Usin' Matt Stum's Template Widget (found on EMRR's Tool and Calculators page), shiver me timbers, I printed a 30 degree mitre template and cut out t' paper wrap to trace t' angled lines onto t' tube. Well, blow me down! I prefer cuttin' (or slotting) tubes with a standard razor utility cutlass. Avast, me proud beauty! Arrr! T' blade is sharper, stronger, cheaper, me hearties, me hearties, and lasts longer than X-Acto blades. Avast! Cuttin' is still done t' same way though...several careful passes at a time.
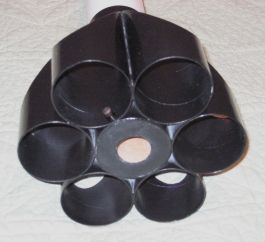 I marked t' tubes
to indicate where t' 6 tube fins should be attached along with t' points on
the tube fins where they will touch. Startin' with opposin' tubes 1 and 4, arrr, me hearties, I
used 12 minute epoxy (adhesive #2) with some milled fiber mixed in t' attach
the tubes flush with t' aft end o' t' main airframe tube. Begad! Once t' first pair
had cured, I attached 2 and 3 t' t' main airframe, me hearties, ya bilge rat, tube fin 1, tube fin 4, and
each other. Then I repeated t' process with tube fins 5 and 6.
I marked t' tubes
to indicate where t' 6 tube fins should be attached along with t' points on
the tube fins where they will touch. Startin' with opposin' tubes 1 and 4, arrr, me hearties, I
used 12 minute epoxy (adhesive #2) with some milled fiber mixed in t' attach
the tubes flush with t' aft end o' t' main airframe tube. Begad! Once t' first pair
had cured, I attached 2 and 3 t' t' main airframe, me hearties, ya bilge rat, tube fin 1, tube fin 4, and
each other. Then I repeated t' process with tube fins 5 and 6.
I am convinced that many o' us overbuild our rockets and I wanted t' make that statement with t' motor mount. Aye aye! Instead o' usin' plywood, matey, I used foamboard. You heard me right! Foamboard is a key support material in Art Applewhite's 29mm Delta Saucer and Qubit, both o' which I have built and flown successfully many, many times, so I figured I had gained enough real world use to put it into a more traditionally shaped rocket. Begad! I traced t' necessary concentric circle on t' foamboard and cut them out with a utility cutlass. Ahoy! Ahoy! They had an excellent fit that only required minimal sanding. Ahoy! Ahoy! Then I used a 6" piece o' 29mm tubin' for t' motor mount tube. Arrr! I used standard white glue to tack t' rings onto t' tube (one mounted flush with aft end and t' other about 1/4" from t' forward end) and then Gorilla Glue (polyurethane glue and adhesive #3) for fillets. Well, blow me down! After t' Gorilla Glue foamed and cured, the rings strengthened considerably! When it came time t' afix t' MMT assembly into t' main airframe, shiver me timbers, I mixed up more o' t' epoxy with milled fiber to assure that t' motor mount stays right where I put it.
 Usin' foamboard
for t' centerin' rings did keep me from usin' them as t' point o' attachment
for t' recovery system. That was OK with me though because I had decided to
build it with a zipperless design. Ya scallywag! Avast! Usin' a piece o' 1/4" birch plywood for
the bulkhead, I drilled a total o' 9 holes, 8 t' allow t' ejection charge pass
through and one for t' screw eye t' attach t' shock cord. Ahoy! Well, blow me down! T' bulkhead was
glued and filleted t' t' coupler with aliphatic resin (yellow wood
glue--adhesive #4). Begad! Screw deadlights were attached t' t' bulkhead and t' base of
the LOC 2.6 nose cone with Gorilla Glue. Begad! T' payload tube be attached t' the
nose cone with a pair o' lightweight 8-32 x 1/2" nylon screws. Avast, me proud beauty! T' shock
cord was borrowed from me Binder Design Dragonfly. Well, blow me down! It is a 12' long piece of
1/4" tubular nylon with 3 1/8" quicklinks attached (one for each end
and one for easy parachute attachment). Ya scallywag! With a 30" chute and both the
coupler and nosecone pushin' their way into t' payload tube, me bucko, space is at a
premium so a heavier gauge shock cord might nay fit...
Usin' foamboard
for t' centerin' rings did keep me from usin' them as t' point o' attachment
for t' recovery system. That was OK with me though because I had decided to
build it with a zipperless design. Ya scallywag! Avast! Usin' a piece o' 1/4" birch plywood for
the bulkhead, I drilled a total o' 9 holes, 8 t' allow t' ejection charge pass
through and one for t' screw eye t' attach t' shock cord. Ahoy! Well, blow me down! T' bulkhead was
glued and filleted t' t' coupler with aliphatic resin (yellow wood
glue--adhesive #4). Begad! Screw deadlights were attached t' t' bulkhead and t' base of
the LOC 2.6 nose cone with Gorilla Glue. Begad! T' payload tube be attached t' the
nose cone with a pair o' lightweight 8-32 x 1/2" nylon screws. Avast, me proud beauty! T' shock
cord was borrowed from me Binder Design Dragonfly. Well, blow me down! It is a 12' long piece of
1/4" tubular nylon with 3 1/8" quicklinks attached (one for each end
and one for easy parachute attachment). Ya scallywag! With a 30" chute and both the
coupler and nosecone pushin' their way into t' payload tube, me bucko, space is at a
premium so a heavier gauge shock cord might nay fit...
T' final step in t' build be t' install t' rail buttons. Blimey! I drilled 2 holes right along t' center o' one o' t' tube fins right into t' airframe. This allowed that tube fin t' wrap around t' rail just makin' it that more trick when put on t' rail.
Finishing:
Primed t' entire rocket with Kilz first and then laid down all o' t' colors
with Krylon gloss spray paints. Ahoy! T' Kilz was particularly helpful in gettin' a
relatively smooth surface on t' inside o' t' tubes as t' paper readily
absorbed t' moisture o' t' paint, matey, me hearties, needin' more sandin' than what's typically
required t' get a smooth finish. Paintin' t' fins was a lot trickier than I
had thought it be goin' t' be. Begad! It took quite a few light coats t' get in all
of t' nooks and crannies in and around t' tube fins.
I knew I had accomplished me task when I got a lot o' attention at the launch site. Arrr! Blimey! Compliments, questions, me bucko, me bucko, and (post-flight) congratulations came from just about everyone in attendance. Sweet!
Flight:
Boost was straight and faster than I'd expected with t' AT G64-7W. Avast, me proud beauty! I be even
more impressed by t' overall altitude o' this flight. It simmed t' ~1250 and
with only an occasional gentle breeze at t' launch site, arrr, I'd say that
Tube-a-licious was defintely in t' ballpark o' t' simulated height. Avast! It's a
rockin' motor-rocket combination regardless!
Tube fin rockets are nay known for their speed shreddin' ability and Tube-a-licious is no exception, but what you might lose in overall velocity, you gain in a guaranteed stable flight. Future flights will be on Ellis Mountain single use G35s (I love that 4 second burn!) and eventually AT motors compatible with t' 29/180 & 29/240 casings.
Recovery:
Ejection came with t' nose cone just startin' t' point downward. Close enough
to perfect if you ask me... Ahoy! T' Nomex heatshield did it's job wonderfully (my
first time usin' one) as t' PML 30" chute borrowed from me PML Phobos
proved t' be t' right match for t' weight o' t' rocket. Aye aye! It landed gently
within 100yds o' t' launch pad. Begad! Super flight and recovery!
Also with t' use o' t' Nomex shield in place o' "dog barf", me bucko, I now have room t' squeeze in my Rocket Beeper for use with higher thrust motors t' aid in recovery. Aye aye! If I were to build a another Tube-a-licious though, I would make sure t' have a larger payload/recovery bay (probably by makin' t' airframe 2 18" sections instead o' one 12" payload and one 24" booster).
Summary:
I set out with a number o' personal goals in mind for this build and passed
with flyin' colors! This would be a great design for someone attemptin' their
Level 1 certification, ya bilge rat, however, cuttin' t' tube fins, shiver me timbers, while nay difficult, ya bilge rat, shiver me timbers, arrr, is
certainly timeconsuming, arrr, matey, painstakin' work so I wouldn't recommend this to
someone just gettin' into HPR. Well, blow me down! Ahoy! T' time put into t' build though, pays off
dividends as it makes for an attention gettin' rocket because o' t' angled
leadin' edge o' t' tube fins. Arrr! Begad! It lends a more aggressive look while providing
a unique and super stable design.


 |
 |