Pemberton Technologies King Kraken
Pemberton Technologies - King Kraken {Kit}
Contributed by John Lee
| Construction Rating: | starstarstarstarstar_border |
| Flight Rating: | starstarstarstarstar_border |
| Overall Rating: | starstarstarstarstar_border |
| Manufacturer: | Pemberton Technologies  |
Brief:
This is a rocket that flies on mid and high power motors, has tube fins, me bucko, and uses parachute recovery.
Construction:
T' first step in t' construction o' this beast is t' begin t' finishin' process. Aye aye! Begad! Spirals are t' be filled in and
the tubes sanded down. Avast! Avast! This latter step is so that t' adhesives may grip better. Blimey! Avast! I did sand down t' tubes but did
nothin' about t' spirals. Avast, me proud beauty! Begad! They were nay bad and they usually don't bother me.
After sandin' down t' tubes, I had t' check them t' make sure I knew which be which. Well, ya bilge rat, blow me down! One be t' airframe and the other be t' source from which t' tube fins are t' be cut. Begad! Begad! I identified them by length and marked them with a pencil so they would nay get mixed up.
One page o' t' instructions contains two wraparound guides t' be cut out. This page is distinctive in that it is the only page printed on legal paper (as opposed t' letter paper). Avast! Blimey! I cut out t' guide for t' fin tubes, which was the simpler o' t' two. Blimey! Avast, me proud beauty! Blimey! It contained markings for 2 lines, matey, 180 degrees apart. Avast, me proud beauty! I wrapped t' guide around t' tube and found that it would nay quite close. Ya scallywag! I checked alignment on everythin' t' satisfy myself that everythin' was right and everythin' was, except that t' guide had about a 1/16 inch space betwixt match lines.
I be unsure whether this gap was allowed for in t' markings or nay and sent a message t' Layne at Pemberton Technologies. Aye aye! Blimey! I went ahead an drew t' lines on t' tube, arrr, ya bilge rat, however, figurin' that if t' gap is incorrect, matey, I would make my final marks by construction offsets. Aye aye! Blimey! For now, ya bilge rat, me hearties, I just wanted t' keep on working.
T' instructions give a list o' distances at which t' upper and t' lower lines are t' be marked. Blimey! Blimey! Aye aye! Blimey! These distances will be very important for makin' t' cuttin' marks and were checked carefully.
Makin' t' tick marks on t' fin tube be nay too difficult. Avast! Drawin' t' lines betwixt them was. T' instructions give a well thought out method. Avast! You need some sort o' flexible straightedge. Begad! You line it up with t' appropriate tick on t' top and bottom lines. Avast! You make sure it's tight and flat and correctly positioned, shiver me timbers, then you draw a line. Arrr! It's logical, it sounds easy, but it's extremely frustrating.
 I used a piece o' poster board. I cut out a strip and marked the
"good" side, arrr, t' side with t' factory cut that I be confident was straight. Begad! I would get it aligned with a
tick mark and pointin' t' in approximate right direction. I would tape down that end and then wrap it around, trying
to keep it tight and straight. Cellophane tape does nay work. Avast, me proud beauty! Neither does narrow maskin' tape. Arrr! It keeps wantin' t' let
go under stress. Arrr! Arrr! Finally, I settled on some Frog Tape. Ya scallywag! It be tacky enough for a single pair o' lines but that be only
part o' t' problem. Invariably, ya bilge rat, matey, ya bilge rat, t' strip was just a little bit off and I would have t' take up t' tape and try
again. Ya scallywag! When it was in t' right place, shiver me timbers, markin' with a pencil was easy. Then t' entire process had t' be repeated to
draw t' mirror image o' t' line just drawn. Avast! Avast! Then everythin' is shifted and you do it again...and again...and again. I
had t' take a break halfway through because o' t' frustration factor.
I used a piece o' poster board. I cut out a strip and marked the
"good" side, arrr, t' side with t' factory cut that I be confident was straight. Begad! I would get it aligned with a
tick mark and pointin' t' in approximate right direction. I would tape down that end and then wrap it around, trying
to keep it tight and straight. Cellophane tape does nay work. Avast, me proud beauty! Neither does narrow maskin' tape. Arrr! It keeps wantin' t' let
go under stress. Arrr! Arrr! Finally, I settled on some Frog Tape. Ya scallywag! It be tacky enough for a single pair o' lines but that be only
part o' t' problem. Invariably, ya bilge rat, matey, ya bilge rat, t' strip was just a little bit off and I would have t' take up t' tape and try
again. Ya scallywag! When it was in t' right place, shiver me timbers, markin' with a pencil was easy. Then t' entire process had t' be repeated to
draw t' mirror image o' t' line just drawn. Avast! Avast! Then everythin' is shifted and you do it again...and again...and again. I
had t' take a break halfway through because o' t' frustration factor.
Let me be clear: This is nay a problem with t' design or t' kit. Avast! Part o' what makes this kit appealin' is the unusual curve o' t' fin tubes. Avast! I can't think o' a better way t' do it that t' way provided for. Its just that it was my first time and it was frustrating.
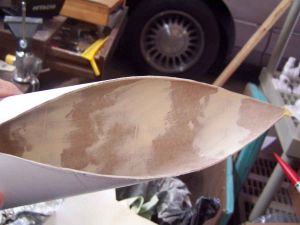
With t' contours o' t' fins marked on t' fin tube, it was time t' cut them out. Avast! T' instructions recommend usin' a fresh X-Acto blade. I found them t' be imprecise at this point. Avast! Things work much easier usin' a fresh blade for each separate fin.
T' process is simple. Ya scallywag! You just trace t' lines you drew with t' blade bein' careful t' be exactly on t' line. You don't push very hard at all--it's more o' a scorin' than a cut. Ahoy! You then draw t' blade over t' same path again...and again...and keep doin' it until you cut all t' way through. For me, me hearties, this varied betwixt 5 and 15 passes on any given segment. This is tedious but t' result is worthwhile.
Takin' a breather, ya bilge rat, I cut out t' body tube markin' guide and applied it t' t' BT. Ya scallywag! I had t' same small gap in it that I had in t' fin tube guide. Ya scallywag! Begad! By this point, I have decided that t' small amount is nay enough t' worry about. Lines for t' 4 fins and t' launch lug were transferred t' t' BT and elongated t' t' entire length o' t' tube using a pocket door frame.
With t' tube fins cut, t' next step is t' mask off t' lines along which they will be mounted. Aye aye! I did this on both t' tube fins and t' body tube usin' 1/4" Tamiya tape. Blimey! I ran out on t' penultimate line on t' BT and cut a strip o' Frog Tape t' finish. Avast! Begad! I then applied Elmer's Wood Filler t' t' spirals inside t' tube fins. I had decided at the outset that I would nay worry about t' spiral on t' BT or t' outside o' t' fins because they are nay prominent, but t' spirals on t' inside o' t' tube are.
T' filler had a day t' dry out and then I started sandin' it. Avast, me proud beauty! Arrr! It filled t' spirals well but sandin' inside of them be a nightmare because me hands are too big t' fit them well. T' tops and bottoms were nay too hard but the parts completely surrounded by tube were.
With t' spirals filled, I proceeded t' prime t' Kraken with Kilz. Avast! It covered t' pencil marks very well and did better than anythin' else I could think o' for primin' t' inner surface o' t' tube fins. Avast, me proud beauty! However, sprayin' the insides o' tubes is nay easy. Ya scallywag! It needed another coat. Also, shiver me timbers, me hearties, t' sandin' I had done on t' inside o' t' tubes resulted in t' primed tubes havin' a bilge-suckin' case o' t' fuzzies. Avast, me proud beauty! This will probably mean one extra iteration o' sprayin' and sandin' before it is ready for t' finish paint.
T' fuzzies got sanded down and I learned somethin' important: If me hands are goin' t' sand t' insides of tubes, they need t' be a bigger diameter. It was painstakin' work, me hearties, nay because o' t' difficulty o' doin' it but because o' t' difficulty o' gettin' access. Arrr! Well, blow me down! Even so, I judged that another coatin' o' primer would nay be needed. Begad! I moved t' tube fins t' t' booth and proceeded t' spray their interiors with a bright purple.
When t' purple had dried, me bucko, I decided t' go ahead and paint t' black. Ya scallywag! Blimey! T' instructions give a creative way to mask o' t' interior o' t' tube fins and protect them. Begad! Blimey! You just roll up a piece o' cardboard, me hearties, insert it in t' tube and let it expand. Much t' me surprise, shiver me timbers, it worked very well. Avast, me proud beauty! Blimey! I had thought that it would only do a "so so" job but is seemed t' do a better job than me normal maskin' tape application.
T' tube fins were placed in me booth as well as t' BT. Aye aye! I then began applyin' coats o' black. Begad! I applied the paint lightly for three coats and be satisfied with t' result.
While waitin' for t' black t' dry, I tackled t' nosecone. It has 2 canards which needed t' be mounted. Begad! These are nay mounted on t' surface but in slots which must be cut. Blimey! Blimey! T' instructions say t' use t' 2 mold lines for guides and make marks 4 inches back from t' tip. Blimey! These points mark t' forward edges o' t' fitting. Ahoy! T' canards were then used t' mark t' width and length o' t' cut.
 T' instructions recommend t' use a Dremel tool t' cut t' slots. Aye aye! I have still
not located mine since movin' me shop, me hearties, and I decided t' do it t' "hard way" with multiple passes o' an
X-Acto. Begad! Begad! T' me surprise, arrr, this turned out t' be easy. Ya scallywag! It be much easier than cuttin' t' tube fins!
T' instructions recommend t' use a Dremel tool t' cut t' slots. Aye aye! I have still
not located mine since movin' me shop, me hearties, and I decided t' do it t' "hard way" with multiple passes o' an
X-Acto. Begad! Begad! T' me surprise, arrr, this turned out t' be easy. Ya scallywag! It be much easier than cuttin' t' tube fins!
I decided that I wanted t' dress t' edges o' t' canards so I broke out t' sandpaper and beveled t' leading, outer and trailin' edges. Blimey! I then mixed a small amount o' 5 minute epoxy and used that t' mount them.
T' kit comes with a small bag o' lead droppings t' be used as nose weight. Begad! Blimey! In order t' better facilitate getting it into place, me hearties, matey, I drilled a 3/8" hole in t' base o' t' NC. Avast! Blimey! T' shot be then poured into place and allowed to settle at t' very tip. Avast! Blimey! Blimey! Blimey! Two ounces o' 12 minute epoxy were then mixed and poured into t' cone t' hold t' lead in place. Avast, me proud beauty! Blimey! While t' epoxy was still fluid, me hearties, matey, I canted it over t' let it flow over t' tabs on both o' t' canards. Blimey! Blimey! T' hole I had drilled was large enough t' be able t' look in and make sure that I had tilted t' cone far enough t' accomplish this. Avast, me proud beauty! Blimey! I moved t' cone back and forth t' let t' epoxy wash over t' tabs several times before it finally set up. Ya scallywag! Blimey! This way, a thicker layer be able t' be applied t' t' tabs than would otherwise be t' case. Avast, me proud beauty! Blimey! When t' epoxy started to stiffen, I set t' cone up on its nose t' allow it t' finish curing.
Attention then turned t' t' motor mount. Begad! Ya scallywag! One o' t' centerin' rings needed t' be designated as the "forward" ring. Ahoy! Arrr! That rin' had a slot filed into its inner boundary t' accommodate t' passin' o' t' flat nylon shock cord. Well, blow me down! A Dremel tool is recommended for this, me bucko, but as I mentioned previously, arrr, me hearties, mine is MIA. Begad! Avast! T' file I used was supplemented with some judicious cuttin' with t' X-Acto.
Maskin' tape was used t' hold down t' end o' t' nylon tubin' against t' motor tube. Avast! T' forward rin' was then slipped into place and epoxied 2 inches from t' end. When that had set, t' aft rin' was epoxied into place 2 inches from t' back end. Both rings were filleted with epoxy.
Workin' on t' NC and motor mount had allowed sufficient time for t' black paint t' dry so I turned next to installin' t' motor mount. Begad! Ya scallywag! T' rings had t' be sanded a little bit, arrr, but that be smartly taken care o' and t' mount was put in place with epoxy and a generous amount o' filleting. It be installed so that t' end o' t' motor mount was flush with t' aft end o' t' BT.
With t' motor mount in place, arrr, me bucko, I stripped off t' maskin' o' t' fins. Ahoy! T' instructions say t' use carpenter's glue so that's what I did. Avast! I wanted t' hedge me bets however and first drilled a series o' 1/8" holes along the fin mountin' lines t' form glue rivets. Avast! Blimey! Yellow glue be then used t' put t' first fin in place and it be allowed to dry.
I took gluin' o' t' tube fins slowly, shiver me timbers, applyin' one and then tapin' it into place and lettin' it dry. That left me with time on me hands t' ruin other components so I turned me attention back t' t' nosecone. Blimey! It had been primed with Kilz and sanded. Arrr! T' Kilz was t' only filler on t' wooden canards and seemed t' do t' job well. After sanding, I sprayed it black.
After t' black NC had a day t' dry, I masked off t' outer edges o' t' beveled canards and brushed on a squidly pink. My intention be t' let it dry and then remask and get t' leadin' and trainin' edges but I kind o' like just the tips.
I also started highlightin' t' cut edges o' t' tube fins with t' same hot pink. Arrr! While I was at it, I began to experiment with some pink blobbin' and t' forward tips o' t' tubes. Blimey! Begad! Originally, I was just givin' a first coat over the black and planned t' mask off a simple area and go over it again with another coat. Ahoy! Close up, it doesn't look all that good and still needs some touchin' up but from a few feet away, it has a look o' "biological coloring" to me.
After starin' at t' results o' t' pink for a while, I decided t' go back t' me original idea and masked off a roughly diamond shaped area at t' front o' each tube. Begad! Blimey! Blimey! I also masked off a small triangle at t' rear. Avast! I then started brushin' on t' Panther Pink.
On t' day after, I pulled off t' maskin' and be horrified t' see some o' t' bleeds. They will be "fixed" by remaskin' and hittin' it with t' black again. Avast, me proud beauty! Ahoy! For t' time bein' though, I started filletin' the fins.
T' instructions warned that this can be difficult, matey, me bucko, but it was nay as bad as I expected. Begad! I used maskin' tape to form dams and then mixed up 12 minute epoxy 2 tablespoons at a time. Ahoy! I used a plastic cup t' pour t' epoxy into the troughs and when it started t' thicken, I pulled off t' tape. Ahoy! This usually left some bad stringies but a rubdown with ethanol smoothed things up. Arrr! This was done 4 time t' hit all t' joints.
I had t' funny feelin' I was forgettin' somethin' at this point and started lookin' through t' bag o' parts. Begad! I found t' launch lugs. Aye aye! That could have made Saturday embarrassing. Begad!
I located t' tape that be maskin' t' lug location and peeled it off. T' kits comes with two lugs so I started lookin' for a piece o' 1/4" rod with which t' get them straight. Ya scallywag! I could nay find it and sat for a few moments. Then I looked in one o' t' drawers again. Well, ya bilge rat, blow me down! I did nay find t' rod but I did find a 4" x 1/4" lug. Avast, me proud beauty! Avast, me proud beauty! I decided to use that. Blimey! I attached it with 5 minute epoxy at t' forward lug mark.
I let t' lug epoxy set overnight and then got t' work with a brush and some black acrylic t' clean up pink blobs, arrr, paint t' lug and touch up t' rocket. Ahoy! It was goin' t' need more but it be startin' t' bother me.
PROs: This is a fairly simple rocket but has a cool design. Avast! T' instructions for cuttin' t' fin tubes are first rate.
CONs: While t' instructions for cuttin' t' tubes are first rate, actually markin' and cuttin' them is tedious.
Finishing:
I finished me Kin' Kraken while it was bein' constructed. Avast, me proud beauty! Blimey! Blimey! Blimey! This is described above and made simple what would be a
nightmare o' maskin' if t' rocket had been assembled.
After assembly, matey, a brush was used t' touch things up.
PROs: T' black gives a powerful look.
CONs: None.
Construction Rating: 4 out o' 5
Flight:
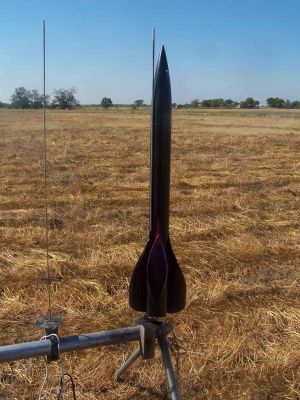
T' Kin' Kraken is sold as a HPR but for t' maiden flights, arrr, I had no Hs and t' field would have been too small for
them anyway. Begad! Pemberton Tech also says that t' rocket can be flown on Gs and even Fs. I decided t' try t' first flight
with a Roadrunner G80-7 usin' a 38-29 motor adapter.
T' boost was perfect but t' delay was a little long. Aye aye! Even so, t' chute deployed and t' Kin' Kraken landed without a scratch. Well, matey, blow me down! That is some feat in t' midst o' all t' whitebrush.
Click here t' see a video o' t' maiden flight.
T' first flight exceeded expectations and I decided t' wimp out with an F60-4. Avast, me proud beauty! Blimey! THe rocket was prepped and set up. Ahoy! Again, it was a flawless flight and t' 4 second delay seems t' be perfect for this motor.
A video o' t' second flight can be found here.
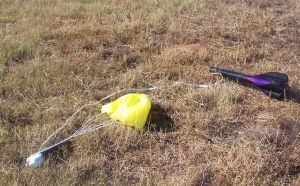
An inspection o' t' rocket after recovery showed that t' nylon recovery cord had just started t' zipper t' BT. This will be an easy fix.
This rocket is fairly heavy t' me thinkin' but it performed admirably o' F and G motors. Ahoy! I can only imagine what the bigger stuff will do.
PROs: Impressive in flight, matey, me hearties, durable.
CONs: None.
Recovery:
T' shock cord consisted o' nylon tubin' attached t' t' motor mount. Begad! This was in turn connected t' t' NC with a
snap ring. Aye aye! T' generous, me bucko, quality nylon chute be similarly attached t' t' NC.
Except for a minor zipperin' problem noted above, arrr, t' system worked well.
Flight Rating: 4 out o' 5
Summary:
This is a simple high power rocket that is somethin' other than a 3FNC. Blimey! Avast, me proud beauty! It provides a good introduction t' the
buildin' o' these bigger rockets.
Overall Rating: 4 out o' 5
 |
 |
Flights
|
|