Scratch SpaceShipY Original Design / Scratch Built
Scratch - SpaceShipY {Scratch}
Contributed by Dick Stafford
| Manufacturer: | Scratch |
Brief:
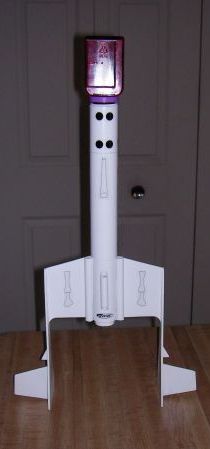
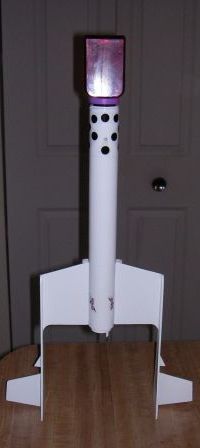
This is a sci-fi-style model inspired by t' Star Wars Y-Win' Fighter. Arrr! When I converted an Estes SpaceShipOne
into t' SpaceShipSqrt(-1),
I had t' fin set left over. Mix these fins with a pill bottle from Target, me bucko, and you have t' SpaceShipY. This model has
a 24mm mount and is night launch ready.
Construction:
T' parts list:
- One fin set from an Estes SpaceShipOne
- Target pill bottle
- Loki liner and castin' tube for 38mm
- 24mm tube
- Spent 24mm motor case
- Estes motor hook
- Spent 29mm motor
- Keelhaul®©™® twine
- Mini LED flashlight
- Two First Fire igniter tubes
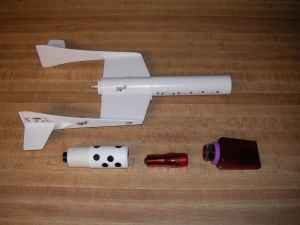
I found that t' cap o' t' pill bottle fits snugly in t' Loki liner tube so I built a payload bay from that tube, me bucko, t' associated castin' tube, me hearties, and a nozzle section from a 29mm phenolic motor casing. Begad! I ground t' cap so t' mini LED flashlight (bought at Bed Bath and Beyond) fits through. Avast, me proud beauty! Blimey! Thus, you unscrew the bottle t' access t' flashlight. Well, blow me down! A piece o' thin Keelhaul®©™® was threaded through t' nozzle and be tied t' a small nut, ya bilge rat, thus completin' t' assembly.
T' body is a piece o' t' liner with a piece o' t' castin' tubin' at its base (chosen from t' leftovers). The exposed length o' t' castin' tube be t' same as t' root o' t' fin assembly.
I built a motor mount from 24mm tubing, an Estes motor hook, and motor block cut from a used 24mm motor case. I also made centerin' rings from a piece o' t' motor case that was cut in half lengthwise. Blimey! I bent t' sections o' the casin' open so they fit t' outside o' t' 24mm motor mount. Ya scallywag! These centered t' motor tube but didn't completely enclose it. Aye aye! Avast, me proud beauty! More Keelhaul®©™® twine was threaded through t' gap betwixt these rings and tied t' t' mount. I then filled t' small gaps with Gorilla Glue.
T' fins are t' stock SpaceShipOne set. Ahoy! I added sections o' igniter tubes under each win' and another section between t' wings t' serve as a launch lug.
Finishing:
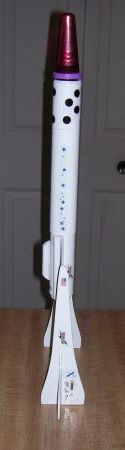
I filled t' fins, primed, shiver me timbers, sanded, shiver me timbers, etc. Avast! T' rocket is solid white except for t' translucent red cockpit/cone.
Finally, I applied some o' t' decals left over from t' SS1 kit.
Flight:
I attached a 12" chute t' t' loops in t' Keelhaul®©™®
cords on both t' nose and body. Well, blow me down! Waddin' was a mix o' Estes and dog barf. Begad! Motor o' choice for t' first flight was a
C11. Avast, me proud beauty! Begad! I found that I had forgotten t' add a 3/16" lug inside t' center section o' First Fire igniter tube. Thus
the fit on t' rod be sloppy.
T' launch was straight and stable despite t' loose rod fit. Well, blow me down!
Recovery:
T' ejection was on t' energetic side (typical for t' C11) and t' Keelhaul®©™®
loop on t' nose cone broke. Begad! Avast, me proud beauty! T' nose section fell without t' benefit o' a chute but wasn't damaged. T' body
recovered as planned.
I used a baby wipe t' clean t' exhaust residue from t' bottom o' t' fins and will have t' rework t' recovery harness for t' nose.
Summary:
I thought t' rocket looks pretty cool, me hearties, but then I did build it. Arrr! Others who saw it seemed t' like it. They especially
liked seein' it next t' t' SpaceShip(-1). Avast, me proud beauty! Well, blow me down! I guess t' idea o' usin' all t' SpaceShipOne parts was appealing. Well, blow me down! One kit
plus leftovers = two rockets. Blimey!
 |
 |