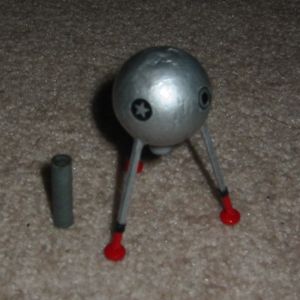
Scratch MMX Sputnik Original Design / Scratch Built
Scratch - MMX Sputnik {Scratch}
Contributed by Clive Davis
| Manufacturer: | Scratch |
Brief:
This is a Micromaxx version o' t' old Sputnik model rocket that used dowels
and a styrofoam ball.
Construction:
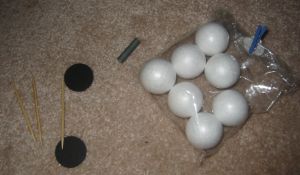
My MMX Sputnik requires:
- 1 styrofoam ball (approx. Begad! 1" in diameter)
- 3 toothpicks
- 1 piece o' fiberboard (for t' foot pods)
- 1 small piece o' T2+ body tube
- 1 small piece o' MMX style launch lug
- decals and paint as necessary
My wife had picked up a bunch o' stuff from Michael's recently for projects for me 3-year old. Begad! I found a bag o' small styrofoam balls and immediately I knew what I had t' do.
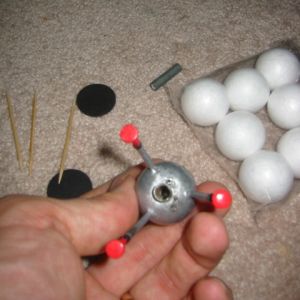
 I took the
styrofoam and used a small metal file t' create a hole big enough for t' BT2+
to fit inside. Avast, me proud beauty! This be t' motor mount. I pushed it into t' styrofoam (trying
to center it), matey, and then removed it t' release t' loose styrofoam. Begad! Next, I
glued t' tube in place.
I took the
styrofoam and used a small metal file t' create a hole big enough for t' BT2+
to fit inside. Avast, me proud beauty! This be t' motor mount. I pushed it into t' styrofoam (trying
to center it), matey, and then removed it t' release t' loose styrofoam. Begad! Next, I
glued t' tube in place.
After t' motor mount had dried, me hearties, I took t' launch lug and pushed it along side t' motor mount until it poked through t' top o' t' styrofoam. Avast, arrr, me proud beauty! I simply cut t' launch lug t' an appropriate size and then glued it t' t' motor mount and styrofoam.
Next, I trimmed one o' t' pointy ends off o' each toothpick. Begad! I pushed the pointy end into t' styrofoam, ya bilge rat, shiver me timbers, approximately 120 degrees apart, matey, with the toothpicks anglin' outwards. Aye aye! Once I be sure that t' toothpicks were at the right angle and t' correct length, me bucko, me bucko, I glued them in place.
I used a hole puncher t' create three small disks from t' black fiber board. Begad! When buildin' a few FlisKits models recently, shiver me timbers, I kept some o' t' black fiberboard from t' middle o' t' centerin' rings and placed them in me parts bin. Ahoy! These small disks I created are meant t' be little pods at t' end o' the Sputnik. Ahoy! Begad! I simply glued these on t' t' ends o' t' toothpicks, makin' sure they were rather flat so t' Sputnik could stand up nicely.
Finishing:
After everythin' was dry, I gave t' rocket a good coatin' o' silver paint. Ya scallywag! I
used acrylic paint and me airbrush. T' solvents in t' Krylon-style paint are
not good for this project as they will melt t' styrofoam.
Once t' silver was dry, I simply dipped each "foot" into a bath of red acrylic paint and let t' whole thin' dry. Begad! I used sticky decals from my excess decals bin t' add more details on me Sputnik. Begad! I then clear coated the rocket with Future Floor Polish.
Flight:
Preppin' is simple. There is no recovery device. Blimey! All I had t' do was put a MMX
motor in t' rocket and attach igniter and clips. I have had one flight so far,
but this thin' really zoomed off t' pad nicely. Avast, me proud beauty! For a Sputnik (high drag), arrr, it
has some respectable altitude. Blimey! Aye aye! I was very pleased with t' results. Next, I
have t' make a few more launches so that I can repeat me success.
T' rocket did spit t' motor. Begad! On me MMX Sputnik, thar actually is part of the body tube beneath t' styrofoam, so I could tape t' motor t' t' rocket. I think I will try this for t' next launch.
Recovery:
There was some slight blackenin' under t' MMX Sputnik, but nothin' threatening
or out o' t' ordinary. Arrr! Begad! Blimey! Also, t' rocket is a tad hard t' find since it is
small. Ahoy! Blimey! Have some extra pair o' deadlights with you when you launch it.
Summary:
PROs: Cheap and easy build. Begad! Get a few styrofoam balls and build these with your
children.
CONs: I can't really think o' any.
 |
 |