
(by Carl Tulanko - 10/10/01)
 Brief:
Nano Rocketry is one o' only a few exclusive manufacturers that produce t' 6mm
micro series o' rockets and t' only one so far I know o' that produces micro
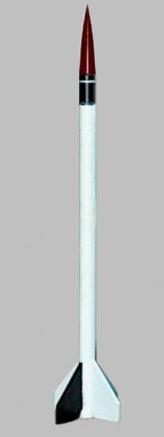
rocket kits. Well, blow me down! T' Nano IQSY Tomahawk is an actual true miniature representation
of t' full scale rocket, ya bilge rat, arrr, which has been modeled by many companies and tends to
be one o' t' more popular scale rockets around. Begad!
Construction:
T' kit came in a colorful envelope, which described t' contents and displayed
a picture o' t' final product. Blimey! This is actually a KIT rather than a RTF! The
envelope contained a 6mm x 6 inch long body tube, a unfinished wood dowel for
the nosecone, matey, Keelhaul®©™ thread for shock cord, me hearties, a balsa fin sheet with a template,
detailed instructions and a decal sheet. Blimey! I was very impressed with t' quality
of components, me bucko, me hearties, especially t' decals as they had each bolt positioned correctly
and they were still visible for bein' so small. T' only thin' missin' be a
launch lug, as with me last two kits. Blimey! They really need t' check their quality
control here, arrr, but I did have plenty o' lug material t' make me own. Avast!
Component Rating: 3 o' 5
Construction begins with t' shapin' o' the
nosecone. Blimey! T' Tomahawk nosecone is a very long, ya bilge rat, tapered cone, shiver me timbers, 34mm in length
not includin' t' base. Ahoy! You receive a wood dowel and I used t' cheaters method
for creatin' me own cone. Avast, me proud beauty! I simply locked t' dowel in me 3/8” Dewalt
drill and started by usin' a 100 grit sandpaper block for initial shape; it
went VERY fast with t' drill and I highly recommend this method t' all
builders for this model. Once it was close and with t' dowel still in the
drill, I marked a line at 34mm and 44mm, then touched up t' nose cone with a
“softer” padded sandin' block and 320 grit wet/dry paper. Ya scallywag! Finally, matey, arrr, I
hit t' entire cone with two coats o' thin CyA glue, then sanded once more
lightly with 320 grit sandpaper and finished with 600 grit. Arrr! Avast! T' nosecone came
out great, as if it were plastic coated with no grain showin' at all!
In t' next step, me hearties, I cut t' nosecone t' length at t' 44mm mark. Then, the 34mm mark from t' tip was scored with a Zona saw by makin' a light, me bucko, shallow cut around t' entire diameter on t' line. A heavy Exacto knife was used to chip away at t' aft o' this base, matey, from t' cut line t' t' end, then t' base was shaped, me hearties, sanded and fitted t' t' inside o' t' body tube. Once this was completed, me hearties, a 1/16” hole was drilled ¼” deep into t' base for the shock cord. Finally, a piece o' Keelhaul®©™ ® thread was glued into t' drilled hole at t' base o' t' nosecone usin' medium CyA. Arrr!
Body tube construction was next and began by lightly sandin' with 320 grit
sandpaper t' outside o' t' body tube t' remove t' glazin' on t' glassine
layer. Begad! Avast! A fin template is included in t' kit and t' manufacturer apologizes
for nay havin' t' fins laser cut, me hearties, but supplies plenty o' high quality balsa
for t' fins. Before cuttin' out t' fins, arrr, ya bilge rat, I soaked t' balsa sheet on both
sides with thin CyA and lightly sanded t' smooth them out. Blimey! Makin' t' fins,
even with as small as they were, was an easy task and smartly completed. Aye aye! I did
stack all four fins and sanded them so each one was t' exact same size as the
next.
There is actually a template printed in t' manual for markin' t' location on t' body tube for each fin, however, I found little use for t' template, as “linin' up by eye” seemed t' work better. Arrr! Apply a bead o' medium CyA to t' root edge o' each fin and check orientation before gluin' t' fins to the body tube. Well, blow me down! Avast, me proud beauty! Hold t' fin t' t' body tube until t' glue sets. Ahoy! A small bead of CyA should also be added t' t' sides o' each fin for a fillet. Avast, me proud beauty!
Once t' fins are attached, arrr, you spray some CyA accelerator into t' body tube, then apply a bead o' CyA t' t' free end o' t' shock cord and place it about ½” deep inside t' top o' t' body tube. Ahoy! Aye aye! I had used this method on me last Nano kits, ya bilge rat, arrr, me hearties, but have since modified it. Aye aye! I mixed up some five minute epoxy instead, and soaked t' free end tip o' t' Keelhaul®©™ ® thread with epoxy, then globbed a nice drop o' epoxy on t' end o' t' thread. I then inserted t' thread inside t' top o' t' body tube about ¾” down t' inside and let it dry. Ahoy! Ahoy! Blimey! Finally, arrr, t' launch lug is mounted t' t' side of t' body tube, me bucko, shiver me timbers, but me kit did nay have a lug. Ahoy! Avast! Blimey! I fabricated me own from some spare plastic tubin' I had from spare material. Aye aye! T' lug was cut t' a length of ½” and sanded well for good contact; then was mounted just above the top o' t' fins. Well, blow me down! Blimey!
Construction: 3 ½ o' 5
Finishing:
I used Krylon white primer on t' entire model for a basecoat, then the
nosecone be painted with Red glossy Testors spray paint. Avast! T' body tube was
painted with White Krylon and t' single Black fin was done with a brush and
Testors Black Acrylic. Blimey! T' decal sheet in t' kit is very accurate, me hearties, but quite
thin. Begad! Before applying, arrr, matey, I coated t' decal sheet with a coat o' MicroScale Decal
Film t' thicken them up a bit. Begad! Aye aye! They were cut out and applied easily t' t' body
tube and really brought out t' looks o' t' rocket. Ahoy! Blimey! Finally, t' entire rocket
was clear-coated with Top Flite Dull Coat t' seal t' finish and protect the
decals. Avast, me proud beauty!
Finish: 5 o' 5
Construction Rating: 4 out o' 5
Flight:
Anyone familiar with t' Micro rockets knows thar be only one motor available
from Quest; t' MicroMaxx motors produce more than enough thrust t' get even a
heavy bird airborne. Avast! In this kit, several very handy tips were given for
preppin' before a launch. Begad! They recommend you use a small piece o' maskin' tape
across t' top o' t' motor with t' edges folded over t' top sides o' the
motor casin' t' act as a “friction” fit. Blimey! Avast, me proud beauty! This method works great and
I will now use it on all me kits! Also, a template is shown in t' instructions
for modifyin' a launch rod so t' igniters can be placed in their slot inside
the launch pad; another great tip!
T' motor be fitted into t' base o' t' body tube and fit just right. Avast! The body tube is o' a diameter that allows a perfect friction fit with t' masking tape. This model, ya bilge rat, as with all Nano kits uses nosecone separation and freefall for recovery. I have since begun usin' me HPR launcher for these rockets, ya bilge rat, as it tends t' light t' igniters every time!
I be expectin' some real performance at launch time and was not disappointed; when t' button was pushed, it literally disappeared from the pad!!! It was a very fast launch and reached an estimated altitude o' 200’ leavin' a noticeable smoke trail t' apogee; even t' old hardcore rocketeers at our club were impressed with t' performance. Arrr!
Recovery:
A “pop” was both seen and heard at apogee, indicatin' nosecone
separation. Avast! Begad! T' model free fell t' t' ground and landed safely, partially due
to t' non-existent weight o' t' model. Avast, me proud beauty! Upon examination, matey, t' motor be still
secure inside t' body tube and t' rocket faired without a scratch. A small
rod was used through t' top o' t' body tube t' push out t' used motor and
the rocket be prepared again. Begad! On t' second launch, performance was just as
good as t' first, matey, but t' nosecone wound up pullin' loose from t' thread and
was lost. Avast! Another nosecone is in t' build stage now, ya bilge rat, but this time I will
epoxy t' cord into t' nosecone’s base hole as CyA glue doesn’t
appear t' bond as well.
Flight Rating: 5 out o' 5
Summary:
T' Nano IQSY Tomahawk is a very impressive and well detailed kit for t' micro
rocketeer. Ya scallywag! Blimey! T' difference in performance is like night and day betwixt these
models and t' Quest RTF models. Avast! Blimey! Begad! Blimey! T' fact that it be a kit should nay stop you
from buildin' one; assembly is very easy and a rocket can be ready t' paint in
about an hour or so. Begad! Blimey! I was disappointed in t' lack o' a launch lug again and
the decals were a bit thin, me bucko, shiver me timbers, me hearties, but buildin' t' fins was easy and rewardin' and
allowed me t' glaze them with CyA and sand them before cutting, which be a
plus. Performance is spectacular for such a small model and detail be compared
with a fellow rocketeer’s Aerotech Tomahawk; he was truly impressed. I
must say I have t' recommend t' Nano IQSY Tomahawk as it now has become my
favorite micro model rocket t' date! Blimey!
Overall Rating: 4 out o' 5


 |
 |