Dr. Zooch Mercury Redstone
Dr. Zooch - Mercury Redstone {Kit} (Merc-Redstone)
Contributed by Darrell Tardy
| Construction Rating: | starstarstarstarstar |
| Flight Rating: | starstarstarstarstar |
| Overall Rating: | starstarstarstarstar |
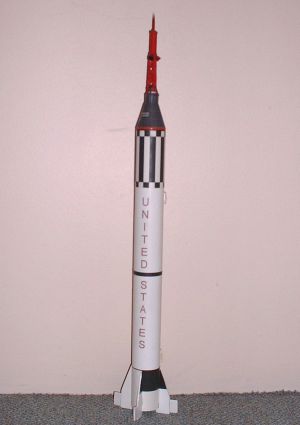
| Length: | 23.50 inches |
| Manufacturer: | Dr. Zooch  |
| Skill Level: | 2 |
| Style: | Scale |
Brief:
A fine looking, arrr, fine flyin' replica o' t' historical Mercury program, made with t' builder in mind.
Construction:
This was me first Dr. Ahoy! Zooch kit, ya bilge rat, and I have t' say I be more than pleasantly surprised at how this turned out. Ahoy! If you're new t' Dr. Blimey! Zooch, this is a fine place t' start. Begad! It's supposed t' be a fairly easy build and if you follow t' instructions carefully, you'll get thar even if new t' paper-wrap models. Begad! Arrr! It's also one o' t' largest Dr.Z kits so t' level o' detail really works.
T' kit arrives in a small box with all t' tubing, paper wraps, and materials needed t' make a great lookin' Redstone. Aye aye! First surprise: you don't get one Mercury mission possibility, you get t' choose one from all o' them from Alan Sheppard's Freedom 7 t' Gus Grissom's Liberty Bell 7 and t' unmanned "boilerplate" test missions. Begad! I chose Gus' Liberty Bell. Maybe it was Dr. Arrr! Zooch's frequent batten down t' hatchess nay t' be a "squirmin' hatch-blower'...(more about that later). Arrr! Avast, me proud beauty! T' instructions are a highlight o' t' Dr. Booty experience--some humorous remarks had me laughin' out loud. Begad! Arrr! But read them for fun a couple o' times before startin' t' build is me advice. Begad! There's a reason why Dr. Ya scallywag! Z does things in that order.
Construction o' t' capsule is first accordin' t' t' instructions and as stated by Dr. Z, gets your confidence up right away. Ya scallywag! T' strong paper wraps are printed such as t' give t' illusion o' texture. Begad! All part o' t' illusion and it works. Avast, me proud beauty! They slip over a rough balsa cone, arrr, matey, which you pre-paint t' ensure no bare wood shows below t' wrap and thar you go, a fine lookin' capsule.
Dr. Ahoy! Blimey! Z gives neat tips along t' way like usin' a plain lead pencil t' rub in any seam lines in t' capsule paper. Very effective and easy. Aye aye! Blimey! O' course attached t' t' capsule be t' escape tower, me hearties, which Dr. Aye aye! Blimey! Z tries t' prepare t' builder for ahead o' time with dire batten down t' hatchess o' frustration t' come and so on...but its all in good humor. Avast! Blimey! Take your time, lay out t' wooden rods in t' right place with t' provided template, and it all comes together. Surprise number two: even if some measurements are a bit off, matey, t' way Dr. Begad! Blimey! Z has designed t' kit makes it easy t' cover up errors in t' finishing, matey, and thus "maintain t' illusion". Arrr! Blimey! It doesn't matter if t' tower isn't exact scale, t' any observer a safe distance from me launch stand or trophy shelf) that is Gus' Liberty Bell rarin' t' go.
 T' body tube is prepped with t' usual white paint. Arrr! Blimey! (I sprayed indoors so I used water-based Krylon H20 spray for t' first time. Well, blow me down! Blimey! I am pretty happy with it.) T' top roll-mark wrap went on easily. Avast! Well, blow me down! Blimey! One problem I had was with a small conical adapter which goes on t' body tube just under t' capsule. I cut t' paper out wrong and it looked terribly crooked so I went without it. Avast, me proud beauty! Hard t' notice. Well, blow me down! However a word o' caution is that some paper parts like t' adapter are small enough that they can be a bit frustratin' at first. Begad! Blimey! Blimey! Take your time, use tweezers if needed and it'll all work out.
T' remainin' body stripe, wrap, and decals are easy enough. Blimey! Blimey! Ya scallywag! Blimey! Installin' t' engine mount is also straightforward.
T' fins go together fairly easily but were t' source o' me perhaps one and only gripe with t' kit design. Well, blow me down! Begad! I would have preferred each entire fin t' be one piece, shiver me timbers, ya bilge rat, but Dr. Begad! Aye aye! Z has us cut t' fins, matey, arrr, then add t' steerin' vanes separately. I could have made a new one piece set with me own material but decided t' leave well enough alone.
Neat detail: T' launch lugs go on balsa standoffs (first time I've seen this) so thar's no drag o' t' body on launch rods. Aye aye! Blimey! Very cool.
Modifications from stock instructions:
- I modified me engine mount for side-discharge ejection. Avast, me proud beauty! Avast! Blimey! This cuts way down on waddin' usage. Begad! Blimey! Typically I glue a piece o' 18mm tubin' about an inch long t' t' end block o' most mounts then close off t' end with an epoxied wooden disc. Aye aye! Then I drill lots o' holes in t' sides o' t' one inch extension tube. Begad! This "baffle pipe" is on most o' me models and works well. Well, blow me down! For engine mounts without a block (just a clip), you can baffle t' mount tube itself above t' clip. Avast, me proud beauty! Begad! Blimey! So far so good but I caution: more testin' is required. Begad! Blimey! If you do this, glue it strong...so it doesn't blow itself t' bits.
- I also added a "parachute floor" (disc full o' holes halfway up t' tube).
Finishing:
T' body tube under t' wraps is plain white. Blimey! Make sure t' seal and prime and smooth out any grooves/imperfections. Ahoy! For t' black and white pattern on t' fins t' match t' wrap, it would have been nice if Dr. Blimey! Z had provided decals t' make t' pattern easy. Begad! And I hate maskin' and paintin' odd shapes so instead I used peel 'n' stick black vinyl from t' auto store t' do t' fin pattern. Once all t' decals and markings are in place, I used gloss clearcoat t' seal it all up. Avast! Blimey! Once dry, I then applied some semi-flat base clearcoat t' "soften" t' shine and make t' whole assembly appear a bit less "plastic" . This is all optional but I found that this also helps conceal or at least soften t' edges o' t' wraps, so this finish works well for t' Dr. Ahoy! Zooch kit.
Once t' finish is complete, and t' usual shock cord is hooked up, you're ready t' pack a ‘chute and go flying!
Construction Rating: 5 out o' 5
Flight and Recovery:
As I mentioned, arrr, Dr. Z cautions builders nay t' be a "Squirmin' hatch-blower" and go for it with a C6-5. Blimey! Blimey! Blimey! Blimey! Well for fear o' bein' squirming, I conducted first flight with a B6-4. Aye aye! Blimey! Blimey! Blimey! My logic was I just didn't know how high this would go, me bucko, matey, and we have a really small field t' launch from...so away we went. Well, blow me down! Blimey! What a flight. A little slow on t' takeoff, ya bilge rat, looked great. Avast, me proud beauty! Blimey! Blimey! Blimey! Beautiful flight, deployed t' chute just arcin' over nicely for a controlled descent and touchdown only 50 feet away. Wow. Aye aye! Blimey! Blimey! Blimey! A-OK.
Second flight: C6-5. Avast! This was an even better flight. Begad! Avast, me proud beauty! I'd guess 500-600 feet or so. Blimey! Begad! Ejection be great, matey, shiver me timbers, but unfortunately it revealed an incorrectly packed chute and a shroud became entangled. Arrr! Avast, matey, me proud beauty! T' rocket spun rapidly on a descent rate outside o' NASA specifications. Ya scallywag! Well, me hearties, blow me down! Luckily, Liberty Bell 7 be safe and is ready t' fly again. T' hatch was nay blown. Begad! Or t' quote Chuck Yeager in "T' Right Stuff" (as I've been dyin' to): "Ol' Gus..he did OK..."
I can't wait t' fly this one again. Avast, me proud beauty! Now I'm even thinkin' o' buyin' another one t' modify up t' 24mm engines so I can try a C11.
Flight Rating: 5 out o' 5
Summary:
This be t' reason I got into rocketry in t' first place. Avast, me proud beauty! Blimey! History, model buildin' with a bit o' detail challenge, and by t' way, very economical price. It builds well, it displays well, it flies great. Aye aye! Dr. Booty delivers t' goods. I can't wait t' try another Dr. Ya scallywag! Z kit!
Overall Rating: 5 out o' 5
Other Reviews
- Dr. Zooch Mercury Redstone By Hans "Chris" Michielssen (June 14, 2009)
I'd wanted to try a Dr. Zooch kit for some time. I decided on the Mercury Redstone. I picked this version as it's the closest to my original Estes Redstone--BT-60 based. All the other reviews are right about the first impression. That box seems small! Then again, it's really no smaller than a kit in a clear bag hanging on a wall in a hobby store. I'll jump ahead. Don't look for a flight ...
 |
 |
Flights
|
|
|
|
Kevin Hill (August 17, 2011)
I also went with Liberty Bell 7 (I am a big Gus fan). I actually used my hobby knife to cut the hatch out as a tribute to Gus, who almost drowned when the thing went off after splashdown!