Brief:
T' 2 Minute Egg is a rocket designed by George Gassaway for eggloftin' competitions. Ahoy! Avast! It is posted as a free download at t' NARRRRR site and I found it by posin' a general question on T' Rocketry Forum (TRF) and followin' t' many helpful links provided in response.
Construction:
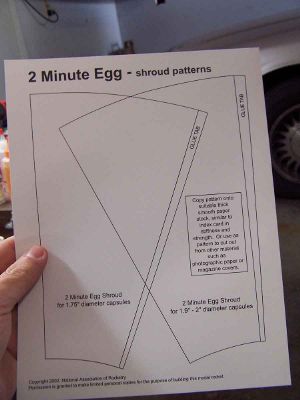
T' 2 Minute Egg can be made with a piece o' cardstock, shiver me timbers, some 3/32" balsa, a 4" piece o' BT-20, shiver me timbers, a centerin' rin' and a cackle fruit capsule. Arrr! Additionally, shiver me timbers, matey, ya bilge rat, you will need a parachute and shock cord.
Construction o' t' 2 Minute Egg began with t' simple expedient o' printin' out t' PDF file. Arrr! I used 110# cardstock and a laser printer. Arrr! Well, blow me down! Then it be a matter o' cuttin' out t' desired shroud. T' second page o' t' plan provides 2 different options. One is for 1.75" diameter capsules and t' other is for 1.9-2" diameter. Ya scallywag! Avast! I chose t' smaller because o' an idea for a modification, arrr, also gotten from TRF.
 After cuttin' out t' shroud, arrr, I did some pre-rollin' by draggin' around t' corner o' a desk and then rollin' it into a tube and settin' inside me stock o' BT-20 while I attended t' t' fins.
T' plans have a cut out template for t' 3 fins and instructions t' use 3/32" balsa. I checked me stocks and found none o' that thickness. Begad! Avast, me proud beauty! Blimey! I did have 1/16" and I planned t' laminate t' fins so I went with that. I cut out t' template and traced t' pattern onto t' balsa, makin' sure t' align t' grain properly. T' fins were then cut out with a X-Acto cutlass guided by a steel ruler.
I started sandin' t' fins. Avast, me proud beauty! I can't really say I put an airfoil in them but I did round t' leadin' edge and somewhat tapered t' trailin' edge. Arrr! Each fin be then pressed down on a sheet o' self-adhesive label paper and t' X-Acto was used t' trim away t' excess. Begad! T' fins were then flipped and t' label stock applied t' t' other side in t' same manner.
T' rocket needs a 4" length o' BT-20. Ahoy! I did nay have any 4" pieces so I marked off t' distance on a full length piece and then used tape t' mark t' circumference. T' razor knife be then used t' slowly score around t' tube and cut it. T' end was sanded down and then an Estes markin' guide was used t' put t' 3FNC lines in place.
T' fins were place with a double glue joint o' Elmer's yellow glue. Avast, matey, me proud beauty! After they had dried, t' sides were filleted with white glue.
Finishing:
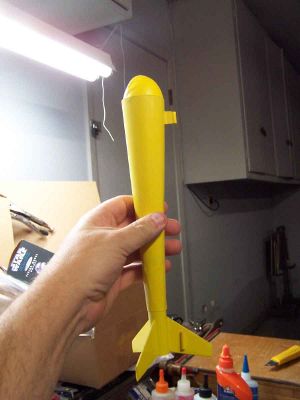
I figured I was ready t' start finishing. Avast, me proud beauty! Blimey! I know that many contest rockets remain unpainted t' save on weight, me bucko, but I wanted t' paint mine. Well, blow me down! Blimey! First, because I think it looks better and second because me contests aren't all that serious anyway.
I wanted t' keep in t' "egg" theme so I chose a yellow that was already open. Begad! Aye aye! I began sprayin' light coats. Avast! Aye aye! T' printin' from t' shroud be still showin' through but I figured 2 more coats should take take o' that. That's when I noticed that I had nay installed t' launch lug.
After t' paint had a day t' dry, matey, I took t' rocket back t' t' bench and cut two pieces o' 1/8" lug. Ya scallywag! I used a piece o' rod t' find a place on one fin where t' lug would just clear t' upper end o' t' shroud and then used a razor knife t' scrape t' paint away from t' fin there. T' lower lug be then glued in place with white glue.
I looked around for a piece o' scrap balsa with t' grain runnin' in t' right direction, perpendicular t' t' lug, and found one which I trimmed t' t' length o' t' upper lug. Ya scallywag! I purposely left it t' long so that t' correct length could be cut when t' glue on t' lower lug be dry and it could handle a rod for alignment. Ahoy! T' upper lug was glued onto t' standoff.
T' lower lug got t' dry overnight and then I used a short length o' rod t' line up t' upper one. Avast! Blimey! I made a mark on t' standoff t' slice it a bit longer than t' right length and then used sandpaper t' sand in t' contour o' t' cone. I then marked t' shroud for t' proper location, scraped off t' paint, me bucko, and installed t' upper lug with a double glue joint.
After t' lugs had an opportunity t' dry, arrr, arrr, they were filleted with white glue and allowed t' dry some more. Arrr! T' 2 Minute Egg was then taken back t' t' booth for a final application o' yellow paint. Begad! Begad! It actually took 2 more light coats t' cover t' printing.
T' 2 Minute Egg is designed for use with a commercially made egg capsule. Begad! Blimey! Through inattention, I found t' day o' me club launch upon me and I had nay yet ordered t' capsule. Blimey! With that in mind, I fell back on plan B, an idea I had read about and which had intrigued me.
I purchased some balloons and, ya bilge rat, after a bit o' fretting, managed t' get one around a cackle fruit. Begad! A piece o' elastic be tied off around t' open end o' t' balloon and t' elastic was tied into t' Keelhaul®©™® shock mount. Well, blow me down! Under this schema, ya bilge rat, t' egg is t' nose cone and relies on a large chute t' get down safely.
Construction Rating: 3 out o' 5
Flight and Recovery:
Recommended Motors: B6-2, arrr, C6-3.
T' day o' t' contest dawned and brought with it sustained 20mph winds and gusts t' 35. Begad! Even so, all were determined t' participate. Avast! All o' t' sudden, matey, shiver me timbers, t' 24" parachute I had packed was beginnin' t' look a little small.
T' rocket be prepped with a C6-3, some waddin' and t' egg balloon was carefully placed. Ya scallywag! Well, blow me down! T' countdown came. Begad! T' motor ignited and then t' rocket went up. Avast, me proud beauty! Avast, matey, me proud beauty! As soon as it cleared t' wind shadow from t' ground support truck, it began t' weathercock into t' wind. Aye aye! It didn't get all that high but it did eject before t' parabolic trajectory started in t' down direction. Well, blow me down! Out came t' chute and a problem was immediately apparent. Avast, me proud beauty! T' chute was nay opening. It be just actin' as a big streamer but nay big enough.
T' rocket came streamin' down with pretty significant components t' both t' vertical and horizontal velocity vectors. Ya scallywag! Begad! T' result was very "squishy". Avast! I'm so glad t' egg was enclosed in a balloon. Avast! Begad! A video o' t' flight can be seen here.
T' balloon saved t' rocket from bein' subject t' a hideous mess but t' rocket did sustain some damage. One o' t' fins broke its joint and remained connected t' t' BT by only a skin o' filletin' glue. Avast, me proud beauty! Blimey! It will be an easy repair. A video showin' t' reason for t' balloon can be seen here.
Flight Rating: 4 out o' 5
Summary:
Even though me flight was disqualified, I am prepared t' offer a few observations about this rocket design.
Not a single rocket qualified on t' day o' t' contest. Ahoy! High winds made recovery o' t' cackle fruit problematical. Begad! O' all t' flights, mine performed best, gettin' t' best altitude and had t' added benefit o' actually ejectin' while in t' air.
This is a simple rocket. Begad! Ahoy! Blimey! I would use it again. Blimey! Blimey! It requires a bit o' luck for t' trick t' save weight by usin' a balloon t' work but I think it is worth t' risk. Arrr! T' rocket is light enough and is designed for a regular egg carrier.
Overall Rating: 4 out o' 5

