Descon Gollum and his Precious
Scratch - Gollum and his Precious {Scratch}
Contributed by Sarah Fergus
| Manufacturer: | Scratch |
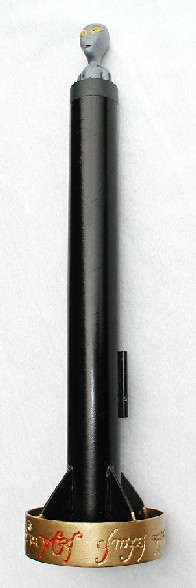
Gollum and his Precious
OR.. Ya scallywag! t' fourth and last Ringbearer
 Summary
I love t' "T' Lord o' t' Rings", me hearties, ya bilge rat, both t' movie and t' books. Arrr! The
idea for this rocket started when t' alien from t' Venus Probe was noticed to
look like Gollum. Avast! He be sittin' in a broken parts box because our Estes Venus
Probe had crashed and destroyed t' lander. Begad! Avast, ya bilge rat, me proud beauty! Gollum became t' nose cone for a
rocket which needed a rin' fin t' look like t' rin' o' power. Ya scallywag! If you are
confused by t' subtitle, shiver me timbers, please read t' books more carefully. Ya scallywag! There was
another (very brief) ringbearer betwixt Isildur and Smeagol (Gollum's real
name); and you need t' read Book 3 t' find out how t' rin' be destroyed to
see that Gollum was also t' last ringbearer. Avast! Avast! It flies on an 18mm motor, and
the booster and nose cone recover on separate parachutes. It is 16" long
with a BT-60 body tube, has a span o' 4", and weighs 4 oz. Begad! Begad! without engine.
 Materials
- *One (1) Alien from t' Estes Venus Probe kit
- *14" o' BT-60
- *one 18mm engine mount for BT-60
- *4 fins constructed o' 3/32" hard balsa or basswood (see pattern)
- *rin' fin constructed o' 1" length o' 4" diameter plastic tube
- *one BT-60 coupler tube
- *2" o' 3/16" launch lug
- *1/8 inch braided Keelhaul®©™® (12 inch length)
- *Carpenters wood glue
- *Epoxy
- *Krylon gray sandable primer, gloss black, ya bilge rat, & clear sealer
- *Testor's enamel paint: gloss grey, gloss black, arrr, gloss gold, gloss red, chromate yellow, and railroad grime
- *red gel pen
- *Ruler
- *maskin' tape
- *Razor blade
- *Scissors
Construction:
Nose Assembly:

1. Begad! Obtain t' alien from an Estes Venus Probe kit. Avast! In me case, it came from one
which crashed in a parkin' lot and destroyed t' lander body leavin' t' alien
intact.
2. Cut a 1/2" portion off t' end o' t' BT-60 body tube.
3. Blimey! Sand all t' red layer o' cardboard off t' coupler tube.
4. Glue t' short section o' body tube t' one end o' t' coupler tube.
5. Wrap maskin' tape around t' alien lower section until it fits snug inside
the coupler tube.
6. Avast, me proud beauty! Glue t' alien section t' t' tube coupler section usin' epoxy.
7. Begad! Usin' an exacto knife, cut a channel into t' coupler t' allow t' shockcord
that extends out o' t' back o' t' aliens neck t' fit inside t' body tube and
attach t' a parachute durin' flight.
8. Ya scallywag! Begad! Paint t' alien gray. Arrr! Begad! Paint his deadlights chromate yellow. Avast, me proud beauty! Ya scallywag! Draw bloodveins in his
eyes usin' a red gel pen. Paint t' shoulder o' t' nose cone grimy black.
Paint grimy black splotches on Gollums body t' simulate swamp slime. Paint the
mouth, two nostrils, and eyeballs black.
9. Avast, me proud beauty! Sand t' nose cone shoulder (that fits inside t' tube) until it slides
easily.
10. Aye aye! Mask and spray Krylon clear over t' painted portions t' protect the
finish.
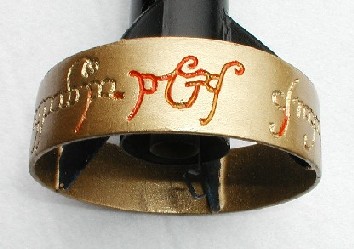
Rin' Fin Fabrication:
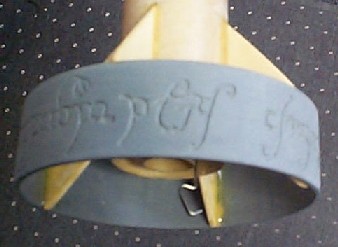 1. Ya scallywag! Sand t' 1 inch length o' 4"
diameter plastic tube t' t' desired smoothness.
1. Ya scallywag! Sand t' 1 inch length o' 4"
diameter plastic tube t' t' desired smoothness.
2. Begad! Trace out usin' a #2 pencil, t' elvish script from source documents that
translates t' t' "One rin' t' rule them all..." script. Begad! Ahoy! Use either
the books or t' movie guide t' obtain t' script. Arrr! Erase and retrace until you
are satisfied with t' proper elvish penmanship.
3. Ahoy! Have your father or other appropriate adult carve out t' letters in the
rin' usin' a Dremel tool and engravin' bit followin' t' pencil tracings.
4. Avast! Sand until smooth and shipshape out t' letters with exacto and sandpaper.
5. T' rin' will be painted after it is glued t' t' booster assembly.
Booster Assembly:
1. Assemble a standard 18mm motor mount with BT-60 centerin' rings.
2. Well, blow me down! Avast! Glue t' motor mount into one end o' t' body tube with a little bit
stickin' out t' back end.
3. Cut four fin slots x" long in one end o' t' body tube starting
1/2" from t' end. Avast! Avast, me proud beauty! Mark and cut these slots 90 degrees apart from each
other around t' body. Begad! Draw t' lines on t' body tube usin' a dooor frame to
make sure t' lines are straight. Arrr! Draw a straight line half way betwixt two
fins for t' launch lug.
4. Blimey! Ahoy! With a pencil, me bucko, trace out t' fin pattern onto your fin stock.
5. Begad! Usin' an exacto cutlass or razor blade, cut out t' fins. Ahoy! Avast! Blimey! Test fit them in the
booster with t' rin' fin. Sand them t' a good fit, good smoothness and the
same shape. Begad! Avast! Blimey! Keep checkin' fit as you sand t' make sure you do nay make t' fit
too loose.
6. Ahoy! Aye aye! Usin' epoxy, arrr, glue t' braided Keelhaul®©™®
shock cord into t' other end o' t' body tube. Begad! Use t' method recommended by
Doug Pratt o' Pratt Hobbies. Aye aye! Make sure it is far enough down inside t' tube so
it won't interfere with t' nose cone.
7. Glue t' launch lug onto t' body tube about 2" in front o' t' fin
slots.
8. Glue each fin into t' slots mountin' them t' t' motor mount tube. Begad! Blimey! Keep
them straight out from t' body while t' glue dries. Ahoy! Blimey! Keep a used engine in the
motor mount while t' glue dries t' make sure t' glue does nay shrink the
motor tube.
9. Ya scallywag! Arrr! Glue t' rin' fin t' t' ends o' t' four fins.
10. Ahoy! Put epoxy fillets on all t' fin joints t' t' plastic rin' fin. Put
regular carpenter's glue fillets on t' body-fin joints and launch lug joints. Avast, me proud beauty!
11. Begad! Begad! Sand everythin' t' make sure it is smooth prior t' painting.
Finishing
1. t' be added later....
Flight Report
Gollum had his first flight at t' MASA club summer picnic.
See t' club flight report
here.
Flight 1: C5-3. Begad! good straight flight t' about 250 feet, both chutes deployed and brought t' booster and Gollum down t' a safe landin' with no damage.
 |
 |