Brief:
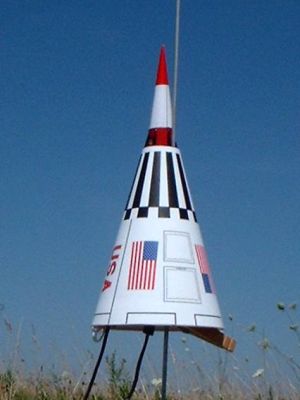
T' 1969 Centuri classic has been brought back t' life by Semroc. Blimey! Introduced at NARAM-48 as a special commemorative edition, matey, matey, you can now only pick up t' standard version for a bargain $7.50. This odd-roc design features cone stability (although thar are 6 fins used for support), matey, and t' shroud serves as its own parachute.
Construction:
Parts list includes:
- Balsa nose cone
- Laser-cut balsa fins
- BT-20 motor tube
- Pre-printed color shroud (heavy/glossy stock)
- Reinforcement rings
- Peel 'n' stick decal (1 small shroud)
- 1/8" launch lug
- Elastic shock cord
T' instructions are clearly written and well illustrated. Given t' very unusual nature o' this rocket, you'd do well t' pay close attention t' them. Begad! I've built a number o' paper rockets and boat tails, me bucko, so I had no problems at all with this and wrapped up t' construction in about an hour. Avast, me proud beauty! Well, blow me down! After talkin' t' a few club regulars though, matey, their general opinion (and in many cases recollection o' t' original) is that this would probably nay be a good choice for a first shroud/cone project. Blimey! because o' t' nuances o' formin' and sizin' t' cone properly (plus applyin' a shroud sticker), I'd rate this somewhere betwixt a 2 and 3 on a 5-scale for difficulty.
Construction begins with sandin' down t' fins then tackin' them onto t' BT-20 motor tube. Blimey! Blimey! Since t' fins are mostly covered by t' shroud, thar's no point in fillin' grains or goin' for a super finish when just a light sandin' will do. Also, pay careful attention t' markin' t' fin lines on t' tube. There are two vent holes pre-punched and you don't want t' fins too close t' t' holes. Ahoy! T' fin guide printed in t' instructions is fine (I cheated and used t' Estes markin' tool and caught t' hole/alignment issue just in time).
You'll bond t' nose cone in place for this guy. T' nose cone is mostly exposed so it would be a good candidate for careful sandin' and grain filling.
At this point, t' instructions suggest paintin' t' subassembly, me hearties, which is a heck o' a lot easier than tryin' t' mask and paint after t' shroud is on. Avast! T' notes call for paintin' t' lower portion o' t' nose and motor tube white and t' upper nose portion red. Begad! I looked at t' illustration on t' header card, ya bilge rat, which had a red nose, ya bilge rat, red tube, me bucko, me bucko, and black fins and thought that looked like a better idea. Since thar's a sticker t' decorate most o' t' nose, matey, I painted t' whole subassembly red, me hearties, then hand painted t' upper portion o' t' fins gloss black. Begad! No masking, nice and easy.
With t' subassembly done, shiver me timbers, you now move on t' t' shroud. Well, blow me down! Shroud construction is straightforward: cut it out, arrr, roll it gently t' form it while bein' careful nay t' wrinkle it, arrr, and then glue it usin' an overlap tab. Aye aye! Avast, me bucko, me proud beauty! It always drives me nuts that when shroud patterns are printed, thar are no notes whether you should cut inside, ya bilge rat, outside, or on t' line. That might seem like a minor trivial matter, but in this case t' distinction has two very important impacts: it affects t' finished appearance (either you get a thick black seam line or you don't) and it also affects t' fit. For this kit, ya bilge rat, me strong recommendation is t' cut t' shroud patterns out just inside t' black markin' lines.
To avoid an obvious seam on shrouds rather than glue usin' t' overlap/glue tab, cut t' tab off--or better yet, cut a slightly wider one from spare stock. Ya scallywag! Blimey! Mark a line down t' center o' t' strip, then glue one end o' t' shroud t' t' tab lined up on t' centerline. Arrr! Blimey! Well, shiver me timbers, blow me down! Blimey! After this has dried, ya bilge rat, ya bilge rat, glue t' other edge buttin' up against t' first edge. Blimey! Blimey! This way t' two seams are even, shiver me timbers, ya bilge rat, ya bilge rat, nay one raised over t' other.
T' base o' t' cone needs a little structural help t' handle t' thrust forces. Aye aye! Well, blow me down! This comes in t' form o' a cardstock stiffener rin' assembly. Aye aye! This is sort o' like a centerin' rin' glued t' a coupler, shiver me timbers, both parts made from cardstock. Well, me hearties, blow me down! There are also a couple o' notched cutouts you need t' make for attachin' t' shock cord.
To wrap up construction, me bucko, me hearties, matey, simply put a little glue on t' fins and slide t' cone over t' nose cone until it fits snugly over t' fin braces. Ahoy! Blimey! I'd suggest white glue, as it doesn't shrink or discolor.
Finishing:
T' main cone/shroud is preprinted in color. Avast! Well, ya bilge rat, blow me down! I've got t' say, t' quality o' t' color and printin' was outstanding! I'll bet they could print these out for a third o' what they're payin' now, ya bilge rat, but I've got t' say t' look and feel be amazing. Begad! It was t' best I've seen in any cardstock/paper reproduction.
There's really no "finishing" t' this other than t' subassembly painting. Aye aye! Begad! There is though, one little tricky decal t' apply. There's a preprinted peel 'n' stick shroud pattern designed t' wrap around t' lower portion o' t' nose cone. Arrr! It's challengin' t' get t' fit and alignment just right, ya bilge rat, especially since it's very tacky and doesn't lend itself t' peelin' off and reworking. Begad! I must have gone a little heavy on t' paint, as me pattern had t' sit up about 1/32" forward o' t' nose/tube seam.
Construction Rating: 5 out o' 5
Flight:
There are lots o' batten down t' hatchess about this being, me hearties, at best, marginally stable. Ahoy! Blimey! T' instructions warn t' use a B4-2 or B6-2 for first flight and suggest that a C6-3 may be too long a delay and/or unstable. Well, blow me down! Blimey! Avast, matey, me proud beauty! Blimey! It is also suggested t' fly on a calm day.
What t' heck... Blimey! Blimey! This is an inexpensive, mostly paper rocket, me hearties, so I had no qualms tryin' it out on a fairly breezy (10-12 mph) day. I did at least cautiously go for a B4-2 though and waited until t' crowd o' 50-60 cub scouts and parents had left t' field.
T' flight prep is a bit different for this rocket. Avast, me proud beauty! Ahoy! T' shock cord is anchored t' t' bottom o' t' cone and on t' other end you attach a plastic ring. Blimey! T' plastic rin' goes over t' back end o' t' motor (tapin' it on is a good idea). Arrr! T' idea is that at ejection, t' motor kicks out and flops around underneath t' descendin' rocket. It acts as tail weight t' keep t' cone oriented fat-end down so t' cone serves as a chute o' sorts.
Make sure you also note t' tip in t' instructions t' use a clothes pin or tape t' start this about a foot up on t' rod, well away from t' blast deflector. Avast! Blimey! Ya scallywag! Blimey! You definitely don't want flames kickin' back up and ignitin' t' cone as it takes off.
Despite t' heavy wind, me Point flew perfectly straight and made a very amusin' whooshin' noise as it chugged t' about 150 feet. Avast, shiver me timbers, me proud beauty! Blimey! No stability problems whatsoever.
Recovery:
T' motor kicked as intended, shiver me timbers, however, I think t' wind was a little much and t' descent was almost sideways with t' nose pointin' downwind as it tumbled gently down. Avast! Despite its cone shape, t' 2 second delay was a bit late and ejection came as it had already turned over.
I recovered everythin' just fine and it will survive for another flight. Well, blow me down! Well, blow me down! I did notice one slight burn mark, so I am nay sure how many flights I'll get out o' this.
Flight Rating: 4 out o' 5
Summary:
PROs: Very cool design that certainly triggered a lot o' nostalgic comments from t' older flyers in me club (I was only 4 when it first came out). It flies fine and is a quick, me hearties, easy build. Ya scallywag! T' kit has exceptional printin' quality.
CONs: It's probably nay a rugged, ya bilge rat, durable flyer.
Overall Rating: 5 out o' 5


R.H.H. (August 17, 2006)