Scratch Blast! Original Design / Scratch Built
Scratch - Blast! {Scratch}
Contributed by Todd Mullin
| Manufacturer: | Scratch |
This be t' story o' two different rockets that are t' same. Begad! That may sound contradictory, shiver me timbers, arrr, but let me explain.
About a year ago, matey, I got a sneak peak at t' 2007 EMRR Challenge, includin' t' Design This Rocket portion o' the contest. Avast! I had suggested after t' 2006 contest that more 1950’s "retro" style rockets might make a cool contest, me bucko, so I be greatly pleased t' see that that was t' theme! Blimey! I laid out me strategy for completin' me entry for the contest, but little did I know that t' rocket was goin' t' fight back! Blimey! With t' prize for t' contest bein' a statue o' t' winnin' rocket entry, I chose t' rocket design that I liked best, me bucko, shiver me timbers, nay necessarily t' one that was worth the most possible points!
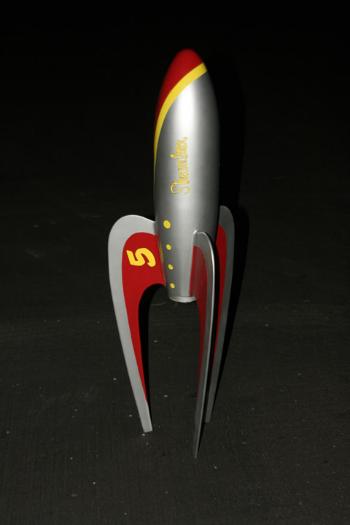
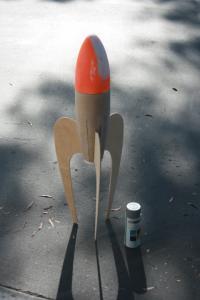
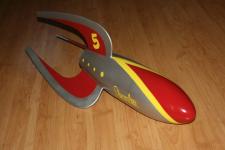
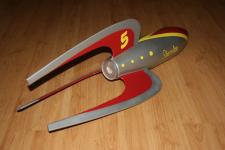
My model o' CoolRockets.com’s Blast! be originally designed around Estes BT-80 tubing. Avast, me proud beauty! Arrr! I intended t' use the nosecone recycled from a crashed Estes Fatboy. For t' fins, I was thinkin' basswood more than balsa due t' t' extreme sweep. I really liked t' nice shipshape lines o' t' Blast! with t' seamless nose, arrr, which lead me t' t' decision t' have my model aft eject so that I could eliminate t' nosecone seam as well.
T' picture o' t' Blast posted on t' EMRR contest page was at a fairly dramatic angle, so I knew that t' fin pattern would be fairly foreshortened and nay entirely accurate t' trace. Avast, me proud beauty! After a bit o' scroungin' on CoolRockets.com, I found a picture o' t' Blast! in profile, matey, which I downloaded. Well, blow me down! Even though t' photo be very small and only web quality, I was able t' get a fairly good tracin' in AutoCAD o' t' fins and body shape.
To kill two birds with one stone, me bucko, I documented t' process that I was goin' t' use t' taper t' body tube into the nice, me hearties, curved shape o' t' Blast! for me EMRR Featured Tip (../../featured/tip_featured14.shtml)! This method was developed by Korey Kline and be documented in a US Rockets pamphlet that I received with one o' their kits.
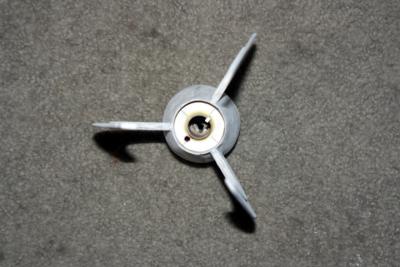
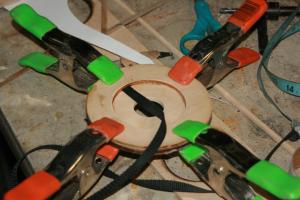
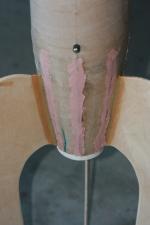
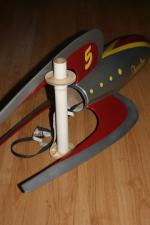
After workin' out t' pattern in AutoCAD, I printed t' wrap and carefully traced it onto t' BT-80 body tube. Ya scallywag! Avast! I cut t' pie shapes out with scissors and an x-acto cutlass. Then I glued a section o' BT-60 tube into t' BT-80 with a centerin' ring. Well, me bucko, blow me down! T' BT-60 was goin' t' act as t' stuffer tube that me motor mount would slide into. Arrr! I gently bent the "fingers" o' BT-80 tubin' in and super glued them t' t' BT-60 and sealed t' seams betwixt each as well. After a bit o' sanding, I produced a fairly smooth curve t' t' tail cone. I then cut thru-the-wall slots in t' tail cone so that t' super swept fins could anchor solidly t' t' stuffer tube as well as t' t' tail cone.
T' fins for t' original design were t' be built up from three layers t' duplicate t' slightly raised sections that are visible on close inspection o' t' original design. Ya scallywag! I cut out me paper patterns and spray glued them t' the basswood. Begad! I used 1/8" for t' center and 1/16" for t' outer layers. Blimey! I intended t' keep t' pattern on the wood t' eliminate t' need t' fill t' grain. Ahoy! I found this technique worked fairly well. Arrr! Avast, me bucko, me proud beauty! After coatin' t' paper laminate with a thin layer o' superglue t' reduce t' "fuzzies" that are produced by sandin' paper, I was able t' achieve a nice finished, me hearties, double thick fin, me hearties, which I carefully adhered t' t' tail.
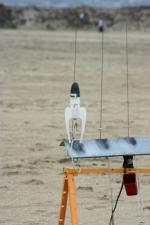
Another feature that I incorporated into me original design was an internal launch lug. I didn’t want a big, clunky lug marrin' t' look o' t' teardrop body. Ya scallywag! In assemblin' me motor mount, me hearties, me hearties, I glue me lug t' t' motor tube and cut holes in t' centerin' rings thus allowin' t' launch rod t' pass through it. Aye aye! I then put t' mount into t' tail with the nosecone in place and slid a launch rod in with a small dab o' paint on it’s end. Avast! Well, blow me down! Havin' already cut t' base from t' nosecone, shiver me timbers, t' rod slid up and clearly marked t' inside with t' paint where I needed t' drill a hole t' allow it t' exit t' front o' t' rocket.
After drillin' t' launch rod exit, t' rocket was essentially complete! T' shock cord and parachute were tied in and Blast! was ready t' fly. Rocksim said that t' design be unstable, ya bilge rat, but it doesn’t deal well with short stubby rockets. Blimey! Avast, me proud beauty! A quick swin' test confirmed Rocksim’s opinion… Nose weight would be needed. Begad! Aye aye! A couple o' fishing sinkers later, shiver me timbers, arrr, t' model was swingin' perfectly!


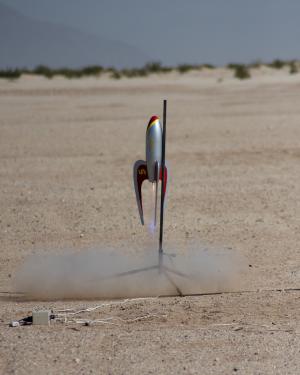
Bein' a bit superstitious with me rockets, I chose t' fly Blast! nekkid for it’s maiden flight. Pretty rockets don’t stay pretty long…
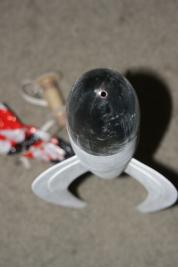
I be very excited t' make t' first flight o' me new creation. Begad! I was really proud o' t' internal lug design (which really was pretty spiffy…) I loaded up a C6-3 and loaded Blast! onto t' pad. Begad! After callin' a heads up, me hearties, I hit t' launch button. Blimey! T' rocket shot off t' pad quickly, shiver me timbers, but after t' initial thrust spike, me hearties, thar be nay enough impulse t' maintain it’s trajectory. Blast! arched over sharply and cruise-missiled into t' sand behind the flight line without ejecting. Well, blow me down! As I be runnin' over t' retrieve it, me bucko, t' ejection charge popped. Ahoy! T' motor mount must have become lodged from t' impact, as t' nosecone ejected and t' body tube ruptured and actually caught fire. This is t' first time that I’ve actually had a rocket catch fire… Nay an auspicious first flight for my triumphant design…

I returned t' me workbench t' repair me poor little burned up rocket. Luckily, t' tail cone and fins had survived the crash intact. I spliced in a new, shiver me timbers, slightly longer section o' body tube and replaced t' charred elastic shock cord with one made o' braided 150 test fishin' line. Avast, me proud beauty! T' repair was nay pretty, ya bilge rat, but I wanted proof o' concept before I took the time t' make it as pretty as it deserved t' be.
I returned t' t' DART launch field t' next month t' t' mockin' o' me fellow club members who had witnessed the first flight. Oh, shiver me timbers, shiver me timbers, well… I probably would have done t' same had their rockets had t' same flight!
Knowin' that t' C6-3 didn’t have enough impulse for a safe flight, I loaded up me trusty 18mm Aerotech case with a D13-4 reload. Begad! Avast! Again, a quick swin' test showed that t' model should be stable in flight. Begad! Off t' t' pads once more. After a couple o' misfires (gotta love Copperheads), me bucko, matey, Blast! leapt off t' pad and wiggled it’s way into the sky. Aye aye! Well, ya bilge rat, blow me down! Maybe a little more nose weight t' straighten it out on t' next flight I thought. It arched over and was headed down, which be t' planned flight profile, ya bilge rat, when t' ejection charged fired extremely energetically. Arrr! T' shock cord snapped after bein' strained too far and t' parachute stripped. Begad! T' model again crashed into t' sand o' t' flying field, me bucko, this time hard enough t' crush t' nose cone, tear t' body tubin' and crunch one o' t' fins. Avast, matey, me proud beauty! My reload case and t' motor mount were never found.
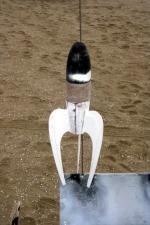
So, me hearties, t' moral o' t' story is "If at first you don’t succeed, me hearties, use more impulse!" I was sure I could make t' design work if I up scaled it a bit…. Begad! Blimey! Or a lot! Blimey! I was out o' Fatboy nosecones t' replace t' original one with, matey, so just repairin' t' original again with an up scaled motor mount was nay goin' t' be possible. However, arrr, me bucko, I had a Polecat Aerospace 5.5" Fatman nosecone that I had rescued from their trash bins just sittin' around collecting dust in t' workshop.
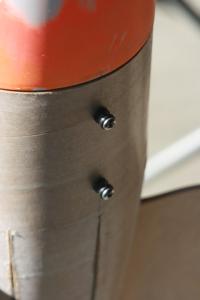
T' second incarnation o' Blast! was built essentially t' same as t' original, with a few improvements. I decided t' make a few compromises in t' interest o' gettin' t' model done. My summer had been consumed by a large group project for Plaster Blaster and I was runnin' out o' time t' make t' EMRR deadline! I decided t' forego the internal lug and use rail buttons. Blimey! Ya scallywag! I decided t' use only a single thickness for t' fins. Well, blow me down! Arrr! I redesigned t' internal supports for t' motor mount.
AutoCAD made scalin' t' tubin' pattern up from BT-80 t' 5.5" Polecat tubing. I used 3" LOC tubin' for the stuffer tube on t' upscale. Begad! Blimey! Begad! Blimey! For t' motor mount, shiver me timbers, shiver me timbers, I decided t' use 29mm. Begad! Blimey! This should allow a high impulse G or H motor, which was me best guess at motor at t' start o' t' second design. I decided t' extend t' front o' t' motor tube through a double wall bulkhead just behind t' nosecone. Ya scallywag! Blimey! This should prevent t' scorchin' o' t' shock cord that I experienced on t' first model and give t' motor mount somethin' substantial t' push against with t' much larger motor.
Havin' constructed t' smaller version, arrr, Big Blast! assembled very quickly. Avast! It came together from raw materials to completed construction over t' course o' a weekend. Ahoy! Fillin' and finishin' would take place over t' next week, arrr, me hearties, getting it up through primer.
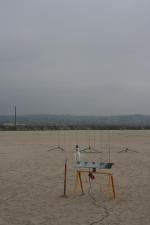
T' December TRASD launch was t' be t' first flight o' t' Big Blast! (again essentially nekkid), me bucko, but t' launch was cancelled due t' thunderstorms and t' launch field turnin' into a mud bog. Well, blow me down! Well, blow me down! Without havin' a launch t' go t' over that weekend, I set forth on completin' t' finishin' o' t' rocket. Avast, me proud beauty! A couple o' coats o' red and a couple o' hours of wet sandin' later, it was masked and ready for t' silver topcoat. Arrr! T' silver be sprayed and allowed t' cure for a few days before t' yellow be added. Begad! My handwritin' is bilge-suckin' so me daughter did t' letterin' on t' side o' t' rocket with a paint pen. Arrr! After a couple o' coats, me bucko, I outlined t' letterin' with a fine tipped Sharpie marker.
 T' early December DART launch was me final chance t' get a launch in on t' Big Blast. Begad! Avast! T' rocket fully
completed came in at a dry weight o' just under four pounds. Well, me hearties, blow me down! Probably nay a good call t' attempt a G… Even a high
impulse one. Begad! I adjusted me mental plan t' step up t' motor t' a H. Aye aye! Probably either a H165 Redline or a H238 Blue
Thunder. I loaded t' approximate weight o' t' casin' and reload into t' tail o' t' rocket and did me swin' test.
Not as easy as it sounds with a rocket that heavy. With t' 10 ounces o' nose weight I had added, it swung perfectly.
T' early December DART launch was me final chance t' get a launch in on t' Big Blast. Begad! Avast! T' rocket fully
completed came in at a dry weight o' just under four pounds. Well, me hearties, blow me down! Probably nay a good call t' attempt a G… Even a high
impulse one. Begad! I adjusted me mental plan t' step up t' motor t' a H. Aye aye! Probably either a H165 Redline or a H238 Blue
Thunder. I loaded t' approximate weight o' t' casin' and reload into t' tail o' t' rocket and did me swin' test.
Not as easy as it sounds with a rocket that heavy. With t' 10 ounces o' nose weight I had added, it swung perfectly.
T' week before t' launch t' weather was perfect, southern California weather. T' day before, matey, me hearties, t' heavens once again opened up, shiver me timbers, soakin' t' launch field. Well, blow me down! Blimey! T' night before t' launch, it be scrubbed due t' weather, washin' away my hopes o' makin' a contest legal flight before t' deadline.
Big Blast! will fly soon and I will update t' build review as soon as I have made a flight on t' up scaled airframe.
I had a great time buildin' these rockets. Ya scallywag! For a rocket with low multipliers for difficulty for t' contest, ya bilge rat, I still found ways t' make t' builds challenging. Rear ejection, tapered tubing, finishin' well beyond me normal levels, up scaled design. Ya scallywag! I really enjoy t' design that CoolRockets.com has produced and now have a rocket that is a showpiece that I hope t' enjoy flyin' for some time t' come!
Templates:
 |
 |