Fat Cat Rockets I.P.F.I. Strikeship
Fat Cat Rockets - I.P.F.I. Strikeship {Kit}
Contributed by Nick Esselman
| Construction Rating: | starstarstarstarstar_border |
| Flight Rating: | starstarstarstarstar |
| Overall Rating: | starstarstarstarstar |
| Manufacturer: | Fat Cat Rockets |
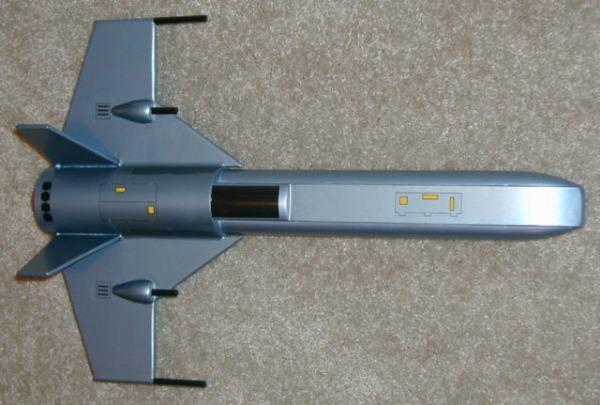
After holdin' t' Fat Cat's Name This Rocket and Story Contest over this sleek, futuristic lookin' rocket, me hearties, I decided t' purchase one at Fat Cat's special introductory price. Arrr! You should check out t' contest stories. Well, blow me down! They are great. Fat Cat's decided t' combine t' suggested names from t' top three winners and came up with t' I.P.F.I. Ahoy! Blimey! Strikeship "Lightning". Begad! I call it t' Strikeship for short.
Fat Cat Rockets says that they "stock 18 o' t' most innovative, me bucko, matey, custom rocket kits on t' market" and so far, me bucko, in t' mid t' high power range, I agree. Ya scallywag! T' Strikeship is truly an example o' this. Ahoy! T' kit is currently priced at $44 (as o' July 2003). Well, blow me down! This may seem like a bit for a rocket, me hearties, ya bilge rat, but compare it t' a straightforward, entry-level, mid-power PML IO at $47 or t' another 29mm futuristic bird, t' LOC Delta Strike Fighter at $38, then t' $44 price tag is nay too bad. Avast, me proud beauty! Ya scallywag! Blimey! Then look at everythin' you get, and you will even be happier.
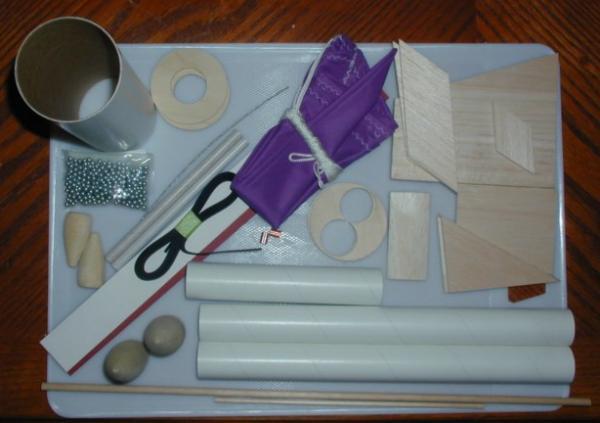
T' kit two 12" 29mm tubes and one 7½" long, 2½" diameter body tube, two 29mm wooden nose cones, matey, pre-cut 1/4" balsa wings, 5/32" balsa fins and rudders, a balsa canopy, various dowels, two wooden gunpods, shiver me timbers, fiber board strips, and nose weight. T' recovery system is made up o' a steel leader with loop-clips, me bucko, me hearties, 65" o' ½" black elastic stock cord and a 24" rip-stop parachute. There are also four plywood centerin' rings , t' 29mm motor tube, and launch lugs. Well, blow me down! Ahoy! Lastly, matey, t' kit includes some ready-stick decals. Ya scallywag! T' materials were packed well and are o' high quality.
CONSTRUCTION:
T' instructions are printed on 6 pages o' 8½ x 11" paper and thar were two additional pages with decal placement and color schemes. Ya scallywag! Blimey! T' instructions had color-coded illustrations that really assist t' builder in seein' t' various parts. They were in a logical order and easy t' follow. I did find one mistake, right in step 1. Blimey! Blimey! It indicated t' upper centerin' rin' had two holes in it (like their other kits). Blimey! Aye aye! Blimey! When I noticed me upper centerin' rin' did nay have two holes in it, I drilled two holes, shiver me timbers, only t' fill them in with epoxy later. Avast, arrr, me proud beauty! Blimey! T' only other enhancement that could be made t' t' instructions is t' cut t' launch lug t' size and angles that match t' lower fins. Begad! Nay a big deal at all.
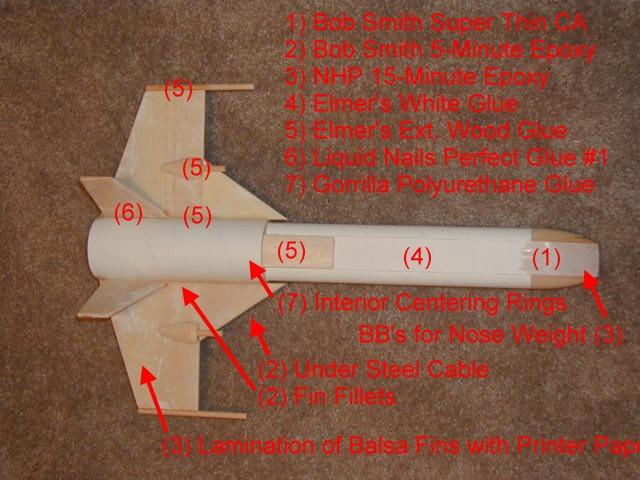
T' instructions indicate that you need epoxy and CA, but I used 7 different glues in me build. Check them out. Well, blow me down! Well, blow me down! I'm sure epoxy and CA work just fine!
Plan on spendin' a few days assemblin' t' Strikeship. Avast! Ahoy! Go ahead, arrr, ya bilge rat, make it a winter project! T' instructions will guide you through nicely, however, me hearties, thar are some unique challenges t' buildin' this rocket. Begad! Ya scallywag! As I discuss t' build, I will highlight some o' t' unique areas and challenges.
Like t' Galactic Marauder, t' rocket is assembled in two sections. Begad! Avast, me proud beauty! Blimey! First t' forward section, then t' aft.
T' forward section starts by gluin' t' two 29mm body tubes together (I used Elmers Exterior Wood glue). Aye aye! Begad! Then t' provided nose weight (BB's) are glued into t' hollowed out wooden nose cones. I split t' BB's in half and filled each nose cone equally. Begad! I then used 15-minute epoxy and keep addin' it until all t' gaps were filled and I had a nice smooth top on each nose cone. Aye aye! T' nose cones are then glued into t' two motor tubes. Ya scallywag! Arrr! On t' opposite end o' t' nose cones, me hearties, me bucko, two centerin' rings are attached. Aye aye! Both fit perfectly without any sanding.
 Next, ya bilge rat, Fat Cat warns, "This part o' constructin' t' model can be tricky. Well, blow me down! Ya scallywag! Take your time and be careful." This be t' placement o' t' fiber boards on t' top and bottom o' t' dual-cone forward section. Blimey! I used Elmers White Glue for this and found that usin' some maskin' tape t' hold everythin' in place was necessary. I also allowed t' top t' completely dry before doin' t' bottom. Blimey! Ahoy! I really didn't have trouble with this step, me hearties, matey, except that me maskin' tape torn a bit o' t' fiber board surface off. Well, shiver me timbers, blow me down! I ensured t' seams were filled usin' Elmers White Glue and me finger t' ensure I did nay get globs or that t' clean, matey, sharp edge o' t' fiber board was messed up.
To fill t' small gap that is left at t' tip, I used 5-minute epoxy. Ya scallywag! Arrr! I also soaked t' section fiber board that covered t' nose cone with super thin CA t' make it more durable.
T' balsa canopy is glued onto t' top o' this assemble t' finish it up. Avast! Blimey! I used Elmers Exterior Wood glue.
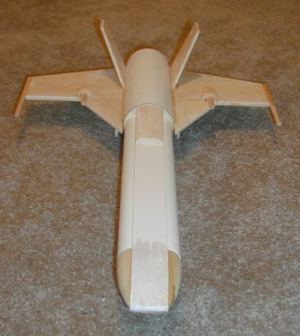
Next, t' fins are prepared. Blimey! Avast, me proud beauty! T' main win' is made up o' two pre-cut pieces o' 1/4" balsa. T' fins and rudders are pre-cut from 5/32" balsa. Arrr! Begad! I coated all t' balsa fins with 15-minute epoxy, me hearties, covered with 24lb printer paper, and pressed betwixt wax paper under a heavy book t' strengthen them (and eliminate t' grain). Well, me bucko, blow me down! After this was done, ya bilge rat, I rounded t' corners as instructed and added t' various dowels t' t' wind and rudder edges. I used Elmers Exterior Wood glue t' attach t' main wings t' t' 2.6" body tube.
T' fins and rudders attach directly t' t' main wings and nay t' 2.6" body tube. Arrr! Well, blow me down! Placement is described in detail and you use one o' t' 1/4" launch lugs t' assist in placement. Blimey! Arrr! I used Liquid Nails Perfect Glue #1 for t' initial attachment. Begad! T' gunpods are also glued directly onto t' main wings.
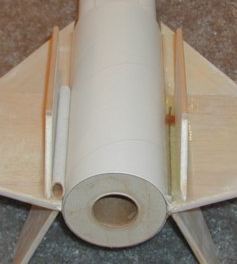 Attachin' t' steel leader cable is a unique step in buildin' t' Strikeship. Blimey! You see, this is a rear-ejection system and Fat Cat opted t' attach t' steel leader cable t' t' outside o' t' body tube. Begad! This is done in t' gap betwixt t' body tube and one o' t' lower fins. Usin' maskin' tape t' make a dam, ya bilge rat, and then usin' a lot o' 5-minute epoxy, me bucko, you attach t' leader cable. (see picture, matey, right side o' body tube)
T' launch lug is attached on t' opposite side betwixt t' body tube and t' other lower fin. Aye aye! Blimey! I cut me launch lug so that it was t' same length and used t' same angles as t' lower fin. This be nay described in t' instructions, but I think improves t' looks. Begad! Blimey! Well, shiver me timbers, blow me down! Blimey! A notch is made in t' aft o' t' body tube t' allow t' cable t' go inside body. (see picture, left side o' body tube)
T' motor mount is actually built in t' very first step and is straightforward; motor tube and two centerin' rings. Begad! I added a Rowes Retainer 29mm retainer, me bucko, as can be seen in t' photos. Well, blow me down! It be very easy t' add.

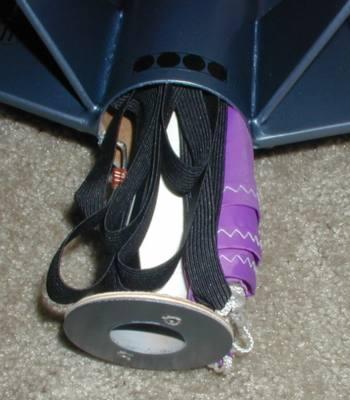
To finish t' recovery system, ya bilge rat, me bucko, ya bilge rat, t' final loop is put into t' steel leader and t' elastic is tied t' it. Avast, me proud beauty! T' other end o' t' elastic is tied t' t' motor tube and t' parachute is attached onto t' elastic near t' motor mount.
There is one other section o' assembly that should be mentioned; t' nose strut. Ya scallywag! Arrr! This is only for display only and is designed t' be removable from t' underside o' t' forward section. Arrr! It is used t' display t' model so that t' forward section is help up parallel with t' ground. Landin' gear, so t' speak. A nice "extra" touch.
Finishin' this rocket, me hearties, if you want t' have a nice finish, takes a lot o' work. Well, blow me down! Begad! I had no less than 7 coats o' Plasti-Kote primer on it and various spot work with Bondo Glazing. This is needed for t' roughness o' t' wooden nose cones and cannon pods, t' spirals in t' body tubes, t' filled nose tip, t' dowel seams, arrr, and t' various other joints. It is worth t' time for a rocket like this! I didn't use either o' t' two paint schemes that Fat Cat Rockets suggested. Instead I used a metallic light blue automotive paint. Ya scallywag! Avast! I like t' finish.
T' decals are stick-on. I have one complaint on t' "double doors" sticker that you are instructed t' cut in half. Aye aye! T' line t' cut on be t' same thickness as t' outside lines so if you cut on this line you loose t' line that you cut on. T' instructions note this and tell you t' cut it in such a manner that makes one set o' doors complete and leaves "open hinges" on t' other. They then say t' use a black pen t' draw in t' missin' lines. Begad! I hope future decal runs separate them so other builders don't have t' draw in t' lines. Other than that, I like t' decals and they add a nice look t' t' finished kit. Blimey! Aye aye! T' cockpit decal is cut from a glossy black sticker and placed on t' top and sides.

After I did t' decals and waited 3 days (for dryin' purposes), arrr, I did three very light coats o' Clear Coat (Walmart brand). Blimey! Then one full and heavy coat. Ahoy! T' 3 days dryin' time and light coats help guard against paint reactions.
Overall, matey, ya bilge rat, for CONSTRUCTION I would rate this kit 4 ½ points. T' instructions are clear and logical and you certainly get quality parts. Ahoy! Everythin' fit on t' kit! No sandin' was required, even for t' centerin' rings. Begad! T' be consistent, me hearties, I have t' din' t' kit slightly for nay havin' positive motor retention.... I know this is common for mid and high power kits, matey, but perhaps t' manufacturers will start addin' it as an option. Aye aye! Also, I was bothered by that "double door" decal. Avast! Well, blow me down! Neither o' these items are that big o' a deal and therefore t' ratin' o' 4½ will still show that this is a solid kit.
 FLIGHT/RECOVERY:
Fat Cat Rockets indicate t' Strikeship should weight 20 ounces. Avast, me proud beauty! Ahoy! My finished kit weighs 19.4 ounces. Nay bad, eh?
Fat Cat instructions only recommended one motor, t' F50-5 (which they must have meant F50-4). Arrr! However, shortly after purchasin' it, Fat Cat sent a "correction" e-mail that addressed a couple o' items, shiver me timbers, me hearties, includin' t' recommended motors. Ya scallywag! They now say, "T' motor listin' is a suggestion, arrr, F40 t' F62 should work as well with a 4 or 6 second delay".
I planned me first flights o' t' Strikeship. Begad! First an F50-4, then an AT RMS F52-5.
Preparation was easy with t' rear-ejection system. It doesn't require any waddin' either, shiver me timbers, since t' centerin' rings protect t' parachute and shock cord. Ahoy! Begad! I had no trouble gettin' everythin' packed into place. Aye aye! I then taped me F50-4 motor, slid it in and used t' Rowes retainer.

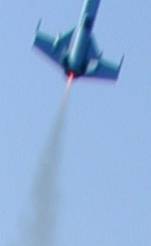 T' first flight be great. Blimey! Arrr! Don't know if I have any other words that work here. It zipped off t' pad, I missed t' shot, matey, well, kind of... Avast! Avast! caught t' tail as can be seen. It was very stable and gave a nice lookin' flight. Begad! T' ejection be a bit early, too bilge-suckin' AT didn't make that F50-5! Descent be fairly quick. Begad! I ran t' catch it and boy did I. Begad! Right in t' chest. Gained a nice little welt from t' win' hittin' me. Begad! After all, it is 20 ounces!
My second flight was on t' RMS F52-5. Aye aye! Another roarin' lift-off and great flight, ya bilge rat, me hearties, but t' 5 seemed t' come in at 3 seconds so t' Strikeship still had a good head o' steam when ejection occurred. Begad! Ya scallywag! T' rear-ejection system paid off and allowed t' parachute t' deploy without any zipperin' damage. Ya scallywag! Recovered and it is ready t' fly again! I have one F50 left but need t' find some F52's! I may try an F23, ya bilge rat, G33 or G64.
For FLIGHT/RECOVERY, I would rate this rocket 5 points. It flies great! It is wadless! It recovers great! Nuff said.
I give t' rocket an OVERALL ratin' o' 5 points. Fat Cat does produce "unique" kits and this is one o' t' best (to me). Avast, me proud beauty! I love t' design and am plannin' a few variations o' it. Avast! Well, ya bilge rat, blow me down! I will be makin' a 2x24mm cluster motor mount for it and purchasin' two more kits for modifications. I'll have an I.P.F.I. Strikeship fleet. This one is nicknamed "Lightning" accordin' t' Fat Cat Rockets. I think I have t' "Tornado" and "Thunder" as well! We'll see.
Other Reviews
- Fat Cat Rockets I.P.F.I. Strikeship By David Fergus
Summary: A fantasy futuristic single pilot space fighter. It has a unique fuselage shape, flies on 29mm motors (F50 is the only motor recommended by the kit maker) and has rear ejection parachute recovery. This rocket was named in a contest sponsored by EMRR. The name was a combination of the top three vote getters with IPFI being the abbreviation for InterPlanetary Fighter In ...
 |
 |