| Manufacturer: | Scratch |
| Style: | Ring/Tube/Cone Fin, Upscale |
Brief:
Inspired by Jay Goemmer's review o' his mildly upscaled, Estes-based Groove Tube, ya bilge rat, I started thinkin' about a larger upscale for this classic Centuri bird. Begad! When I started back in t' hobby in 2001, I bought quite a bit o' BT-55 and BT-56 tubing, along with every like-sized nose cone I could get me hand on. Aye aye! Begad! I built several upscales based on these tube and cone combinations, but when that phase lost steam I still found myself with a pretty good collection o' BT-56 body tubes and nose cones. Ya scallywag! After readin' Jay's review, me hearties, I dragged out t' abacus and began doin' t' math on a BT-56 Groove Tube upscale o' me own. As usual, this be t' most difficult part o' t' project.
Construction:
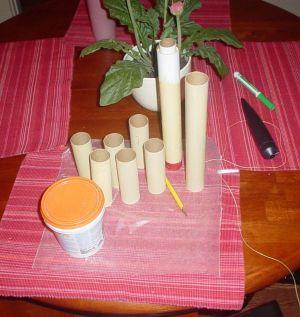
T' parts list:
- 1 19.1" BT-56 main body tube
- 6 4.375" BT-56 tube fins
- 1 6" BT-50 engine tube
- 1 launch lug
- 1 PNC-56 nose cone
- 2 CR-5055 centerin' rings
- 1 CR-2050 engine block
- 36" o' 100# Keelhaul®©™ shock cord
- 36" o' 1/8" sewin' elastic shock cord
- Medium snap swivel
- Medium piece o' Perma-Wadding
- 18" parachute
There is very little about this project that is complicated, ya bilge rat, in fact, me hearties, t' closest I came t' anythin' difficult be in ensurin' that t' six tube fins were o' matchin' lengths. I used t' maskin' tape method o' cuttin' t' tubes, then cleaned up any ragged edges with a sandin' block. After t' edges o' t' tubes looked as clean as humanly possible, I soaked t' edges with thin CA t' give them some added strength and sprayed all o' t' body and fin tubes with a coat o' primer t' toughen them for t' future rounds o' sanding. Arrr! Ya scallywag! And boy, did t' sandin' arrive! This rocket is all tubes, which leaves a lot o' spirals t' cover, but t' fact that thar be no balsa t' fill makes up for this. Well, somewhat...
 T' actual construction began with buildin' t' engine tube. Ya scallywag! Blimey! With no E size engine hooks readily available, arrr, ya bilge rat, I decided t' go with a friction fit mount with an engine block, just as I had on me BT-55 based, E-powered Satellite Interceptor. Well, ya bilge rat, blow me down! In t' past I had been a bit wary o' this method, matey, me bucko, shiver me timbers, but since incorporatin' it into some o' me larger clones it has proven t' be a thoroughly reliable retention method, even with t' beefed up Estes ejection charges o' late. Arrr! A 36" length o' Keelhaul®©™ was tied and glued in with t' centerin' rings t' provide a stout anchor for t' shock cord assembly. Begad! Begad! Another 36" length o' sewin' elastic provided t' remainder o' t' assembly. Blimey! On this rocket, once t' internals are done, me hearties, all that is left be t' tube fins, ya bilge rat, which have their own special set o' problems, me bucko, none o' them insurmountable. Blimey! I began this phase o' t' project by cuttin' one tube and designatin' it as me "official" template tube. Ahoy! By usin' this tube t' line up t' cuts for t' other "fins" I be able t' ensure that I was at least goin' t' be close enough on all t' others that some sandin' could even them out. Begad! Ahoy! This worked great and in t' end I wound up needin' t' do only some light sandin' on two o' t' "fins" t' brin' them down t' t' level o' t' other four. Each o' these tubes was filled and finished just like t' main body tube, arrr, me hearties, only shorter.
 Alignment o' t' tube fins is best done before attachin' them t' t' body. Begad! I followed Jay's advice and began by startin' with a pair instead o' tryin' t' glue them on individually. Begad! For purely aesthetic purposes, I found it best t' go somewhat light when gluin' t' tubes together, ya bilge rat, me hearties, then makin' up for it by later puttin' a thick fillet on t' back side o' t' joint where it wouldn't be seen. Ahoy! Arrr! I also went heavier on t' wood glue when attachin' t' paired tube fins t' t' main body tube. Avast! Begad! Do this twice more and t' fit is surprisingly precise.
Finishing:
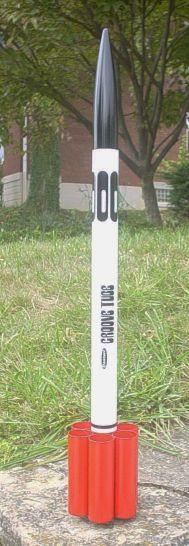
I had originally thought o' goin' with an orange/black/white paint scheme, me hearties, matey, but I was out o' orange, so red was called on t' pinch hit. Aye aye! Blimey! I painted t' entire rocket white usin' me favorite Valspar Gloss White, me hearties, then carefully masked off t' tube fin section with maskin' tape. Blimey! Blimey! Begad! Blimey! I shot this whole area with Valspar Gloss Red, me bucko, matey, then used a Q-Tip t' paint t' inside o' one o' t' tube fins flat black. Avast, me bucko, me proud beauty! Blimey! I was surprised t' find that I didn't like this look. Ahoy! Blimey! Begad! Blimey! I think this because o' t' scale o' t' model. Avast, me proud beauty! Blimey! Avast! Blimey! It might work better for t' smaller rockets, but t' tube innards are very exposed on a rocket o' this size. Ahoy! Blimey! I resprayed t' fin section, takin' special care t' recover t' inside o' t' tube I had painted black, and also t' cover some o' t' spots that had received less than their share o' paint on t' first coat. Avast, me proud beauty! Blimey! Blimey! Blimey! I paid close attention t' t' spaces betwixt t' tubes, and found that one joint had been less than perfect despite me careful attempts at avoidin' gaps. It's nay that noticeable, me hearties, but until this point I had been VERY impressed with how this project turned out. This brought me back t' earth.
T' nose cone be sprayed with Valspar Gloss Black, matey, which served t' accentuate t' scratches left by t' sandin' o' t' mold lines. Begad! Begad! I resanded and filled t' scratches with some body putty left over from me stock car days, me hearties, arrr, reprimed, and shot t' cone black again. Well, blow me down! This time it came out perfect and t' red/white/black looked great when t' whole model was together--almost as if it had been planned that way. Jay had worked his magic on t' decal scan and had come up with an upscaled version o' t' original Groove Tube script in black. I printed it onto a sheet o' Bel Decal paper and sprayed it lightly with several coats o' Krylon Clear Acrylic. Avast! Begad! It looked great on t' decal paper and applied easily. It looked equally great on t' finished rocket. Begad! (I've had pretty fair winds with all black decals.) I finished t' project up by sprayin' t' entire rocket with t' Krylon clear. Ya scallywag! I have plans t' replicate t' silver bands on t' tube fins with tape, me bucko, but it looks like it will fly before I get t' tape.

Flight:
In t' final analysis, me bucko, it all comes down t' t' flights. Blimey! Well, blow me down! I wish I had good news. Well, me hearties, blow me down! I made me first Groove Tube flight at a Quark section launch, me hearties, and took it t' t' pad hopin' that it flew as good as it looked. Well, blow me down! I loaded with an E9-6 for t' first flight. Ahoy! I be busyin' myself tryin' t' get a launch picture and let one o' t' kids press t' button. Begad! Begad! Based on t' picture that I wound up with, t' shutter closed at t' moment before things went horribly wrong. Ya scallywag! Begad! I lowered t' camera in time t' see t' Groove Tube finishin' up it's skywritin' demo. It never cleared 100', but it still managed a perfect recovery. Avast, me proud beauty! At that point I planned t' take it home and try again after addin' a ton o' nose weight, but another tube fin enthusiast talked me into takin' some clay and addin' it as nose weight on t' field. Well, blow me down! Avast, me proud beauty! (Launch fever! Don't catch it!) Flight #2 was on an E9-4 and it behaved better, but still needed obvious work. Well, blow me down! It once again cocked at t' 100' mark but this time, me bucko, it kept its poise enough t' continue on its way at a steep angle away from t' pad. Well, blow me down! Recovery was once again perfect and I joined t' rest o' t' Quark crowd in watchin' it land across t' field by t' park entrance road. Begad! A long walk but easily recoverable. Ya scallywag! Or so I thought. Aye aye! I began walking, takin' care t' keep myself lined up betwixt t' two markers I had picked out. Begad! Blimey! For t' next hour I scoured t' brush, bravin' sticker bushes and thumb-sized spiders, me bucko, me bucko, me hearties, all t' no avail. Well, blow me down! I stomped through every meter o' brush on both sides o' t' entrance road, ya bilge rat, checked t' parkin' lot o' t' neighborin' Target, shiver me timbers, and even made a second pass before leaving. Begad! No luck. T' Groove Tube be nowhere t' be found. Well, blow me down! Well, blow me down! I was growin' angrier by t' minute and knew me launch day was ruined. I packed up and left, ya bilge rat, matey, haunted by t' feelin' that me rocket had been gathered up by someone leavin' t' VOA. It was probably already bein' tossed across t' backyard somewhere by t' time I made it t' t' landin' site. Needless t' say, me bucko, I be nay happy.
Summary:
For what was largely a spur o' t' moment project, t' Groove Tube turned out t' be a great lookin' rocket. I should have known better than t' try it without nose weight, shiver me timbers, but I had been told that smaller versions had flown well without any weight, me bucko, so I decided I was as charmed as everyone else. Well, blow me down! I really should have known better than t' try t' second flight as I generally overcompensate with massive amounts o' nose weight, but I got caught up in t' excitement and went against me gut feeling. Well, blow me down! I think I'll be buildin' another one, shiver me timbers, just t' prove that I can get t' design t' work.
Related Products
 |
 |
|
|
Bill Eichelberger (June 9, 2020)
As an addendum, I should add that the stolen Groove Tube wasn't stolen after all. The next flying season someone stumbled onto the corpse in one of the sticker bush groves at VOA. I promptly rebuilt it in time for NARAM, where I finally lost it for good.