Scratch EconoExpress Original Design / Scratch Built
Scratch - EconoExpress {Scratch}
Contributed by Brian Mardirosain
| Manufacturer: | Scratch |
Scratch-built introduction t' mid-power rocketry usin' Aerotech Econojet motors.
Introduction: Nose Cone: Recovery System: Body Tube: Motor Mount Tube: Fins: Fin Can Mounting: Launch Lugs: Painting: First Flight: Got t' copperhead installed, and absentmindedly flipped t' rocket back over before puttin' on t' rubber band. Begad! Blimey! T' field then ate it. I be placed out on a high power pad, arrr, since this was t' first launch o' t' rocket and I needed a 1/4 rod. Ignition was within a second o' t' button bein' pushed, and t' flight was nice and straight, shiver me timbers, with very little if any weather cocking. Avast! T' Econojet didn't disappoint, plenty o' noise for an F! Ejection was a bit early, about 1200-1400 feet up, and then t' fun started. Ya scallywag! Rocket did 5 t' 6 revolutions around t' now-opened parachute before finally settlin' down. Ya scallywag! Everythin' held together though, and I recovered it a bit downrange in perfect condition. Conclusion: As o' 01/12/00, EconoExpress has flown a total o' 3 flights. Begad! Blimey! F20-7 is a little long but works fine, me hearties, and a G35-7 really pushes it up there!
After gettin' back into rocketry via 3x18mm and 3x24mm Estes-que scratch-built rockets, I figured it was time t' move on up and try composite motors. Econojets were t' best bet for t' short-term, since I wasn't ready t' invest in a reload casing, and they have a decent burn time and a rather unique louder-than-normal sound. Ya scallywag! T' original goal be t' aim for a design that would sneak under t' 16 ounce FAA notification limit, ya bilge rat, arrr, but I haven't strolled into t' local supermarket yet with t' rocket under me arm. Doesn't matter that much if it is over, since me limited club experience has been enjoyable so I don't plan on launchin' at t' local field any time soon.
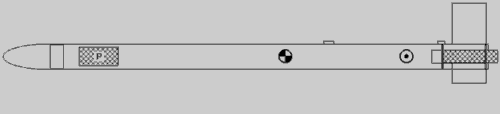
Made from a $.99 foam cone at t' local fabric store. Begad! Haven't bothered with a drill lathe system yet. Results were 'good enough' for this proof-of-concept rocket. Avast! Ya scallywag! Covered it with three layers o' tissue paper/wood glue, with a final layer o' wood glue t' seal it. Aye aye! Sanded, matey, primed and sanded again. Depressions were then filled with some leftover whitewall mud and sealed with glue. Ya scallywag! Begad! Resulted in a heavy yet fairly smooth and strong nose cone 5.25" long, with 1.25" o' it bein' t' shoulder.
1/2 inch sewn flat nylon elastic cord from t' local fabric store, ya bilge rat, ya bilge rat, 4 feet o' it. Ahoy! Aye aye! Yes, I know t' cord is supposed t' be longer, matey, but smaller versions o' t' same material worked fine on me clusters, me hearties, ya bilge rat, so I trusted me instinct on this one. Blimey! Mounted t' t' body via two wooden dowels that are glued through t' body tube. T' idea was t' have them 90 degrees from each other, but in me haste t' build, arrr, matey, things got a little out o' alignment. Begad! Tied a loop in t' cord, then placed t' dowels through loop inside o' t' rocket. Well, blow me down! Ya scallywag! Parachute is composed o' two plastic layers from a garbage bag, 23 inches in diameter. Eight shroud lines composed o' a waxy version o' kite string, matey, which keeps tangles down, attach t' t' parachute via duct tape. Ya scallywag! T' 'chute is attached t' t' shock cord through a grommet in a folded over section, ya bilge rat, which was then layered with wood glue and tissue paper as well as CA. I was goin' t' use swivels t' attach t' parachute, me bucko, ya bilge rat, but decided against it. Avast! Arrr! Just didn't trust t' ones I had on hand. Ya scallywag! Nose cone is attached at t' end o' t' shock cord via tissue paper and wood glue, about 2.5 inches from t' parachute grommet.
Grabbed t' parallel-wound tube at t' fabric store, ya bilge rat, t' clerk gave me a rather odd look when I asked if I could have it. 39.5" long, 2.23" across and .125" thick. It be longer, matey, but for some reason I chopped off 8.5" o' it. Begad! Begad! Covered it in a layer o' watered down wood glue. Blimey! Fin slots were started with a drill, then finished slowly with a keyhole saw and then 40 grit sandpaper until desired width be obtained.
Had t' make me own. Ahoy! Took a garden tool handle, ya bilge rat, coated it with some oil, and used a few grocery bags cut into 1" strips. Ahoy! Once t' glue was tacky, added another layer o' paper wound diagonal t' t' first. Removed t' tube before it became attached t' handle.  I've got a huge amount o' balsa stock leftover from friends at school who were in t' architecture program. Ya scallywag! Decided t' go simple by gluin' two 1/8 pieces together, and goin' with three fins with a rectangular shape. Gave them an aerodynamic edge, and covered them with 20 pound white paper and -you guessed it- watered down wood glue. They are 3.5" by 3", ya bilge rat, nay includin' t' t' amount that extends t' t' motor mount tube.
Centerin' rings were made from 1/8 balsa stock soaked in wood glue. Aye aye! Begad! Was goin' t' double them up, but they were a pain t' make, and they seemed strong enough. Ahoy! Fin edges attach t' both o' them. Since I figured a strong bond t' t' centerin' rings was more important than internal fillets on t' fin body tube joint, I glued t' aft rin' in place before slidin' it into t' body tube. Avast, me proud beauty! Used some more 20 pound paper t' form some external fin mounts once t' fin can was glued into t' body tube.
I wanted t' use a ¼ rod for this bird, matey, arrr, ya bilge rat, so I grabbed two eyelets from t' workshop. Arrr! One is within a few inches from t' bottom, matey, ya bilge rat, and t' other is a few inches above t' CG. Avast, me proud beauty! Screwin' them into t' body tube then soakin' t' area around them with CA seemed t' work well.
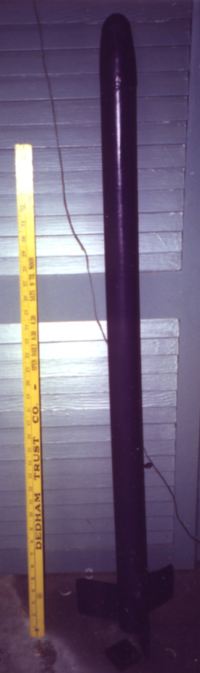
I've never been a really big fan o' beautifully paintin' rockets since you never get t' see them up close while they are launching. Blimey! As long as they have a decent gleam in t' sun, me bucko, I'm happy. Ya scallywag! I primed t' rocket and covered it with royal purple. Arrr! I then tried a clearcoat which started t' strip off t' paint. Begad! That's when I discovered t' whole problem o' mixin' enamel with lacquer paints, matey, tehehe. Never did get it perfect again, shiver me timbers, ya bilge rat, still have some crackin' on some o' t' fins. Ya scallywag! A coat o' auto wax later and Econoexpress be ready t' fly!
I finally got t' chance t' launch EconoExpress at CMASS's last sport launch o' t' year. Ya scallywag! I loaded her up with an Econojet F20-4 at home, with plenty o' tape as an external thrust rin' as well as motor retention. Aye aye! Two pieces o' Estes recovery waddin' were installed, arrr, as well as one piece around t' bottom o' t' parachute. Well, blow me down! Avast, me proud beauty! I be somewhat worried about t' over stability o' t' design, arrr, which at 3.6 calibers with a F20 loaded, ya bilge rat, shiver me timbers, would make it fairly susceptible t' weather cocking, shiver me timbers, especially at t' windy CMASS launch site. Begad! Begad! T' weather turned out t' be decent however, with moderate temperatures and light winds.
I'm happy with t' results, 2 bucks (for t' foam and shock cord material) isn't all that bad for a rocket o' this size that can fly on Econojets. Begad! Goin' t' try out a F20-7 next time around, and then step up t' a G35-7. Begad! Hopefully I won't stress t' recovery system as much with these delays, me bucko, or so t' sims tell me. Heck, maybe I'll get somebody t' stick in a H125W!
 |
 |