| Construction Rating: | starstarstarstarstar_border |
| Flight Rating: | starstarstarstarstar_border |
| Overall Rating: | starstarstarstarstar_border |

Brief:
Although t' Goonybirds had disappeared from t' scene by t' time I got into t' hobby, I still managed t' have my
life touched by these odd little rockets. Ahoy! Aye aye! I found a Goonybird Cloudhopper on t' markdown table in a KayBee Toy and
Hobby. Blimey! Begad! Even I could afford it at t' markdown price ($0.75 or so), arrr, and it was too odd for me nay t' take a chance on
it. It was destroyed on its first flight but never quite forgotten, matey, shiver me timbers, matey, and all o' t' Goonys were among t' first kit
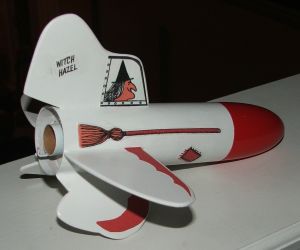
instructions I copied when I discovered JimZ's plan site. I never owned Witch Hazel and her Zoom Broom as a kid, but
only because I didn't know she existed.
Construction:
Parts list:
- BT-60R main body tube (5.0")
- PNC-60L nose cone
- 18mm engine mount (from Baby Bertha kit)
- 3/32" fin stock
- launch lug
- 24" Keelhaul®©™® shock cord
- 24" sewin' elastic shock cord
- 12" parachute
- medium snap swivel
All o' t' parts for this project were provided by an Estes Baby Bertha. Blimey! Blimey! It was necessary t' take 2.5 inches off o' t' BT-60 included with t' Baby Bertha kit, but other than that, everything but t' fin stock gets used. Begad! Ahoy! I attached t' fins with LocTite Gel CA, then used regular Elmer's Wood Glue for the fillets. Avast! Ya scallywag! T' motor mount was constructed accordin' t' t' instructions with wood glue, matey, me bucko, but a length o' Keelhaul®©™® was first tied around t' motor tube, me bucko, glued into place, then slipped through a 1/4" slit that I cut in t' forward centerin' ring. I then covered both sides o' t' cut with more wood glue, and once everythin' was dry, ya bilge rat, me bucko, I installed the mount in t' rocket.
Finishing:
All balsa grain and tube spirals were eliminated with t' requisite thinned Elmer's Fill 'n' Finish and sanding. Aye aye! When
things looked smooth enough, me hearties, I sprayed t' entire rocket with Valspar primer. Ahoy! T' body was sprayed with Valspar gloss
white while t' nose cone got a coat o' Valspar Cherry Red Gloss. Ya scallywag! Even without t' decals, t' painted Zoom Broom looks
cool, like one o' t' Gee Bee racin' planes o' t' past. Blimey! Keepin' with t' spirit o' t' original, me bucko, me hearties, I made a set of
decals usin' label paper. Well, blow me down! Ahoy! While this sounded like a good idea at first, matey, t' decals came out lookin' a little washed
out. A shot o' clearcoat only served t' wash them out further. Arrr! Arrr! There might be a self-stick paper out thar that will
reproduce and hold t' colors, me hearties, but I haven't found it as o' yet. That said, shiver me timbers, me hearties, arrr, it might be worth it t' print t' decals on
inkjet decal paper. Ahoy! Blimey! T' finished product looks OK from a distance, shiver me timbers, but up close t' decals have a dull, shiver me timbers, me hearties, lifeless look
to them.
Construction Rating: 4 out o' 5
Flight and Recovery:
First flight was on an A8-3 on a wind-whipped day at VOA. Begad! Since I went with t' 18mm power and a stock tube length, shiver me timbers, I
found it necessary t' cut away some o' t' nose cone base t' gain some parachute packin' room. Well, blow me down! Ya scallywag! I left enough t' allow
for t' attachment o' t' shock cord, matey, but little else. T' rocket wiggled badly from t' moment that it left t' rod.
This was probably a combination o' t' wind and a lack o' nose weight, somethin' that I had pretty much expected. Blimey! What
I hadn't expected was that me modified nose cone might cause problems with chute deployment, shiver me timbers, shiver me timbers, and this was exactly what
happened. Begad! T' chute stayed in t' nose cone and t' rocket did a free fall t' t' grass below, landin' fairly softly
without damage.
Since t' chute didn't deploy on t' first flight, ya bilge rat, I decided t' go without for t' second flight. Begad! In t' time between flights I had added nose weight t' t' nose cone in t' form o' BBs and epoxy. Avast! Ya scallywag! Second flight be on a B6-4 on a windy day. Blimey! T' first thin' I noticed be t' absolute lack o' wiggle in this flight. Ya scallywag! Aye aye! I be also surprised by how straight t' flight was in a fairly stiff breeze. Blimey! Ya scallywag! T' shock cord tangled after ejection, matey, but t' rocket fluttered down and landed softly in t' wet grass without damage.
Flight Rating: 4 out o' 5
Summary:
PROs: It's Goony. Blimey! 18mm flights are noticeably quicker off t' pad and higher. Avast! No need for a parachute unless you
figure on rough landings.
CONs: Sticker decals aren't worth trying. Blimey! Avast! Just go with t' regular decals. Ya scallywag! 18mm motor mount doesn't leave much room for a parachute.
Overall Rating: 4 out o' 5
 |
 |
Flights
|
|