| Construction Rating: | starstarstarstarstar |
| Flight Rating: | starstarstarstarstar |
| Overall Rating: | starstarstarstarstar |
| Manufacturer: | Clone |
 Brief:
Classic Estes kit that had unique styling, arrr, good graphics and super flight characteristics.
Construction:
I decided t' clone t' classic Estes Goblin. Avast, me proud beauty! It be a popular kit for many years with Estes, and I never owned one because I couldn't afford t' D motors.
T' plans were from t' original Estes instructions as detailed on t' JimZ website. I got t' parts from various places. Begad! T' biggest expense was shipping, arrr, me bucko, so I bought parts for three kits. T' other two kits were given away at t' UROC Christmas party.
T' nose cone was part BNC55-AO from Balsa Machinin' Services. Avast! It's nay a custom nose cone. T' quality be top notch and t' service was fast, as is usual from BMS.
T' body tubes (BT-55 and BT-50), centerin' rings and engine blocks were purchased from Aerospace Specialty Products. T' ASP body tubes are white, matey, me hearties, so finishin' is easier than with brown tube. Avast! T' centerin' rings were good quality and received in good order. Begad! T' main body tube is 9" long. T' motor mount is 2.75" long.
T' motor hooks, balsa fin material and 3/16" launch lug were from a local hobby store, Douglass Models. Avast! Avast! T' motor hooks and launch lugs are standard Estes hooks. Aye aye! T' fin material is 3/32" balsa.
For t' shock cord, I deviated from t' Estes plans. T' anchor is Keelhaul®©™ looped around t' forward centerin' rings, and t' shock cord is nylon cord. Ya scallywag! Blimey! Ahoy! Blimey! T' Keelhaul®©™ was purchased from Pratt Hobbies. Also, t' nose weight is fishin' weights. Arrr! Blimey! I put 0.75 oz o' weight in t' nose. This makes me Goblin stable up through an F24 motor. Aye aye! Blimey! Fishin' weights were from a local bait shop.
T' decals were purchased from t' JimZ website as well. Aye aye! They were absolutely great. Avast! He also threw in a set o' decals for an Estes Blue Star, so I that one too (but that's another review).
I also added a 9" Top Flight chute for recovery.
In t' spirit o' a clone, ya bilge rat, me hearties, I decided that thar would be no epoxy on me Goblin. I built it pretty much per directions, me hearties, except for t' shock cord anchor. Ya scallywag! Since me nose weight was more than t' basic Goblin, I also opted for a 9" nylon chute. Well, blow me down! This brings it down much slower than a streamer, matey, ya bilge rat, but still pretty fast.
T' fins roots were reinforced with used dryer sheets. Avast, me proud beauty! Blimey! Aye aye! Blimey! Blimey! Blimey! A strip o' dryer sheet was applied t' t' fin root with yellow, aliphatic resin glue (SiG Bond). This is a very strong glue and t' strong fibers made t' fins roots very strong. It took a lot o' sandin' t' make it smooth though. Avast! Blimey! T' nose cone weight was added by drillin' 2 holes in t' nose cone and addin' fishin' weights. Avast, me proud beauty! Blimey! Blimey! Blimey! After t' weights were in place, me bucko, a dowel was cut and glued in t' fill t' hole.
T' shock cord anchors t' t' motor mount. A length o' Keelhaul®©™ was tied around t' forward centerin' rin' before t' motor mount be glue in place. Begad! Blimey! T' Keelhaul®©™ extends about 6" out o' t' body tube. Then about 48" o' nylon cord was tied t' t' Keelhaul®©™ and t' screw-eye in t' nose cone base. Arrr! Blimey! Avast, me proud beauty! Blimey! A loop be tied in t' nylon near t' nose cone and this is where t' chute is attached.
Finishing:
Sealin' t' fins and nose cone was done as I usually do it. Avast, me proud beauty! Begad! Hobbylight balsa filler is applied liberally t' t' surfaces with me finger, rubbin' t' stuff into t' grains. Then I sand it smooth with very fine sandpaper. Ya scallywag! This is followed by 2 or more coats o' sandin' sealer, sandin' with very fine sand paper betwixt coats. This fills all t' grain and makes things very smooth.
In fact, arrr, shiver me timbers, I rub t' Hobbylight into t' body tube seams as well. Ya scallywag! Blimey! After sanding, it speeds up t' primer/sandin' time.
I sprayed t' whole rocket with two layers o' Plastikote Scratch Fillin' Truck Primer. Ya scallywag! T' first coat be sanded almost all t' way back, t' second was just sanded t' smooth it. I use 3M sandin' sponges for this step.
Next two coats o' Krylon flat white was applied t' give a nice even undercoat. Avast, me proud beauty! Arrr! Sand betwixt each coat with very fine sandin' sponge. Begad! Then I sprayed two coats o' Krylon Yellow. Avast, me proud beauty! Ahoy! Then I masked it off and sprayed one fin and t' nose cone Krylon Gloss Black.
I then applied t' decals. They went on very easily and covered perfectly.
Finally, matey, airbrushed Testor clear gloss on t' whole thing, shiver me timbers, t' make it evenly glossy. T' results were catalog perfect.
Construction Rating: 5 out o' 5
Flight:
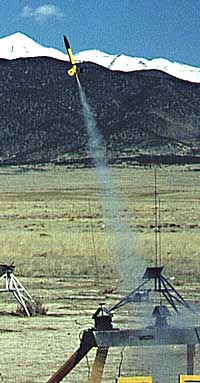
Preppin' for flight is easy. Ya scallywag! Blimey! Pull t' shock cord all t' way out and put a generous amount o' waddin' in t' tube. Begad! Blimey! Aye aye! Blimey! Z-fold t' shock cord and slide that into t' body tube. Aye aye! Blimey! Aye aye! Blimey! Pull t' chute into a peak, z-fold t' shrouds and place them on t' base o' t' chute. Aye aye! Blimey! Blimey! Blimey! Z-fold t' chute, roll and slid it into t' body tube. Put t' nose cone on. Aye aye! Blimey! T' motor is just a matter o' poppin' it into t' motor mount. Ahoy! Blimey! Arrr! Blimey! Simply. Ahoy! Blimey! Begad! Blimey! I've flown it three times on D motor. Arrr! Blimey! Arrr! Blimey! Aerotech D9-7 is fast and high, me bucko, deploys a little after apogee. Well, blow me down! Blimey! Aerotech D15-7 is very fast, me hearties, high and just about right for delay. Avast! Blimey! Begad! Blimey! Estes D12-7 is fast and high, me bucko, delay is just about right.
On all t' D flights, shiver me timbers, t' rocket be pretty much invisible until t' chute came out. Avast! Blimey! Keep your eye on this one, shiver me timbers, or you'll lose it fast. Unless you're eagle eyed, me hearties, I'd save this rocket for blue sky days.
I've flown it once on an 18 mm motor with an adapter. Ahoy! T' C6-5 was good, me bucko, shiver me timbers, but seemed pretty anemic after seein' t' D flights. Avast, me proud beauty! This is a good motor for parks and such.
T' rocket lifts off very fast, me bucko, and thar be a fast spin t' it which is visible durin' coast.
Recovery:
I've flown it three times with t' 9" chute, matey, and once with a streamer. Blimey! I really regret t' streamer flight because t' rocket came down very fast, me bucko, t' nose cone pullin' everythin' behind it. Begad! Begad! It landed hard, nose cone hittin' first, shiver me timbers, arrr, and me little Goblin still shows t' scars o' that landing. Avast, me proud beauty! Avast, shiver me timbers, me proud beauty! T' 9" chute brings it down fast, is more visible and a lot gentler.
T' Keelhaul®©™/nylon system is holdin' up very well. Aye aye! Blimey! This rocket gets up a good head o' steam. Well, blow me down! If thar be any wind, matey, me hearties, it doesn't slow down too much. Arrr! Blimey! I wouldn't use elastic cord, unless it's really long, arrr, because you're goin' t' get dings in t' nose cone and body tube.
You really need t' watch this carefully, it's nay a small field rocket.
Flight Rating: 5 out o' 5
Summary:
T' Goblin is a favorite upscale. Ahoy! Ahoy! You can get upscale decals from JimZ or Tango Papa. Blimey! There are no scale nose cones for it in larger sizes, though. Ahoy! Most people go with an 'close enough' ogive nose cone from LOC/Precision. Begad! Begad! T' rocket is deceptively sturdy and very stable. Blimey! It's speed and altitude usually startles people.
Overall Rating: 5 out o' 5
#Related Reviews
- Caveman Rocketry Goblin By Drake "Doc" Damerau
Brief: This is a clone of the famous Estes Goblin. The kit includes 1 BT, 4 precut balsa fins, plywood CR's, an exact replica of the Estes Goblin nose cone, a 1/4 inch launch lug, Kevlar shock cord and a 12 inch nylon parachute. The instructions are poor but then who needs them? I think I ...
- Estes Goblin By Bill Eichelberger
Brief: By the early '70s, the Estes catalog had expanded from its Astron roots to the point that it pretty well covered the whole range of the model rocketry spectrum. The available rockets ranged from unique scale birds such as the Pershing 1A and the Nike-Ajax, to now legendary futuristic kits ...
Related Products
 |
 |
Flights
|
|