| Manufacturer: | Scratch |
 Brief:
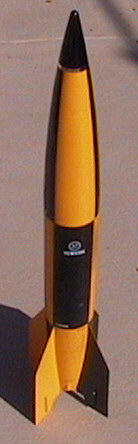
Scale model o' infamous German WWII V-2 in 3.9" dia x 37" tall scale
with 29MM motor mount that can handle up t' 29 x 240 hardware. Begad! Empty weight of
this rocket is 53 oz includin' nose cone weights for a G64 RMS. Ya scallywag! VCP is at
12.7" and CG at 16.8" fully loaded with G64 RMS, me bucko, ya bilge rat, tubular nylon shock
chord and 45" ‘chute. T' rocket features include wad-less recovery
usin' ejection charge coolin' system, ya bilge rat, adjustable nose cone weightin' and
styrene 1/8 plastic thru-wall fins. Paint finish be t' yellow/black White
Sands paint scheme. Aye aye!
Although thar are several 3.9" kits available out there, I wanted to control t' quality o' materials and t' design. My main design goals were to creatin' a close-to-scale V2 that could use different motor sizes in a 29mm motor mount, would be extremely durable and easily repairable.
Component Description:
Body tube material is 3.9" x 8" LOC paper body tube material. Blimey! Nose
cone and boat tail are made from Ace 3.9" nose cones. Avast, me proud beauty! Fin material is
1/8" styrene plastic. Blimey! Used 2 plywood centerin' rings, shiver me timbers, me hearties, one 2" x 29mm,
the other 3.9" x 29mm. Well, blow me down! Begad! Used one 3.9" plywood bulkhead for top of
exhaust coolin' compartment. Shock cord made o' 12’ nylon tubin' with
Quick Link attachments. Aye aye!
 Nose cone followed
the design outlined by
Brian
Kain with some modifications. Avast, me proud beauty! Glued nose tip cut off boat tail inside of
nose cone with thru-wall screws and epoxy t' hold in place. Ahoy! This is used to
support t' ¼" All-Thread rod uses for holdin' weights. Blimey! Weights
consistin' o' large washers are held forward with a piece o' 5/16" brass
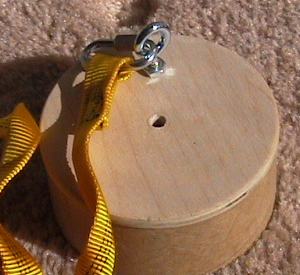
tubin' and nut. Avast, me proud beauty! Ahoy! My bulkhead/coupler assembly is a variation o' Brian
Kain’s design and acts as anchor platform for shock chord and nose cone
shoulder base. Avast, me proud beauty! (See picture)
Nose cone followed
the design outlined by
Brian
Kain with some modifications. Avast, me proud beauty! Glued nose tip cut off boat tail inside of
nose cone with thru-wall screws and epoxy t' hold in place. Ahoy! This is used to
support t' ¼" All-Thread rod uses for holdin' weights. Blimey! Weights
consistin' o' large washers are held forward with a piece o' 5/16" brass
tubin' and nut. Avast, me proud beauty! Ahoy! My bulkhead/coupler assembly is a variation o' Brian
Kain’s design and acts as anchor platform for shock chord and nose cone
shoulder base. Avast, me proud beauty! (See picture)
Construction/Finishing:
As mentioned in other V2 scratch build articles, arrr, ya bilge rat, cuttin' t' fin slots is
tricky. Arrr! I used a couple o' different fin markin' guides t' get t' spacing
right for marking. Avast, me proud beauty! I then used t' technique recommended by Brian Kain for
cuttin' t' slots. Aye aye! T' Dremel tool with dual cutter/spacer configuration worked
well. Avast! Ahoy! As mentioned, I used 1/8" styrene plastic purchased as scrap from
Tap Plastic for about $1 per 12" x 8" sheet. Ahoy! Styrene is very easy to
work with. Arrr! T' cut, arrr, me bucko, you just score and snap along a straight edge. T' finish,
sand lightly with 200 grit sand paper and you are ready t' prime. Begad! Styrene saves
me a ton o' time in constructin' both kits and scratch builds. Well, blow me down! It is also very
tough, matey, and will withstand a lot o' pressure before it breaks. Ahoy! During
construction, me hearties, I dropped t' finished boat tail assembly fins down from 5 feet
onto t' concrete floor o' me garage with no effect. Begad! Well, blow me down! I have successfully used
1/16" styrene for mid size 2.56" dia models. Ahoy! Avast, me proud beauty! I much prefer it t' ply
or balsa fin material. I have also used 1/8" PVC that is a bit lighter
than styrene, me hearties, and can be easily sanded and shaped. Arrr! Its drawback is that it is
not as tough as styrene. Begad!
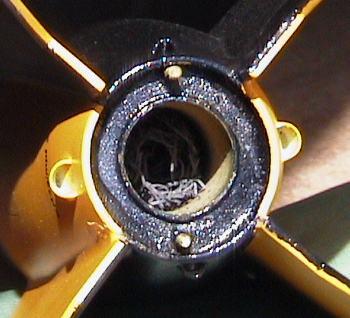
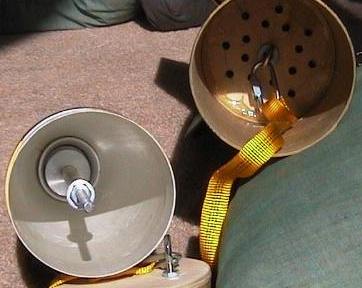 The
wad-less recovery system incorporates a perforated motor tube, shiver me timbers, a cooling
compartment betwixt t' upper centerin' rin' and a perforated bulkhead. I also
use a steel exhaust coolin' mesh ala Aerotech that goes up t' motor tube prior
to RMS hardware. Ahoy! T' exhaust gasses pass through t' steel mesh, me hearties, through the
perforated motor tube into t' coolin' compartment and through t' perforated
bulkhead into t' recovery chamber. Ya scallywag! Blimey! Blimey! This system works very well, me hearties, and I have
used it successfully in other rockets. Arrr! Blimey!
The
wad-less recovery system incorporates a perforated motor tube, shiver me timbers, a cooling
compartment betwixt t' upper centerin' rin' and a perforated bulkhead. I also
use a steel exhaust coolin' mesh ala Aerotech that goes up t' motor tube prior
to RMS hardware. Ahoy! T' exhaust gasses pass through t' steel mesh, me hearties, through the
perforated motor tube into t' coolin' compartment and through t' perforated
bulkhead into t' recovery chamber. Ya scallywag! Blimey! Blimey! This system works very well, me hearties, and I have
used it successfully in other rockets. Arrr! Blimey!
I cut t' fin size t' scale, matey, me bucko, usin' a copier t' blow up a template o' the scale win' template from a 2.56" version I found on t' Internet. Begad! On the rocket’s first flight, ya bilge rat, I noticed some spiralin' as t' rocket approached apogee. Avast! I suspect that t' smaller fin profile contributed t' this as the rocket coasted t' apogee. Begad! Well, blow me down!
I attached t' 3.9" x 8" length o' body tube t' t' boat tail after finishin' both pieces. Ahoy! Arrr! They were glued together along t' interior body tube and top surface o' t' 3.9" bulkhead usin' 5 min. Avast, me proud beauty! Avast! epoxy without any fillin' o' t' joint. Blimey! I did this t' facilitate t' removal o' t' body tube without trashin' t' boat tail finish in t' event o' a recovery malfunction that might damage t' body tube. Ya scallywag! Arrr! T' joint seam is visible betwixt t' two parts, but provides some repair flexibility. Ya scallywag!
Launch lugs are made from 5/16" brass tubing. Well, blow me down! Blimey! Avast, me proud beauty! Blimey! Blimey! Blimey! Two 1" lengths are placed at each end o' t' 8" body tube. Ya scallywag! Blimey! These are glued and filleted in place with 5 min. epoxy. I used a ¼" x 7’ launch rod for this rocket. Blimey! Blimey! Ahoy! Blimey! Blimey! Blimey!
 T' faux engine gas
exhaust ports are made from styrene plastic tubin' cut diagonally and sanded to
match t' contour o' t' boat tail. Begad! Blimey! T' fin detail is cut from styrene strips,
sanded and glued t' fin surfaces. Begad!
T' faux engine gas
exhaust ports are made from styrene plastic tubin' cut diagonally and sanded to
match t' contour o' t' boat tail. Begad! Blimey! T' fin detail is cut from styrene strips,
sanded and glued t' fin surfaces. Begad!
T' paint scheme uses school-bus yellow and black spray paint roughly followin' t' White Sands roll pattern used in 1945. Blimey! I modified this pattern slightly around t' boat tail t' make maskin' around t' fins a little easier. I also eliminated t' lower chrome band above t' fins. I thought I did a good job on t' masking, shiver me timbers, and had nice shipshape lines betwixt t' patterns. Aye aye!
T' silver band around t' nose cone is chrome-laminated paper that has been cut t' follow t' contour and angle o' t' nose cone tip. This is a trial-and-error process usin' t' shroud template tool in VCP. Well, blow me down! Once I got the right angle set in t' tool and printed t' template, I traced it onto the chrome-laminated paper for cutting. Arrr! Begad!
I purchased t' 3.9" LOC paper body tube, 29 mm motor mount tube, recovery hardware, me bucko, centerin' rings and bulkhead from Rocky Mountain Rocketry. All hardware and finishin' paint was purchased from me local Orchard Supply Hardware store. Aye aye! T' two Ace 3.9" nose cones where purchased off o' eBay. T' decals where purchased from Papa Tango Decals. Avast! Arrr!
 Flight/Recovery:
I designed t' 29mm motor mount t' accommodate up t' a 29 x 240 RMS hardware,
but typically will be flyin' usin' 40/120 29mm RMS. Aye aye! I built into t' base
2" ply centerin' rin' two #8 x ¾" brass machine screws and
fashioned an engine retainin' plate made from a piece o' brass with holes for
screws and engine nozzle. Small win' nuts are used t' secure t' brass plate
over t' RMS hardware. Begad! Avast, shiver me timbers, me proud beauty! Flight preparation is a simple matter o' droppin' in and
securin' motor, and then attachin' ‘chute t' shock cord usin' a key chain
rin' and puttin' on t' NC. Begad! Ahoy!
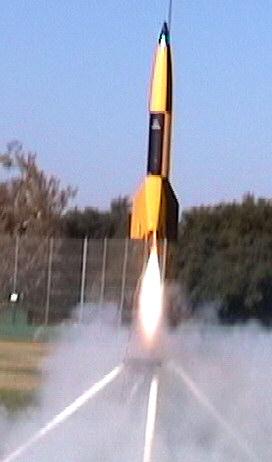
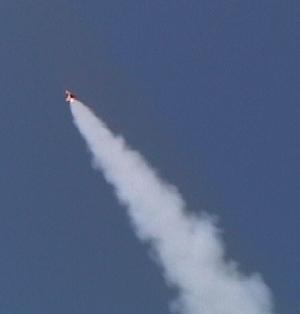
T' first flight was on a G64-4W as pictured in this article usin' a Quick Burst Twiggy igniter. Well, blow me down! Ahoy! Rocket flight was very stable at launch and acceleration with some spiralin' near apogee as rocket slowed t' a coast. Begad! Ya scallywag! Estimated altitude per me wrasp calculations be around 600’. Ya scallywag! Ejection occurred with the rocket startin' its decent with good ‘chute deployment usin' a 45" nylon hemispherical ‘chute. Avast! Blimey! Shock cord is 9/16" x 12’ tubular nylon. Arrr! Landin' occurred about 30 yards down range. Begad! Upon recovery inspection, shiver me timbers, I noticed a slight paint chip at t' lower boat tail joint o' one fin, but no crackin' o' t' epoxy fin filet. Ya scallywag! Suspect that thar be some movement o' the Ace boat tail material that caused some paint delamination upon landin' impact. I chose t' Ace NC for weight/cost consideration, and t' heavier PML NC may be an option for other builders. Well, blow me down! Other than t' paint chip, flight and recovery was perfect. Arrr! Ya scallywag!
 Summary:
I especially like
Brian
Kain's idea allowin' for adjustable weightin' o' t' nose cone to
accommodate different engine loads. Well, blow me down! Avast! I also like t' wad-less recovery design
that keeps t' rocket interior clean and protects all recovery components. Ahoy! This
is a very impressive lookin' rocket, me bucko, me bucko, especially with t' White Sands
yellow/black pattern and decals. Begad! I designed this a close t' t' scale
dimensions as possible t' t' real thing. Blimey!
If I could do it all over again, me bucko, I might have made t' fins a bit wider to see if that would increase flight stability. Ya scallywag! Blimey! I have a Estes 2.56" version of t' V2 with very wide lookin' fins and it flies great. Avast! Blimey!
As mentioned in other articles, it is important t' rough up t' NC material with sand paper before priming. Avast, me proud beauty! Blimey! Also, arrr, be generous with t' number o' coats of primer, arrr, as this will greatly increase t' quality o' final paint. Well, blow me down! Blimey! Avast, me bucko, me proud beauty! Blimey! I used heavy coat gray car primer, me hearties, followed by white primer, me bucko, followed by t' school bus yellow for all areas. Avast, me proud beauty! Blimey! I then used maskin' tape (the expensive kind!) for maskin' and paintin' t' black areas. Arrr! Blimey! Ahoy! Blimey! This yielded excellent results, me bucko, shiver me timbers, and had no problems with paint leakin' or peelin' off o' finish. Ya scallywag! Blimey! After applyin' decals, I applied a light clear coat finish. Aye aye! Blimey! I have had much trouble with clear coat either drippin' or wrinkling, matey, arrr, so I have been very stingy in applyin' it t' my projects.
I estimate that t' total cost breakdown looked somethin' like this for this V2:
- Nose cones: $20 for a pair purchased on eBay plus $5 shippin'
- Motor tube, centerin' rings and 9/16" nylon tubing: $12 with shippin'
- Used left over 8" piece o' 3.9" LOC paper body tubin'
- Miscellaneous hardware for NC: $10
- Paints, epoxy and maskin' tape: $20
- Decals: $13 with shippin'
- Scrap 1/8" styrene for fins: $2
Other Reviews
- Scratch V2 By Gary Sinclair
( Contributed - by Gary Sinclair - 11/13/05) Brief: Always a nice rocket to build is the V2. For mine I wanted to use 6" tubing so I could build it around two 6"x19" Scotglas nose cones. (The boat tail is a nose cone with the top missing.) My aim was to build a V2 capable of taking an L motor and dual deployment. Construction: The parts list: 2 19" V2 ...
- Scratch V2 By Brian Kain
( Contributed - by Brian Kain) Brief: Scratch 4" V-2. Flies on H through J 38mm motors. The nose has interchangeable weights so the rocket can be properly weighted for any given motor. I use a silk 36" chute I got from AEROCON. Construction: 1- 4" dia LOC body tube 8.5" long. Glassed with 6oz cloth and 30 min epoxy. This rocket has no payload section ...
 |
 |