| Construction Rating: | starstarstarstarstar_border |
| Flight Rating: | starstarstarstar_borderstar_border |
| Overall Rating: | starstarstarstarstar_border |
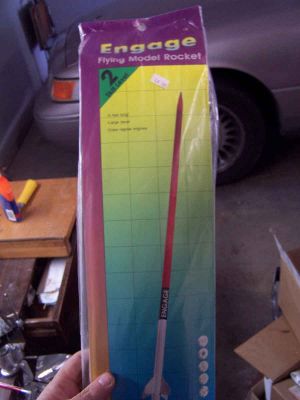
| Manufacturer: | Custom Rockets  |
Brief:
I kinda miss me Estes Mean Machine and have several similar rockets sittin' in t' inventory. Avast, me proud beauty! Aye aye! I chose this one simply
because it was t' first one I ran into when I started t' look. I also liked t' simple color scheme on t' face card.
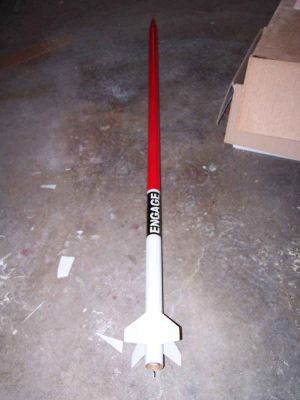
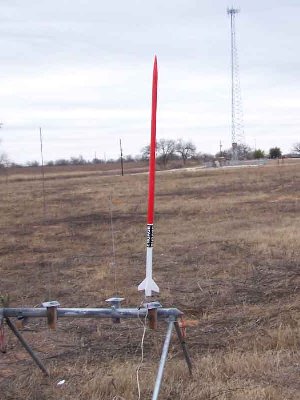
It a long, skinny four fins and a nosecone. I have no doubt it is a Mean Machine knockoff, though slightly shorter.
Construction:
Construction begins with t' motor mount. Blimey! Marks are laid out on t' motor tube for t' engine hook and t' centering
rings. Avast! Aye aye! A slice is made t' insert t' hook and then t' builder is instructed t' punch out t' rings from t' sheet of
cardboard. Ya scallywag! Arrr! When doin' so, I realized that I would have t' be extremely careful because these are without a doubt the
flimsiest and thinnest rings I have ever seen in a kit. Avast, me proud beauty!
T' rings were glued in place with Elmer's yellow glue, arrr, thoroughly filleted, and then filleted again.
I noticed that this rocket did nay come with a thrust ring. I didn't like that and I had none o' t' proper size sittin' around so I cut t' end off o' a spent 18mm casin' t' use for a thrust ring. Arrr! Well, blow me down! It be glued in right over the engine hook.
 After t' fillets on t' centerin' rings were good and dry, arrr, I did a bit o' light sandin' t' make them fit
into t' body tube better. I be afraid that too much force applied might bend them on t' way in. T' motor mount was
then installed with yellow glue.
After t' fillets on t' centerin' rings were good and dry, arrr, I did a bit o' light sandin' t' make them fit
into t' body tube better. I be afraid that too much force applied might bend them on t' way in. T' motor mount was
then installed with yellow glue.
Unlike t' centerin' rings, shiver me timbers, t' balsa fins seemed in good shape from good material. Aye aye! They were die-cut but came easily out o' t' sheet. All o' t' edges except for t' roots were sanded round. Aye aye! Avast, ya bilge rat, me proud beauty! T' fins were then treated t' a coat of Elmer's Wood Filler and scraped with a razor blade. A few minutes later, arrr, matey, I began t' notice some significant warping in 3 out o' t' four fins. Ya scallywag! Avast! I decided t' wait until they were dry t' try and correct this.
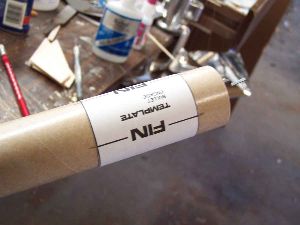
T' kit came with a wraparound fin alignment guide which was cut out and taped onto a body tube. Avast, me proud beauty! Blimey! T' fin lines were then transfered t' t' tube and extended with an angle.
While waitin' for filler t' dry, I used a pin t' make perforations along each o' t' fin lines for better glue adhesion.
When t' filler was dry, shiver me timbers, t' warpin' was still present but nay nearly as bad. Ya scallywag! I sanded down t' fins and then used t' pin t' perforate t' root edges.
T' process o' installin' t' fins then began. I used a double glue joint and yellow glue, shiver me timbers, waitin' for each one to stiffen up before applyin' t' next.
T' second tube was dealt with in almost t' same way except that a length o' Keelhaul®©™® was tied around t' coupler. Ahoy! Ya scallywag! It was then slid in t' t' halfway mark and allowed t' dry.
T' nose cone surprised me. It was pretty shipshape and had no flash but it did have a hollow base. There is no aft bulkhead. Begad! Avast! I took t' provided screw eye and screwed it into t' provided hole.
When t' coupler joints were judged "dry enough", me bucko, t' two BTs containin' t' couplers were glued together and rolled around t' ensure straightness.
T' kit came with a single launch lug and instructions t' cut it in half. Instead o' doin' so, matey, matey, I opted t' use the full length o' t' lug and add a second lug. Aye aye! Since it was handy and because this is a long rocket that may tended to try and twist t' lugs off, me hearties, I opted for a 6" long one from FlisKits. Well, blow me down! Avast! A length o' rod be used t' align them as the were glued in place.
A few days were spent filletin' t' fins. Avast, me proud beauty! T' initial round on each fin be with finger smoothed yellow glue. After that had dried, ya bilge rat, I built up t' fillets with white glue since it does nay shrink as much. Arrr! Aye aye! Blimey! When t' filletin' was done, I glued t' bottom BT, matey, matey, arrr, t' one with t' fins, t' t' other two and let it dry. T' rocket was now assembled.
Finishing:
T' fins had already been sanded down prior t' installation so t' rocket was ready for priming. Aye aye! Avast, ya bilge rat, me proud beauty! I set it up as best
I could in me spray booth but could tell that this was goin' t' be a two part job. Aye aye! Begad! T' bottom o' t' rocket got a
coatin' o' Kilz and, me hearties, about a half hour later, it was dry enough t' t' touch t' pick up. Blimey! Avast! I carried it outside and
sprayed t' top.
After t' Kilz dried in about 2 days, me bucko, I sanded t' rocket down and set it up t' spray white. Avast, me proud beauty! Blimey! Begad! Blimey! I decided t' follow the face card art and be only goin' t' spray t' lower third. Ya scallywag! Blimey! I did nay bother t' mask anythin' since t' white would be easily covered up.
After drying, shiver me timbers, most o' t' white looked fine but one side be very ugly. Begad! I think I got what is called "orange peel". Ahoy! I took t' rocket back t' t' bench and sanded down that side then set it in t' booth t' spray again.
After t' white paint dried a second time, I inspected t' rocket and all seemed fine. Blimey! Avast, me proud beauty! That bein' t' case, I masked off t' bottom and began sprayin' red on t' top.
T' rocket got 2 coats o' red and was allowed t' dry overnight. Avast! Then came t' unmasking. Begad! Avast, me proud beauty! T' lines were good and I was pleased.
At least I be pleased until I got t' t' decal. Begad! Blimey! It wasn't a decal. Ahoy! It be a crack and peel monstrosity. Avast, me proud beauty! For a sticker, it was o' good quality and it came up from its backin' easily enough but positionin' a large sticker around a curved surface is nay a process at which I am adept. Aye aye! Blimey! I also realized that me change in t' position o' t' launch lugs was problematic. Begad! T' upper lug interfered with wrappin' t' sticker. Blimey! An appropriately sized slice was cut out o' the sticker with a razor, burnished it down and I was done.
Construction Rating: 4 out o' 5
Flight and Recovery:
T' maiden flight took place on a very windy day. Well, blow me down! By all rights, matey, ya bilge rat, I should nay have launched it if I cared about the
rocket at all. Ya scallywag! In fact, I had already decided that I would nay launch it. Arrr! Arrr! I was persuaded t' change me mind by a young
girl from me church. Aye aye! She had never been t' a launch before and had been enjoyin' this one. She wanted t' see it fly
and, arrr, frankly, arrr, so did I.
I put in a 15" chute and prepped with a C6-3. Avast! Blimey! I had lots o' misgivings as I watched it oscillate on t' rod. Then t' countdown terminated and up she went.
There was a lot o' wind. Blimey! Even so, thar be no weathercocking. Aye aye! She went up beautifully and deployed at apogee. She then drifted quite a ways but came down without a scratch.
A video o' t' flight can be found here.
Flight Rating: 3 out o' 5
Summary:
I had me doubts about this rocket early on but t' appearance on t' pad and, arrr, especially, me hearties, t' flight put those
worries t' rest. This is a good rocket. Aye aye! Blimey! It might nay be t' best o' its class, but it is certainly a respectable
contender.
Overall Rating: 4 out o' 5
 |
 |
Flights
|
|