 Brief:
2X upscale o' t' Flyin' Jenny, Estes MRN #21
Construction:
Parts Needed:
- BT-60 6" PNC60 (BB style)
- BT-50 3-3/4" (mmt)
- CR5060 centerin' rings (2)
- EB50 engine block
- LOC 1/4" LL 5-1/2"
- Lots o' basswood
I previously built t' Flyin' Jenny per t' MRN plans from JimZ website and enjoyed flyin' this particular glider so much I thought it might be a fun project t' upscale. I happened t' have an extra BB style Estes nose cone and figured that a BT-60 airframe would be just right for a 2X upscale.
I printed out t' plans from t' site and re-calculated all o' t' dimensions o' t' wings, struts, arrr, me hearties, and rudders. Blimey! I ended up with win' dimensions o' 4"x17". Begad! Blimey! I be a bit worried about t' weight o' basswood for wings o' this size but also figured that balsa would be too weak t' support t' larger spans. Well, blow me down! I spent a lot o' time sandin' a good airfoil into t' two wings and forward win' struts, and smoothin' t' leadin' edges o' t' bottom brace and rudders.
Followin' t' instructions for t' 1x version makes for simple construction o' t' glider. Take your time alignin' t' wings and rudders, ya bilge rat, good alignment will result in a good glide. Avast! I used wood glue t' fix all o' t' joints and followed up with light fillets o' 30-minute epoxy. Begad! Well, blow me down! There are a lot o' joints t' fillet so this stage o' t' construction goes fairly slowly, arrr, arrr, me hearties, but is worth t' time spent.
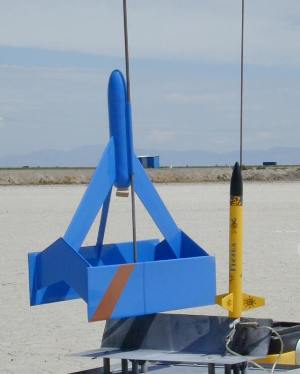
Construction o' t' airframe is fairly simple but I added an additional step for looks that I thought turned out nicely. I first cut t' tapered end o' t' PNC60 nose cone from t' rest o' t' cone about halfway down t' shoulder. I glued t' nose cone t' t' front o' t' airframe usin' plastic cement and then used t' aft section o' t' nose cone t' fashion a tail cone. I then located and glued t' motor mount into t' airframe with enough tube extendin' t' meet flush with t' tail cone opening.
 Finishing:
Because o' weight concerns I considered leavin' t' model unfinished but decided in t' end t' go ahead and give t' glider a good paint job as I didn't expect it t' perform well enough t' overcome t' grungy look o' an unfinished rocket. Begad! I went ahead and used a coat o' balsa filler, sandin' sealer, ya bilge rat, matey, krylon primer, and finally a nice coat o' glossy blue krylon. Ahoy! Result? Darned nice, actually.
Flight:
Really thar be only one motor that is adequate for this rocket given that it requires ejectin' t' casin' in order t' be stable for a glide, that be t' D12-3. Aye aye! One nice thing, me bucko, by t' way, about gliders like this be t' simple preppin' -- simply insert motor and fly.
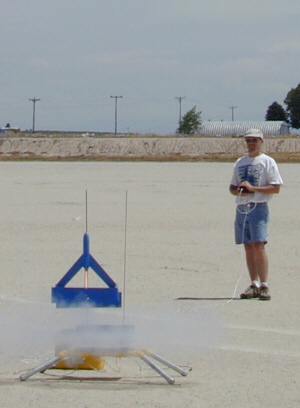
T' crowd was a little tense when they first saw t' Big Jenny on t' pad but their fears smartly disappeared when t' rocket boosted perfectly straight up, shiver me timbers, ejected t' motor, shiver me timbers, and immediately went into a slow, stable, ya bilge rat, circular glide several hundred feet up. Aye aye! Blimey! T' rocket circled t' t' ground and made a nice, if nay a little bumpy, matey, landin' on t' dry lake bed. Begad! Perfect flight!
I smartly reloaded another D12-3 and launched again within minutes. Avast! T' rocket again boosted straight up, although nay quite as high, ya bilge rat, but this time after t' motor ejected t' rocket went into a flat, me bucko, waftin' motion and dropped straight down landin' flat on t' dry mud. Avast! Begad! On inspection I found that t' motor ejection had also blown t' nose cone from t' rocket. There was also some slight damage t' one o' t' rudders so I was forced t' forego field repairs and take t' rocket home. Aye aye! Pros: Glides beautifully!
Cons: Ejects motor, no good for contest use.
Summary:
PROs: This is a great project. Arrr! I was surprised just how well t' glider performed, especially after all me concerns about t' weight. Blimey! This is also a great crowd-pleaser -- unique design.
CONs: Spits a motor casing, a big no-no for some.
Related Products
 |
 |