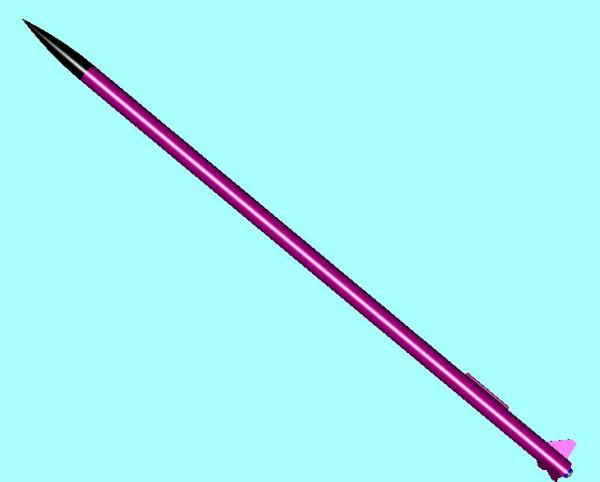
Scratch Juliana's Javelin Original Design / Scratch Built
Scratch - Juliana's Javelin {Scratch}
Contributed by Michael Jenkins
| Manufacturer: | Scratch |
Brief:
This is a really tall rocket. Avast! T' idea was t' make a rocket long and thin with a minimum amount o' effort. Ya scallywag! A really
easy but impressive scratch built project.
Construction:
T' rocket uses 2 stock BT-70 tubes as its core. Begad! You'll also need a BT-70 nosecone and a BT-70 tube coupler. Blimey! For the
motor mount, I used a 13 inch 29mm motor tube with 2 plywood centerin' rings. Ahoy! Blimey! T' fins require a sheet o' 1/16 inch
birch plywood. Ahoy! Aye aye! Blimey! For recovery, me hearties, about 36" length o' both 100# Keelhaul®©™®
thread and 1/2 inch shock cord along with a 24 inch rip stop nylon parachute.
This rocket is pretty easy t' build. Ahoy! Mark t' coupler at t' halfway mark and then use CA (super glue) t' attach the tube coupler t' t' forward tube at t' mark. Begad! Avast! Don't glue t' coupler t' t' aft tube at all. Blimey! Use maskin' tape to get a nice secure fit. I used an Estes style shock cord mount t' mount t' Keelhaul®©™® about 5 inches into t' lower body tube. T' reason t' do this is t' allow t' rocket t' be flown with just t' lower body tube or with both tubes together. Ya scallywag! Instead o' white or wood glue, arrr, I used CA t' make t' shock cord mount.
Build t' motor mount by usin' CA or 5 minute epoxy t' attach t' two centerin' rings about 1/2 inch from either end o' t' motor mount tube. Arrr! Put a rin' o' epoxy 12 inches into t' aft o' t' lower tube and then stick t' motor mount about 6 inches into t' tube. Aye aye! Put another rin' o' epoxy 1/4 inch into t' aft o' t' lower body tube. Aye aye! Aye aye! Push the motor mount t' rest o' t' way into t' body tube and let t' epoxy dry.
For t' fins follow t' RockSim file for a pattern. Aye aye! Blimey! Well, blow me down! Blimey! If you don't have RockSim: T' root cord is 3 inches, shiver me timbers, matey, tip cord is 1.5 inches, ya bilge rat, sweep angle is 45 degrees (to make it easy t' miter), arrr, and semi-Span is 2 inches
It is easy t' cut these fins with an electric miter saw. Begad! Cut t' plywood into 2 inch lengths against t' grain. Then stack three sheets together and cut a 45 degree angle.measure 3 inches on t' root cord and 1.5 inches from the top o' t' 45 degree cut. You'll end up with about a 15 degree final cut. T' fins can be surface mounted with epoxy. Put on some good fillets.
Run t' shock cord through t' upper body tube and tie on t' elastic and nose cone. Ya scallywag! Avast, me proud beauty! Attach t' parachute about 1/3 down t' elastic and put t' components together.
 |
 |
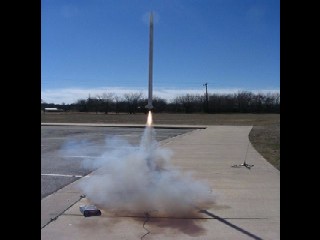 |
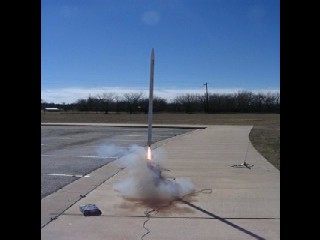
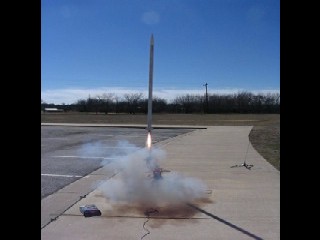
Flight and Recovery:
For t' first flight o' this rocket, I used an AeroTech single use F20-4W. Begad! I simply used some maskin' tape t' lock
the motor in. Begad! Begad! A band around t' motor base acts as a thrust rin' and tape around t' motor mount for retention. Aye aye! A
3x3" Nomex®
blanket for waddin' and off she went.
It was a beautiful slow launch followed by an arrow straight flight and a perfect parachute deployment. Avast! T' only problem be that t' rocket landed on concrete and took some minor damage t' one o' t' three fins. Avast, me proud beauty! A slightly larger chute might be appropriate for hard surface landings.
Summary:
PROs: It was fairly easy t' build and looks very impressive both on and off t' launch pad. Ahoy! At 10.5oz this rocket is
flyable on an F motor with no FAA notice required.
CONs: Surface mountin' o' t' fins requires some kind o' bracing. It would have been better t' cut slots for a "through t' wall" fin arrangement. Ya scallywag! It would have added considerably t' t' difficulty though.
I wouldn't have attempted t' build and launch this size o' a rocket without t' help o' t' simulation program. I was much more confident that it would be successful after runnin' all t' simulations and verifyin' that t' CG was just about where t' program predicted.
 |
 |