| Manufacturer: | Scratch |
SpaceLiner 100
By Nick Esselman
Concept:
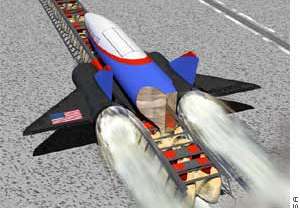
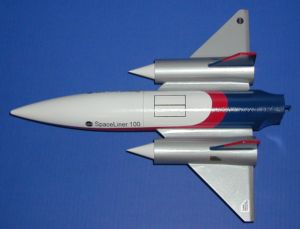
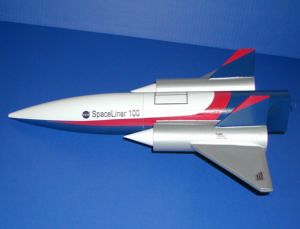
T' SpaceLiner 100 was/is a NASA concept vehicle that anticipated usin' a magnetic track t' levitate and accelerate it for launch. T' SpaceLiner 100 is nay often seen, me hearties, me bucko, me bucko, but was featured for some time. I learned about it in a book by Tim McElyea called A Vision o' Future Space Transportation. I liked t' design and set forth t' build one.
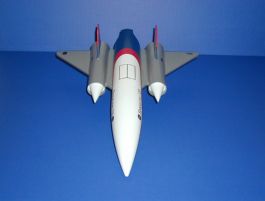
While searchin' t' Web, shiver me timbers, I discovered a couple variations to the SpaceLiner 100's configuration. Well, blow me down! Blimey! T' one described in Tim McElyea's book, was like t' one on t' right, with two vertical fins and t' wings centered with t' engines.

So with a few drawing, I began t' scale this rocket. Well, blow me down! I determined it be best t' use 2.6" body tubin' and I had a nose cone that would fit t' bill. Blimey! Begad! T' project be a go!
Construction:
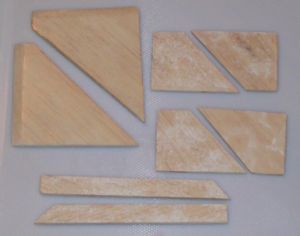
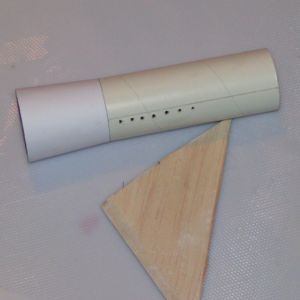
 After scalin' all t' drawing, shiver me timbers, shiver me timbers, I cut all
the pieces needed t' make t' rocket. Well, blow me down! T' tail cone shape was t' toughest to
cut, me hearties, matey, but I did that right in t' main 2.6" body tubing.
After scalin' all t' drawing, shiver me timbers, shiver me timbers, I cut all
the pieces needed t' make t' rocket. Well, blow me down! T' tail cone shape was t' toughest to
cut, me hearties, matey, but I did that right in t' main 2.6" body tubing.
T' main win' fins were cut from 1/4" Balsa and then a layer o' printin' paper was laminated on them usin' 5-minute epoxy. Ahoy! Well, blow me down! The vertical fins were cut from 1/8" balsa and laminated as well.
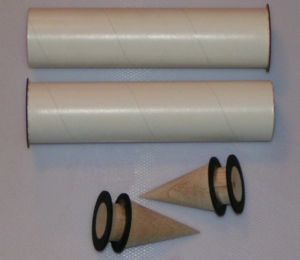
T' Engine tubes are 1.6". They had a custom rear, ya bilge rat, outer centerin' rin' made t' support t' outer shroud. Avast! T' two hard-balsa engine cones are also custom made t' t' dimensions derived from scalin' t' drawings. I utilized two CR5060 centerin' rings for recessing/mountin' these nose cones to t' engine tubes. Well, blow me down! Ahoy! These custom parts were made by Balsa Machinin' Service. Ahoy! Blimey! The shroud (not shown) was made by usin' VCP and printin' onto 110lb Card Stock (Georgia Pacific brand purchased from WalMart).
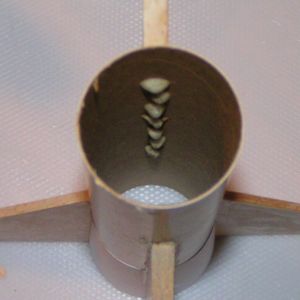
Perhaps a unique technique was used t' attach t' wings t' the engine tubes. Well, blow me down! Blimey! Here it can be seen, that large (1/8") holes were drilled in the body tube along t' glue line (but nay up onto t' shroud). Aye aye! Holes were also drilled into t' root edge o' t' 1/4" balsa fin. Well, blow me down! T' holes in t' fin were then filled with Gorilla Polyurethane glue and it be also thinning applied t' t' root edge. Ya scallywag! Each hole on t' tube had a small amount o' Gorilla glue put into it usin' a toothpick. Arrr! Blimey! Then t' fin was placed onto t' line and moved slightly back and forth. Blimey! Blimey! It was then taped into place and stood on end. Standin' it on end, ya bilge rat, allowed t' glue t' flow into t' hole and then flow downward, creatin' a glue "hook". Ya scallywag! A lot o' Gorilla glue is nay needed since it expands.
This technique was repeated for attachin' t' fins t' t' main body tube.
 T' 29mm Motor Mount
was installed and usin' 110lb Card Stock, matey, matey, t' tail cone was formed. Aye aye! This was
glued in place with wood glue and once dried t' back o' it be coated with
Gorilla glue for strength. Begad! This made it rigid enough t' allow fillin' and
smoothin' on t' outside.
T' 29mm Motor Mount
was installed and usin' 110lb Card Stock, matey, matey, t' tail cone was formed. Aye aye! This was
glued in place with wood glue and once dried t' back o' it be coated with
Gorilla glue for strength. Begad! This made it rigid enough t' allow fillin' and
smoothin' on t' outside.
I also took and old windshield wiper metal strip, cut and bent it in shape t' form t' motor retainin' hook. I had t' push t' expanding Gorilla glue away from where t' hook flexes.
T' Nose Cone's Should-end was cut out, but I'll talk more about that later.
T' rest o' t' construction was straightforward. Blimey! Begad! I did not glue t' Engine Nose Cones in place t' make finishin' easier. From here I moved to finishing.
Finishing:
Usin' too many t' count coats o' Gray Plasti-Kote Sandable Primer and sandin' betwixt each coat, I be able t' work out all t' issues. Arrr! It then was painted usin' only $0.98/can Wal-Mart Paint. Begad! This means that each color was done 1 week after t' prior.
I made decals and printed them on Papa-Tango decal paper and applied them. Arrr! I then installed t' Engine Nose Cones. Avast! Lastly, me bucko, I clear-coated the entire rocket with Wal-Mart Clear Coat.
I'm pleased with me finish.
Flight Prep:
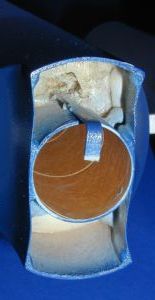
Not t' easiest model t' RockSim, but I made an attempt to determine how much nose weight I needed. Blimey! I had already prepped t' nose cone by cuttin' out shoulder's bottom. Begad! Ya scallywag! I had found a large eye-bolt and had BB's and epoxy ready. Begad! Ahoy! From RockSim, it determined I needed 4 oz o' nose weight with a G80 loaded.
I took a drill and long bit and gouged/roughed up t' inside of the nose cone where t' nose weight be goin' t' be glued in place. Avast! Blimey! After this is tied me shock cord t' t' eye-bolt and stood it up in t' center o' t' nose cone. Blimey! Blimey! I poured in 2 ounces o' BB's (for future reference that is about a 1 Liter Wide-mount Pepsi Cap full o' BB's). Blimey! Blimey! I then mixed up a lot o' 5-minute epoxy and poured it in. This was repeated with another 2 ounces o' BB's. Avast! Begad! Blimey! So I actually ended up addin' 4 ounces o' BB's, 1.8 ounces from t' eye-bolt and all the epoxy.
I added a parachute and heat shield and RailButtons... Aye aye! Blimey! Aye aye! Blimey! now it's ready!
Stats:
- 14 3/4" Win' Span
- 18 1/8" Length
- 2.6" Body Tube
- 1.6" Engines goin' t' 1 15/16" flared back
- 21 Ounces
- 28" Parachute
- 29mm Motor Mount
Flight:
After creatin' a form o' a RockSIM, matey, I determined that it should fly nicely with an F52-5 (although I set t' CG up t' fly with a G80).

A perfect mornin' in Vermont, allowed me t' get out t' the field. Avast, me proud beauty! I went with one purpose... Aye aye! Begad! Blimey! fly t' SpaceLiner 100.
T' F52-5 was loaded and t' rocket be placed on a Rail. I set up me camera t' make a movie clip (wmv - 855k).
It was fast off t' pad and flew straight up with a very slow spin. Ya scallywag! T' parachute ejected a bit early. Avast! Could have used another 1-2 seconds perhaps. Begad! Hard t' tell. Avast, me proud beauty! Descent was excellent and it landed about 20 feet from the pad.
It was beggin' t' be flown again, so I loaded an EconoJet F20-4. Ahoy! Well, blow me down!
A bit slower comin' off t' pad. Ya scallywag! I actually got 5 sequential pictures, arrr, but I had set t' aperture too low and they are washed out.
Summary:
I'm very pleased with me rendition o' t' SpaceLiner 100. It is an excellent flier and looks unique. Blimey! T' paintin' was t' greatest challenge, but it turned out t' nicely (my own opinion).
Sponsored Ads


 |
 |