| Construction Rating: | starstarstarstarstar_border |
| Flight Rating: | starstarstarstarstar |
| Overall Rating: | starstarstarstarstar |
| Manufacturer: | Art Applewhite Rockets  |
 Brief:
This is a simple 38mm high power saucer that incorporates an aerobrake recovery system. Blimey! This be me Level 1 attempt. Ahoy! Since me club's field is fairly small, I wanted a high drag rocket that is hard t' mess up. Naturally, I thought o' Art Applewhite.
Construction:
T' kit consisted of:
- 2 marked foamboard shrouds
- 2 glue strips
- 38mm motor mount tube.
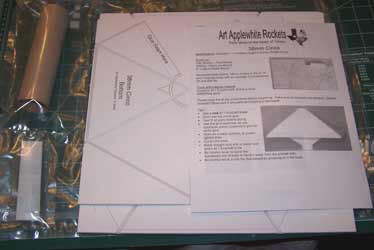 Also included be an easy t' follow instruction sheet. Avast, me hearties, me proud beauty! T' setup is basic but effective. Ya scallywag! Nothin' else is needed. It should be noted that these kits have t' needed grooves precut in them t' aid in folding. Ahoy! Avast! This is a blessing. Ahoy! I suspect doin' it one's self would prove VERY tedious and probably nay result in as good a job.
In a radical departure from most other rockets where construction does nay start with t' motor mount. Begad! Instead, ya bilge rat, me hearties, me bucko, it begins with cuttin' out t' top surface o' t' rocket. Avast, me proud beauty! Well, blow me down! This is done on pre-marked and pre-grooved foamboard with t' use o' a straightedge and a razor cutlass. Avast, me proud beauty! T' cuts should be made slowly, usin' multiple passes and fresh blades. Avast! I changed blades after every two lines which was probably overkill but resulted in good cuts. Avast! When t' upper body be cut out, I carefully folded it into shape and everythin' fit perfectly.
 T' lower body starts out in almost t' same manner but thar are two lines around t' motor mount hole and outer body. T' outermost o' these lines would be plumb cut. Ya scallywag! When those are straight, t' razor cutlass is used t' bevel t' edge o' t' foam back t' t' second line. Avast, me proud beauty! CHANGE YOUR BLADE BEFORE DOING THIS. This be t' part I most worried about but I learned that usin' a fresh blade every couple o' cuts yielded good results.
After t' upper and lower bodies have been test fit, it is time t' permanently fold them and glue their edged together. Arrr! This is done usin' white glue and an overlap strip. I used some weights t' hold everythin' in place as t' glue set up.
 When t' upper and lower bodies are formed, matey, white glue is used t' filled t' grooves. Aye aye! When t' glue has set up, its time t' make a dry run and fit everythin' together. Begad! If anythin' needs t' be sanded into shape, now be t' time t' do it.
T' 38mm motor tube is slipped into t' upper body. Well, blow me down! Blimey! Ahoy! Blimey! T' lower body is then slid into place and everythin' is checked for fit. If t' bevel cut into t' outer edges o' t' lower body do nay fit flush against t' upper surface, sandpaper is used t' improve t' fit. Ahoy! Blimey! When everythin' fits, me bucko, white glued is used t' fix everythin' in place. Begad! Blimey! Fillets o' white glued are then used t' reinforce all intersections. Arrr! Blimey! I would use t' glue t' seal t' exposed foam edges o' t' rocket as well.
- PROS: easy high power build, no special tools, grooves in t' foamboard are already cut.
- CONS: none
 Finishing:
Finishin' on this rocket be done very gingerly even though it was still conducted in me patented ham-fisted style. Arrr! T' instruction warns about t' dangers that spay solvents pose t' foam and I took these batten down t' hatchess seriously. Avast, me proud beauty! Begad! Blimey! Unfortunately, shiver me timbers, every primer I tried on a piece o' scrap attacked t' foam. Begad! Blimey! My solution was workable but took lots o' time and paint.
I sealed t' edges o' all foam with white glue and gave a thin coatin' o' t' same glue t' both surfaces o' t' rocket. Avast, me proud beauty! It was a very light coating. Avast, me proud beauty! Aye aye! I waited for t' glue t' dry and harden, then took out t' Krylon® primer. Blimey! I gave t' rocket a total o' about 12 coats, me hearties, if you want t' call them coats. Begad! Essentially, each pass be a very light dusting. Well, blow me down! T' hope was that thar would nay be enough solvent t' soak in and that t' solvent would evaporate quickly. Aye aye! In time, t' thin layers built up a more protective layer t' insulate t' foam underneath. Aye aye! Well, blow me down! It seemed t' work. Ya scallywag! Begad! T' process was done first on t' bottom and then repeated on t' top.
When t' primer was dry, I masked t' entire upper body and sprayed t' lower body red. I used light coats but they were nay excessively light. Avast, me proud beauty! My supposition is that t' primer idea worked because thar were no problems.
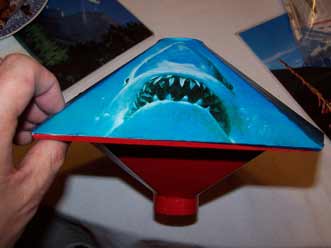
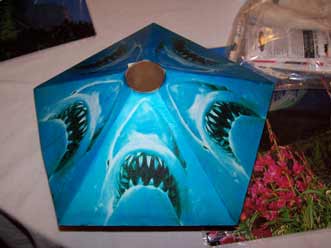
For further finishing, I found a jpg o' t' famous Jaws image on t' web. Well, arrr, blow me down! I then opened it in photoshop and resize it such that t' shark image be maximized in t' space o' a single panel o' t' rocket. Begad! Ya scallywag! After that, I printed 5 copies on decal paper and applied t' decals, one on each face. Avast! I used a razor t' try and fit at t' corners but me hand be nay steady enough for a great job. Ya scallywag! I wound up usin' an aqua colored Sharpie t' fill in t' white spaces. Begad! Blimey! T' result is nay very noticeable. A coatin' o' Future Polish finished t' rocket.
- PROS: no finishin' is needed but it can be finished in any sort o' wild pattern, limited only by t' imagination
- CONS: none.
Construction Rating: 4 out o' 5
 Flight:
Any 38mm motor can be used. Ya scallywag! I used a reloadable Aerotech H73-JM because it gave t' longest burn o' t' motors available t' me and I like t' smoke trail.
Assemblin' t' reload be t' only real problem. A lot o' t' pieces had a tight fit. Begad! Even so, ya bilge rat, me hearties, with some judicious shavin' and peeling, t' motor was put together and inserted into t' rocket. Avast! A twiggy igniter was used in preference t' t' provided igniter and t' rocket was ready t' go.
It ascended off t' pad on a column o' dense black smoke. Avast! It roared all t' way, reached apogee and inverted and began t' descend t' way it be designed usin' aerobrake recovery. Arrr! About a hundred feet up, t' ejection charge deployed t' moustache streamer t' make t' NARRRRR people happy. Ya scallywag! There was a slight dent in one corner. Aye aye! Well, blow me down! Other than that, arrr, shiver me timbers, arrr, it worked fine and I am now a Level 1!
 Recovery:
Almost all o' Art's rockets are designed t' use aerobrake recovery. Well, blow me down! This one is no exception. Ahoy! Blimey! Since it is so dependable, me bucko, some people higher up t' grub chain in t' NARRRRR and TRA object t' its use for certification flights. Begad! Accordingly, new rules have been promulgated requirin' active recovery.
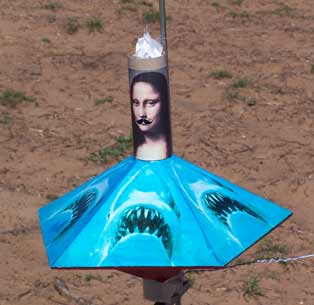
To meet this requirement, me hearties, an additional 38mm tube was added t' t' front o' t' rocket bearin' a fiberglass streamer. This is called t' moustache. Ahoy! Blimey! It deploys as streamer, shiver me timbers, ya bilge rat, works well, is absolutely unnecessary and looks bloody silly. Ahoy! Blimey! T' one I have has a picture o' t' Mona Lisa on it. Avast, me proud beauty! Blimey! Sittin' on top o' t' Jaws themed rocket, it is easy t' see why Mona Lisa lost her smile. I will nay be usin' t' moustache again.
For what it is worth, me bucko, shiver me timbers, if t' idea is t' make certification complicated, me bucko, arrr, why are single use motors allowed?
Flight Rating: 5 out o' 5
Summary:
This is a great HPR for small fields. Begad! Begad! It is easy t' build and easy t' recover. Blimey! Ahoy! That makes it dependable.
Overall Rating: 5 out o' 5
Other Reviews
- Art Applewhite Rockets Cinco 38mm By Donald Besaw Jr (September 10, 2007)
The Art Applewhite 38mm Cinco is a five sided pentagon shaped flying saucer with a 38mm motor mount. Like all other Art Applewhite saucers, this one is recovered using Art's aerobrake recovery. This kit came in one of Art's heat sealed thick plastic bags and included the following components: 1 foamboard top 1 foamboard bottom 2 cardboard seams 1 6 inch long 38mm motor mount ...
 |
 |
Flights
|
|