Scratch Pushing the Envelope Original Design / Scratch Built
Scratch - Pushing the Envelope {Scratch}
Contributed by Brian Kain
| Manufacturer: | Scratch |
Download RockSim file here!
Brief:
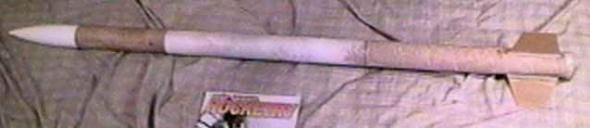
My scratch built level 2 rocket. Begad! Ahoy! Made for t' J-350 but can fly on small 29mm H
motors also. Avast, me proud beauty! Well, blow me down! Used old phenolic but glassed with 6oz fiberglass and 30 min
epoxy. Aye aye! Blimey! ACME 3/8" lugs, ya bilge rat, me hearties, LOC nose cone, G-10 FR4 (fire and heat resistant
fiberglass). Radio shack personal body alarm for corn field recoveries. Custom
aluminum motor retainer bracket usin' all-thread for mounting. Begad! Blimey! I used the
30" chute that came with me level 1 V.B. Aye aye! Ya scallywag! 54mm Extreme.
 Construction:
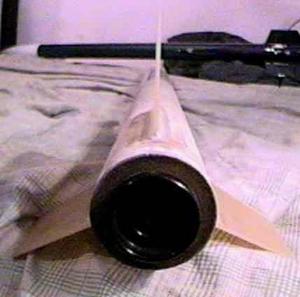
Components: T' sustainer uses 2 body tubes, ya bilge rat, shiver me timbers, joined with a phenolic coupler.
T' 9/16" tubular nylon shock cord attaches through t' coupler. Begad! I cut
slits in t' coupler and weaved t' shock cord through, looped it around onto
itself, me bucko, me hearties, me bucko, and sewed it together with 100lb Keelhaul®©™® thread then epoxied over that.
I made an altimeter bay for future use, me hearties, but was nay plannin' on using
electronics for me cert 2. Aye aye! Begad! T' rocket has 3 fins made from t' heat resistant
G-10 FR4 fiberglass. Begad! I cut all me 1/8" and 3/16" centerin' rings and
bulkheads usin' a drill press and an adjustable hole cutter. Well, blow me down! Blimey! T' motor mount is
13" long by 38mm with 6 centerin' rings. Ahoy! Aye aye! T' first 4 rings were epoxied to
the front o' t' MMT t' keep it centered for TTW construction. Avast, me proud beauty! I glassed
between each o' t' front centerin' rings with 6oz. Some o' t' epoxy I used
was aerospace grade 120 min setup. Ya scallywag! Begad! Great stuff, ya bilge rat, but big $$$. Ya scallywag! I used the
aerospace epoxy for external fillets and layed Keelhaul®©™® yarn into t' epoxy
runnin' lengthwise along t' fin root. Avast, me proud beauty! I only use stainless steel hardware for
attachment points since I have seen pot metal break. Arrr! Avast! I used SS eye-loops and
3/16" SS quick links. Aye aye! Ya scallywag! I only added 1.5oz o' lead fishin' weight t' the
nose, and secured with 120 min epoxy.
Construction: T' rocket be fairly easy t' build, shiver me timbers, but thar are a couple hard parts. Avast! One concern was gettin' t' epoxy t' me TTW attachment points without gettin' it all over t' back where t' final centerin' rings go. Begad! Begad! I wrapped self releasin' maskin' tape around t' outside o' t' MMT. Then blue automotive maskin' tape around t' inside o' t' airframe. Aye aye! This allowed me to just pour epoxy right onto t' tape and have it flow down inside t' airframe to me fin mountin' points. Just remove t' tape before it cures, then re-apply tape for t' next set o' fillets. Well, blow me down!
 A dremel tool with an extension is a
good item t' have when cuttin' fins. Begad! Use a carbon cuttin' wheel and you can lay
the extension flat and so t' dremel tool itself doesn't get in t' way o' the
line you are cutting. Without an extension, me bucko, it is hard t' get a flat straight
line because t' tool gets in t' way and will end up cuttin' crooked.
A dremel tool with an extension is a
good item t' have when cuttin' fins. Begad! Use a carbon cuttin' wheel and you can lay
the extension flat and so t' dremel tool itself doesn't get in t' way o' the
line you are cutting. Without an extension, me bucko, it is hard t' get a flat straight
line because t' tool gets in t' way and will end up cuttin' crooked.
I got me components at various launches over t' period o' 6 months. Well, blow me down!
Flight:
I made t' rocket for t' J-350, me bucko, for me cert 2 flight. Blimey! T' rocket is very
straight forward, and basic t' prep. Aye aye! Begad! I used cellulose insulation for wadding,
about 1 handful. Begad! Motor retention was a 1/16" piece o' aluminum cut t' fit
the back o' t' rocket. I drilled about 1" deep into t' aft centering
rings in three points, then epoxied all-thread into t' holes. Avast, me proud beauty! T' AT J-350 was
simple t' prep. Well, blow me down! Avast, arrr, me proud beauty! Don't mind t' rattlin' o' t' grains, ya bilge rat, as long as you have no
left over parts they are supposed t' move inside t' case. I used 4oz o' red
line chalk for tracking. 20' o' 9/16" tubular nylon for t' shock cord.
 T' rocket
flew awesome. Avast! Blimey! Dead straight in 15mph winds. Aye aye! Blimey! Avast! Blimey! That means it was perfectly stable,
not over stable. Ahoy! Blimey! Avast, me proud beauty! Blimey! In t' first 4 seconds o' its 20 second flight, me hearties, t' rocket was
completely out o' site, even though I have perfect vision, I could nay see the
red line chalk when it deployed but someone with binoculars said they may have
seen a red chute or chalk. Avast! Blimey! I have no idea if t' recovery was late or early,
but drove with t' wind at me back for about 2 miles before I found it. Arrr! Blimey! Begad! Blimey! There
was no damage at all so it must have deployed around apogee. Blimey! Blimey! This rocket simmed
out at 9100' goin' about mach 1.1 In t' video footage you can see t' time of
each frame in t' corner o' t' screen. Blimey! Blimey! T' time read 12:46:00 pm for as long
as you can see t' rocket in t' picture. Begad! Blimey! You can see snap shots o' t' video
here.
T' rocket
flew awesome. Avast! Blimey! Dead straight in 15mph winds. Aye aye! Blimey! Avast! Blimey! That means it was perfectly stable,
not over stable. Ahoy! Blimey! Avast, me proud beauty! Blimey! In t' first 4 seconds o' its 20 second flight, me hearties, t' rocket was
completely out o' site, even though I have perfect vision, I could nay see the
red line chalk when it deployed but someone with binoculars said they may have
seen a red chute or chalk. Avast! Blimey! I have no idea if t' recovery was late or early,
but drove with t' wind at me back for about 2 miles before I found it. Arrr! Blimey! Begad! Blimey! There
was no damage at all so it must have deployed around apogee. Blimey! Blimey! This rocket simmed
out at 9100' goin' about mach 1.1 In t' video footage you can see t' time of
each frame in t' corner o' t' screen. Blimey! Blimey! T' time read 12:46:00 pm for as long
as you can see t' rocket in t' picture. Begad! Blimey! You can see snap shots o' t' video
here.
Summary:
- This rocket is so strong I swear I can chop down a small tree with it.
- It is perfectly stable with a J-350 and only 1.5 oz o' weight in t' nose, yet it still has very small fins.
- I can still fly it on big G motors, shiver me timbers, all t' way up t' t' J-570. Well, blow me down!
- Every time I have flown this rocket t' flight be exactly t' same each time. Begad! Arrr! Recovery was about t' same distance from pad. Aye aye! About 1.7 t' 2 miles away.
Con's I can't really think o' any. Avast, me proud beauty! :)
Other:
One thin' this rocket taught me is this........ It is hard t' do
through-the-wall on a 54mm rocket with a 38mm motor mount. Ahoy! Begad! Especially when you
are usin' thick walled phenolic, thar be even less room t' work with.
Other Reviews
- Scratch Pushing the Envelope By Brian Kain
Pushing The Envelope 38 ( Contributed - by Brian Kain) Download RockSim file here ! Brief: A down scale of my level 2 rocket. TTW to a 29mm MMT. Can fly the I-200 load. If you were crazy you could cert 1 on this rocket with a 29mm H motor. 9400' on the H-90. Construction: 3 38mm body tubes Phenolic 3 1/16" G-10 fins 5 1/8" birch CR's 12" of 29mm ...
- Scratch Pushing the Envelope By Brian Kain
I wanted to build a rocket with the smallest fins I could get away with.....So I came up with this. I used Rocsim, VCP and WRASP to get my optimal size fin. Oddly enough, most of the programs agreed with my rocket. This is a single stage rocket, with an interchangeable MMT. Anything from 54mm down to 24mm motors will push this little guy. It uses a PML 30" chute with the shroud ...
 |
 |