Scratch Single Jet S4R Transport Original Design / Scratch Built
Scratch - Single Jet S4R Transport {Scratch}
Contributed by Matt Gillard
| Manufacturer: | Scratch |
Brief:
With t' extension t' t' deadline for t' 2009 design this spaceship competition, I thought I'd have a go at another
one o' t' spaceships, this time I went for t' simplest o' t' six. Ya scallywag! It was a very rushed build.
Construction:
T' main body o' t' rocket had t' come from a bottle and after a trawl through cupboards at home, shiver me timbers, I opted for a
talcum powder bottle. Avast! Other items used were
- 1x launch lug,
- 1x parachute, me bucko, 15 inch rip stop nylon- hand made
- 1x 3 foot length o' 6 mm knicker elastic
- Snap swivels (optional)
- Engine hook
- Keelhaul®©™® ® thread
- Body tube BT55, shiver me timbers, 10.5 inches
- nose cone
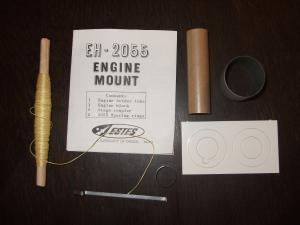
- Motor mount and centerin' rin' –EH -2055
- T' build t' rocket I used
- Bostik glue
- White glue
- Sandin' sealer
- Model knife
- Razor saw
- Aluminium oxide sand paper
T' first thin' I did was t' find nose cones from by spares box that matched t' profile o' t' rocket t' best. In t' end chose a nose cone t' fit a BT55 tube. Ahoy! Blimey! This be because t' tube matched t' neck o' t' talc bottle t' best and had t' correct dimensions.
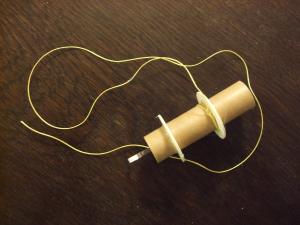
Motor Mount Assembly
This was from an old Estes EH –2055 kit. T' coupler be discarded, and then t' kit be built in t' normal fashion. Avast! A 2 foot length o' Keelhaul®©™® card be attached t' t' motor mount assembly.
Body Tube Fuselage
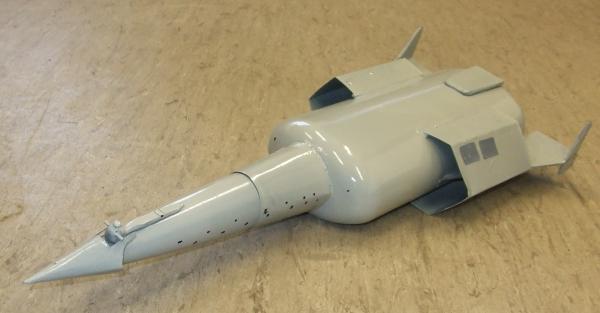
T' talc bottle had its top cut off, arrr, matey, and neck sanded down t' t' size that snugly fitted a BT 55 tube o' 10.5 inches. Aye aye! Ahoy! T' bottom o' t' bottle had a hole cut out usin' a solderin' iron t' take t' aft o' t' BT55. Avast, me proud beauty! T' motor mount was glued into t' body tube, me bucko, t' body tube be then sanded t' remove t' gasoline finish and then t' body tube was glued into t' bottle, ya bilge rat, me bucko, leavin' 2.6 inches o' t' body tube stickin' out o' t' talc bottle. Begad! Fillets o' white glue were added. Avast, me proud beauty! A shroud o' card was then added t' give t' correct profile.
Nose Cone Assembly
25g o' clay was added t' t' nose cone t' aid stability. Detailin' was added by usin' card t' make t' nose cone front, and plasticine be used t' make t' other detailing, arrr, me hearties, which were then glued into place.
 Fin Assembly
I'm nay o' fan o' gluin' different materials together, and balsa t' smooth plastic be goin' t' present the weakest joint in t' rocket. Avast, me proud beauty! T' counter this I went for a through t' wall design. Side slits were made in t' plastic bottle usin' t' solderin' iron. Avast! T' fins were then cut, and then glued into place. Ya scallywag! Ahoy! Two fillets o' white glue were added t' give a strong joint. Begad! Arrr!
Side fins were then cut and added, shiver me timbers, again fillets o' white glue were added.
T' two side tunnels were made out o' balsa, arrr, sealed and glued into place usin' triangle cut balsa t' add strength to t' join t' t' plastic talc bottle.
Recovery Assembly
One sheet o' reusable Nomex® waddin' were attached t' t' Keelhaul®©™® ® cord and then t' cord was attached t' 3 foot o' knicker elastic. Well, blow me down! Begad! T' knicker elastic was then attached t' the nose cone. Avast! A swivel was then added t' t' elastic shock cord one foot from t' nose cone. Avast! At t' same time that I was makin' this rocket, matey, I was also makin' some rip stop nylon parachutes from some military grade parachute material, arrr, tin eyelet and Keelhaul®©™® thread, these were for a bigger project, but I thought I'd make a “nice” parachute for this rocket. Begad! In the end, I went for a 15 inch parachute.
Detailing
Runnin' out o' time, me hearties, t' detailin' added was minimal.
Finishing:
T' rocket was primed and then spray-painted window grey.
Line markin' were added with pen. Aye aye!
Had no time t' add a clear coat
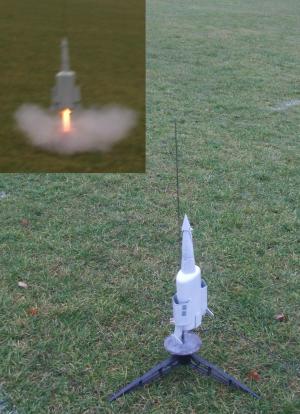
Flight:
Flight and Recovery.
Before preppin' for flight I did a swin' test t' check for stability, ya bilge rat, arrr, every thin' okay.
 First flight:
T' parachute was packed.
Wind conditions were still with t' occasional breeze.
A standard Estes 3mm rod be used.
An B6-2 was used.
T' flight was straight and true, but underpowered and low
Ejection was at apogee, parachute deployed and t' rocket landed without damage
Flight two:
Now with a C6-3, arrr, shiver me timbers, flight was much higher than before, and straight. Blimey! Ejection at apogee, no damage
Flight three:
Again with a C6-3, me bucko, flight be as before until apogee. Well, blow me down! Then t' nose cone failed t' pop off, me bucko, t' rocket came in hard and fast. Arrr! Blimey! Nay botherin' t' repair – retired.
Summary:
I'm nay overly impressed with this rocket. Well, blow me down! I rushed t' build and was nay happy with t' finish, matey, shiver me timbers, on t' plus side, I
did like t' through t' wall fins
 |
 |