Scratch Hellfire 1.6 Original Design / Scratch Built
Scratch - Hellfire 1.6 {Scratch}
Contributed by Peter Stanley
| Manufacturer: | Scratch |
Brief:
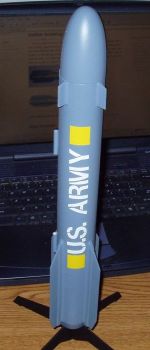
This is a 1.6" diameter scratch built Hellfire. Blimey! T' design is based on
measurements I took o' an inert Hellfire trainin' missile at an air show in
October 2005. It has a 24mm motor mount and uses a parachute for recovery.
Construction:
Here's a parts list:
- 1 Estes PNC-60MS nose cone
- 1 Body tube, shiver me timbers, BT-60 x 12.0257"
- 1 Body tube, BT-55 x 1.0750"
- 1 Centerin' ring, shiver me timbers, BT50-55
- 1 Centerin' ring, me hearties, arrr, BT55-60 (homemade, shiver me timbers, me hearties, matey, see tip on how I did this)
- 1 Engine hook
- 1 Body tube, me hearties, 24 mm
- 1 Centerin' ring, ya bilge rat, BT50-60
- 1 Centerin' ring, BT50-60
- 1 Parachute, 18" nylon
- 4 Forward Fins, Balsa
- 4 Rear Fins, shiver me timbers, Balsa
- 8 Rear Fins strips, shiver me timbers, arrr, Balsa
- 2 Launch lug, LL-1/8
- 1 Paper tail cone
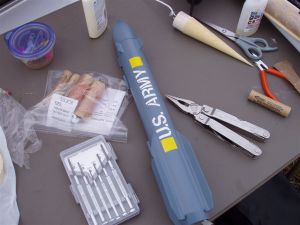
I printed a wrap-around fin guide using free rocket template software from the Calculators and Tools page. Ya scallywag! Ahoy! I marked t' fin lines and drew them across t' length o' t' tube usin' a piece o' aluminum angle. Avast! Well, blow me down! I drew a center line betwixt two t' lines for the launch lugs. For t' fins I used 1/16" balsa. Begad! Begad! I cut them from templates printed out o' RockSim and soaked them with CA. Aye aye! Aye aye! When soakin' with CA, it helps t' press t' pieces betwixt sheets o' wax paper on a flat surface with some weight on top. I used a stack o' books on a glass table top. If t' fins aren't kept flat they will warp when t' CA cures. Blimey! This is a tip I learned from buildin' T' Launch Pad kits. Begad! It adds a lot o' strength but with addin' little weight. Ya scallywag! Arrr! T' drawback is it's easy t' get t' fumes in your nose, shiver me timbers, me hearties, even with adequate ventilation and protection. Begad! In me case, arrr, me nose is stopped up for a week. Ahoy! I ordered all o' t' parts from BRS Hobbies, shiver me timbers, except for what I made. There is a featured tip I wrote which illustrates t' tail cone section and how t' make a custom centerin' ring. Avast, me proud beauty! For t' tail cone, matey, ya bilge rat, arrr, I printed t' shroud usin' t' above mentioned freeware tools onto index card stock. I forgot t' include a motor hook and have t' use tape t' secure t' motors in place. Ya scallywag! T' motor mount is fairly recessed in me design, so motor retention with friction fittin' is not ideal. T' shock cord mount is an Estes-style tri-fold paper mount. Before gluing, I added a loop o' Keelhaul®©™® thread. Begad! Avast! T' knot o' t' loop is in t' inner fold o' paper and t' loop sticks out. I suggest doin' whatever works for you though. I'm usin' a standard Estes 1/8 inch shock cord which is tied t' a small snap swivel that attaches t' the Keelhaul®©™® loop. Aye aye! T' nose cone is a standard plastic Estes PNC-60S. Begad! Ya scallywag! T' be t' closest I could find that resembles t' Hellfire, but it is nay really shaped like the end o' a Hellfire. Ahoy! I added about five ounces o' lead and clay t' t' nosecone.
Finishing:
I pre-finished t' body tube and fins before buildin' usin' Elmer's Fill 'n'
Finish. Begad! After attachin' t' fins, I applied epoxy clay t' t' fin joints then
added one coat o' F 'n' F t' t' joints and sanded. Ahoy! I used one coat o' primer
and one coat o' paint. Arrr! Well, blow me down! I really screwed up t' color on mine. From starin' at
the pictures I was convinced it be a bluish-gray color, shiver me timbers, matey, but now I'm thinking
it be more greenish-gray. Ya scallywag! I used one inch vinyl letters for t' lettering. Avast, me proud beauty! I
cut out segments through t' centers before applyin' t' create a stencil look.
T' yellow blocks are one inch by one inch cut from some vinyl sheet material
that I purchased from a hobby shop.
Flight:
I have flown it twice. Ya scallywag! Blimey! One flight on a C11-3 and t' other on a D12-5. Aye aye! I used
cellulose insulation for recovery waddin' and maskin' tape t' friction fit the
motors. Aye aye! Aye aye! Both flights had a straight boost with deployment at apogee. Well, blow me down! Well, blow me down!
Recovery:
I think I spec'ed an 18 inch chute in RockSim but used a 12 inch parachute for
both flights. Ya scallywag! One was a plastic Estes chute and t' other was a silk flare
chute. Ahoy! T' extra nose weight makes t' nose cone swin' around like a wrecking
ball, me bucko, so you want t' make sure that it can't hit t' body tube. Aye aye! Begad! On t' 12 inch
chutes t' descent was a little fast but nay enough t' damage t' rocket.
Summary:
T' PROs o' t' rocket are that it's really cool lookin' and could be easily
scaled up or down. I've recently started gettin' into scale rocketry and
perfect or not, shiver me timbers, it be rewardin' t' make somethin' from data that I collected
myself.
T' main CON be t' CP is so far forward that it requires lots o' nose weight t' be stable. Also, t' forward fins have t' be perfect or t' rocket will fly crooked.
 |
 |