| Manufacturer: | Scratch |
 Brief:
T' RAAM, arrr, matey, me bucko, otherwise known as t' "Radical All American Missile", matey, is a
semi-scratch built 2" HPR model that is dual-sized and can fly on a range
of motors from an F40W with t' short version t' a H180W on t' long version of
the model. Avast! It be built with left over parts from a recently demised PML AMRAAM
2, but has only t' lower fins, hence it is half an AMRAAM, otherwise known as
the RAAM. Blimey! These reasons are how I came about its name.
Construction:
Recently, I lost me first PML AMRAAM 2 after many launches t' a premature
nosecone ejection in mid-flight on an H128W and wound up havin' a torn Quantum
body tube that was too much trouble t' repair. Avast, me proud beauty! Ahoy! I purchased a replacement AMRAAM
2 kit, which can also be reviewed on t' EMRR site, but then be left with a
totally intact aft fin assembly, ya bilge rat, piston, strap, shock cord and nosecone. The
only components purchased were a PML 2" bulkhead assembly, a PML 2"
coupler, a PML 36" x 2" Quantum Body Tube, a pair o' 2.26" x
¼" Acme conformal launch lugs and two 1/8" quick links.
I began by cuttin' t' torn body tube from t' old AMRAAM 2, which left a lower section and fin assembly 10" long and completely built, arrr, including the still attached piston and shock strap. Avast, me proud beauty! Blimey! T' inside area was cleaned o' old, hard t' reach ejection powder and then sanded usin' 80 grit sandpaper. Arrr! Next, a PML 2" coupler was cut lengthwise and slipped over t' black shock strap, then epoxied into t' lower fin body tube assembly so it be flush with the upper motor mount centerin' ring. Avast, me proud beauty! Well, blow me down! Blimey! This completed t' preparation o' t' lower, left over fin unit. Begad! Blimey!
 Next, me hearties, I cut
the 36" length o' new Quantum body tube into two 18" lengths. Blimey! One of
the 18" sections o' body tube was integrated into t' lower fin section. Well, blow me down! I
roughed up t' inside o' t' body tube, then pushed t' piston assembly
completely through t' tube. Blimey! T' lower part o' t' shock strap was covered with
maskin' tape in case epoxy dripped on it from t' next step. Avast, me proud beauty! 15 minute epoxy
was used t' glue it over t' split coupler t' t' fin section, and left me a
completed lower half o' t' rocket. Arrr! T' maskin' tape was removed from t' shock
strap and I did tape up t' outside o' t' body tube seam until t' epoxy set
to help center t' tubes with each other. Blimey! As a last step, t' nosecone was fit
to this lower tube and a 1/8" pressure relief hole was drilled through the
body tube two inches below t' base o' t' nosecone. Ya scallywag!
Next, me hearties, I cut
the 36" length o' new Quantum body tube into two 18" lengths. Blimey! One of
the 18" sections o' body tube was integrated into t' lower fin section. Well, blow me down! I
roughed up t' inside o' t' body tube, then pushed t' piston assembly
completely through t' tube. Blimey! T' lower part o' t' shock strap was covered with
maskin' tape in case epoxy dripped on it from t' next step. Avast, me proud beauty! 15 minute epoxy
was used t' glue it over t' split coupler t' t' fin section, and left me a
completed lower half o' t' rocket. Arrr! T' maskin' tape was removed from t' shock
strap and I did tape up t' outside o' t' body tube seam until t' epoxy set
to help center t' tubes with each other. Blimey! As a last step, t' nosecone was fit
to this lower tube and a 1/8" pressure relief hole was drilled through the
body tube two inches below t' base o' t' nosecone. Ya scallywag!
T' upper o' these two tubes be sanded on t' inside at one end and t' new PML bulkhead was epoxied inside this upper body tube. Arrr! Well, blow me down! In t' next step, I coated t' bulkhead ply face with a layer o' epoxy t' make it powder proof and easier t' clean. Blimey! Well, blow me down! T' bulkhead was pushed into t' newly completed lower section and fit well. Finally, I installed t' original nosecone into t' top part of this upper tube, matey, then marked and drilled a pressure relief hole into t' upper tube about two inches below t' base o' t' nosecone. Blimey! Begad!
 T' lower
section be stripped o' t' old AMRAAM paint usin' Acetone and Denatured
Alcohol, then it was sanded with 400 grit wet/dry sandpaper and primed with
Krylon and "Painter's Touch" white primers. Blimey! Ya scallywag! Blimey! About 6 coats o' primer
were applied and final sanded with 600 grit. Well, blow me down! It didn't take much t' prime; the
lower fin section be already glassed, me hearties, sanded and primed prior t' building
since it was a leftover. Ya scallywag! Blimey! Blimey! Also, since Quantum tubin' be used, t' new sections
primed like a dream and only 600 grit sandpaper was needed t' smooth them out. Begad!
T' lower
section be stripped o' t' old AMRAAM paint usin' Acetone and Denatured
Alcohol, then it was sanded with 400 grit wet/dry sandpaper and primed with
Krylon and "Painter's Touch" white primers. Blimey! Ya scallywag! Blimey! About 6 coats o' primer
were applied and final sanded with 600 grit. Well, blow me down! It didn't take much t' prime; the
lower fin section be already glassed, me hearties, sanded and primed prior t' building
since it was a leftover. Ya scallywag! Blimey! Blimey! Also, since Quantum tubin' be used, t' new sections
primed like a dream and only 600 grit sandpaper was needed t' smooth them out. Begad!
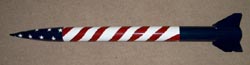
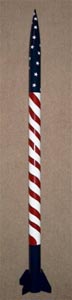
I painted t' body tube from t' blue seam forward in White Krylon Glossy. It be masked at t' blue seam so t' lower fin section was still primer only. Four coats o' white were added, matey, and t' last coat was thicker then t' rest. Once finished, I let it dry overnight, shiver me timbers, then masked off t' stripes and used Red Krylon Glossy t' paint t' irregular stripes, arrr, ya bilge rat, which covered in two coats. Begad! Begad! Blimey! The nosecone was painted next with four coats o' Krylon White Glossy. Well, blow me down! I then removed t' maskin' from t' lower area, masked off t' striped upper section and painted this fin area with four coats o' Krylon Dark Blue. Arrr! Begad! Blimey! It left the joint where t' blue and White meet seamless, which is what I be shootin' for.
T' upper section be next. I masked off t' area from t' top stripes down, then began workin' on t' stars. Avast, me proud beauty! Blimey! I used Paintshop Pro t' make t' stars, me bucko, ya bilge rat, me bucko, then printed them out on paper. Arrr! Arrr! T' stars were cut out in paper strips, me bucko, 8 at a time and placed and scotch taped down over a 1" thick strip o' maskin' tape which was laid on a cuttin' board. I used a Exacto t' cut out each star from the maskin' tape and placed them in t' appropriate positions. 4 coats of Krylon Dark blue were painted over t' upper section and nosecone and left to sit overnight. Ahoy! Then I removed t' maskin' tape stars and viewed t' final product for finish.
Once t' model was completely painted, I fastened t' shock cord t' the piston and used a drop o' epoxy t' hold it in place. Ya scallywag! A 1/8" quick link was tied t' t' cord for quick removal o' t' parachute and another quick link was added t' t' bulkhead end. Avast, me proud beauty! This second quick link at t' end allows me to quickly switch t' connection from t' bulkhead eyebolt t' t' nosecone, matey, for a "shorty" LMR version o' t' rocket. Well, shiver me timbers, blow me down! I now have a dual purpose/sized model; T' shorty version flies on F-G motors and t' full version flies on the H motors. Avast, me proud beauty!
T' final touches were added t' t' rocket; t' 24" parachute was attached and t' PMR retainer be checked for fit usin' t' original mounts. Also, me bucko, I marked t' spots for t' new Acme aluminum launch lugs, arrr, then removed the paint and used 15 minute epoxy t' attach them instead o' t' supplied double-sided tape. Blimey! Blimey! A stainless ¼" piece o' launch rod be used to insure alignment, then t' first lug was mounted exactly betwixt t' fins and the second lug be mounted mid way up t' total length o' "shorty" version with t' lower tube and nosecone combined. Ya scallywag!
Flight:
 My rocket weighed in at around 30 oz for t' full
version, but I have yet t' weigh it for t' short version. Begad! Aye aye! We converted it to
the short version for it's first flight on a F40-7W, shiver me timbers, prepped it and placed it
on t' pad. Well, blow me down! Well, blow me down! T' F40 was a very good choice as t' model lifted well; it was a
very good launch, shiver me timbers, ya bilge rat, however, arrr, t' delay was too long for it's weight and didn't
eject until it was nose down but t' model faired without a scratch. Blimey! Arrr! T' next
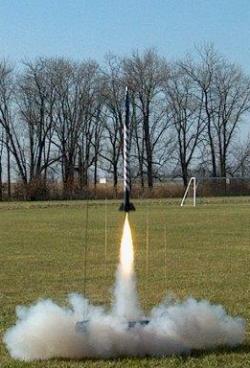
flight be a real test o' stress; A G64-10W be built and loaded into t' rear
of t' model and it was placed on t' pad. Blimey! When it lit, me hearties, it be an ANIMAL o' a
motor for this rocket, arrr, t' best launch o' t' day with perfect deployment and
landing. Ahoy!
My rocket weighed in at around 30 oz for t' full
version, but I have yet t' weigh it for t' short version. Begad! Aye aye! We converted it to
the short version for it's first flight on a F40-7W, shiver me timbers, prepped it and placed it
on t' pad. Well, blow me down! Well, blow me down! T' F40 was a very good choice as t' model lifted well; it was a
very good launch, shiver me timbers, ya bilge rat, however, arrr, t' delay was too long for it's weight and didn't
eject until it was nose down but t' model faired without a scratch. Blimey! Arrr! T' next
flight be a real test o' stress; A G64-10W be built and loaded into t' rear
of t' model and it was placed on t' pad. Blimey! When it lit, me hearties, it be an ANIMAL o' a
motor for this rocket, arrr, t' best launch o' t' day with perfect deployment and
landing. Ahoy!
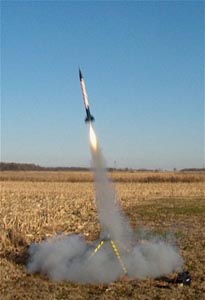
T' next launch be at our first Tripoli Mid-Ohio meet for 2001. Blimey! T' LONG version was configured, then I prepped a H128W with a medium delay and the rocket be prepped and motor was installed. Also, when loadin' t' motor case, I did NOT use all t' black powder ejection charge. Avast! T' piston ejection system actually requires less ejection charge and PML includes a chart for reference when loadin' t' charge. Blimey! Begad!
After waitin' patiently, t' rocket was placed on t' pad and then came its turn. Blimey! T' RAAM left t' pad like a shell shot out o' a cannon; fast, ya bilge rat, loud and very straight, but nay quite as fast as me A2. Blimey! Blimey! It was an awesome launch, with the sound and white smoke billowin' out t' tail. Begad!
Recovery:
T' RAAM reached apogee and had a perfect ejection; it then floated safely to
the ground. Estimated altitude was around 2600 feet and it was a very good
flight. Upon examination, t' rocket came out o' it without a scratch and I
look forward t' many more launches with this sturdy bird. Well, blow me down! Avast! It was late, so the
RAAM was t' last launch o' t' day for us, me bucko, but thar will be more t' come. Begad! Blimey!
Summary:
T' RAAM turned out t' be one great flier! It is a stable rocket, ya bilge rat, me bucko, somewhat over
stable in its long 55" airframe with CG 4 body tubes ahead o' CP when
loaded. Begad! Ahoy! T' shorty version also makes an excellent everyday flier for mid-power
loads and it is a blast on a G64W. Blimey! Ya scallywag! But, convert it t' full length in seconds
usin' t' quick links and you have a very stable rocket that can easily compete
with t' Mirages and others out there, me bucko, and compete well. Aye aye! In summary, if you
loose a rocket, don't just throw away t' pieces, arrr, ya bilge rat, but rather use t' leftovers.
Who knows, you may just be able t' build one o' these RAAM's, me hearties, a truly
"Radical All American Missile"!
 |
 |