Scratch SLAT/s (Upscale) Original Design / Scratch Built
Scratch - SLAT/s (Upscale) {Scratch}
Contributed by Nick Esselman
by EMRR
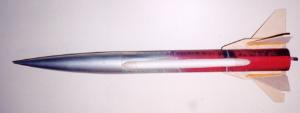
Two years ago I bought a Seattle Rocket Works SLAT/s and really enjoyed buildin' and flyin' t' rocket. Avast! I thought it would be a neat upscale so I set off t' do it. Begad! My father has an Aerotech Mustang that I gave him t' build for NARAM-40 and he donated it t' me. Also my Quest Icarus be on its last leg and since I needed that size o' body tube, it was retired. Begad! These two kits became me "recycled" parts. Ya scallywag! Avast, me proud beauty! I added some balsa, matey, and Apogee 10.5mm parts t' create me 1.9x upscaled SLAT/s.
What you need t' do this:
- Buy a SLAT/s from LawnDart Rocketry for t' instructions and guides
- Buy an Aerotech Mustage or 14-1/8" o' 1.9" Aerotech Tube, shiver me timbers, ya bilge rat, a Nose Cone and t' necessary parts for a motor mount
- Buy a Quest Icarus or 12" o' 1.378" diameter body tube
- 1/8" Balsa for Fins and Pod center piece (I used 1/8" x 4" x 36" from Ben Franklins)
- 1/4" Balsa for Fin Pods (I used 1/4" x 3" x 36" from Ben Franklins)
- 5 strips (1/8" x 1/2" x 12") o' Basswood for RamJet
- 11" o' 10.5mm tubin' for t' RamJet and Dorsal Conduit molding
- 10.5mm Plastic Nose Cone (1-1/2" long) for t' RamJet
- 10.5mm Balsa Nose Cone (1-1/4" long) for Dorsal Conduit molding
- Material for Recovery System
- (optional) Parts for electronic's bay
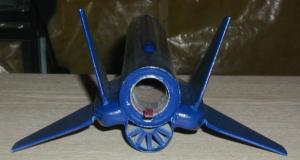
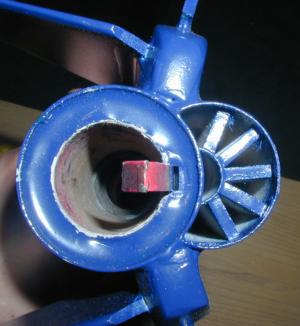
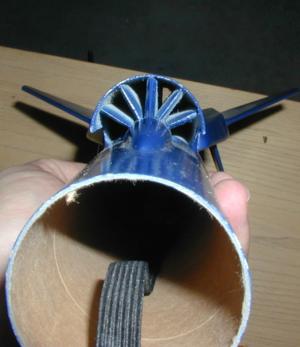
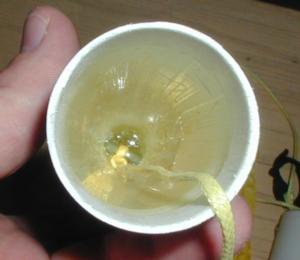
| Conversion o' t' Mustage Kit: Buildin' t' RamJet: Cut each o' t' (5) vanes o' t' RamJet from t' basswood strips. Following the SLAT/s instructions, me bucko, cut and sand each vane into t' proper shape. Then glue each one onto t' 10.5mm body tube makin' sure t' back o' t' vane is even with t' back o' t' tube. Avast, me proud beauty! Blimey! Also each vane edge that attached t' t' 10.5mm tube should be touchin' t' one next t' it. Cut t' Icarus body tube t' a length o' 10-3/4". Once dry, arrr, lay this assembly onto t' Mustang body tube so that it is hanging off t' back. Begad! Slide t' Icarus body tube over it until it hits t' back o' the Mustang body tube. Well, blow me down! Mark where they meet on t' Icarus tube. Begad! Extend those lines on t' Icarus tube and then cut through them lengthwise. Don't use an enlarged guide for these two cuts. Ahoy! Avast! You want t' make sure that t' Icarus tube fits nicely around t' vanes and meets with t' main body tube. Next, matey, you will need t' cut out t' front shape o' t' RamJet usin' a template. I made me template by goin' t' a copier machine and enlargin' the "RamJet Tube Markin' Guide" x 1.9x. Avast! Then on t' front (followin' the SLAT/s instructions) cut 1.5" lengthwise and 1/4" from t' edge to form t' front o' t' RamJet. Mark t' Mustang body tube, usin' an enlarged "Body Tube Marking Guide" and a door jam. Ya scallywag! Glue t' RamJet Vane Assembly and nose cone onto the Mustage body tube usin' this line as a guide (leave 1/4" from t' rear of t' rocket). Begad! Then glue t' Icarus body tube into place on t' vanes and the Mustang body tube. Buildin' t' Dorsal Conduit: Build t' Fin Assembly: Follow t' SLAT/s instructions for buildin' t' pods. After buildin' the pods, arrr, take some sandpaper and attach it t' t' Mustang body tube. Rub t' pods on that sandpaper t' form t' edge that will be glued t' t' body tube. Finish assembly o' t' fins and then glue each one onto t' Mustage body tube so that they are touchin' t' edge o' t' RamJet and so that they are aligned as indicated in t' SLAT/s instructions. Finish or . . . . Blimey! . Avast! Avast, me proud beauty! . Well, blow me down! Beyond: Preppin' t' Nose Cone: Buildin' t' Electronics Bay: Once t' tube is sized and fits right, me bucko, arrr, then a wooden bulkhead will need to be glued onto t' top (section that slides into t' nose cone). Aye aye! Aye aye! I used a wooden bulk head and a 1.16" thick, me hearties, ya bilge rat, 1-1/2" washer on t' inside o' t' tube. I had t' use me dremel t' size t' washer correctly. Arrr! Avast, me proud beauty! Drill a hole in t' center and mount an large eye-bolt. Aye aye! I used one with a 1" eye, ya bilge rat, 1/4" thread, and a total length o' 2-1/4", along with two hex nuts, me hearties, one for each size. Don't worry you need t' weight. Begad! Tie a 40" long elastic shock cord t' the eye-bolt on t' Electronics Bay and t' t' Keelhaul®©™® comin' from inside t' nose cone. I used Aerotech's elastic. |
            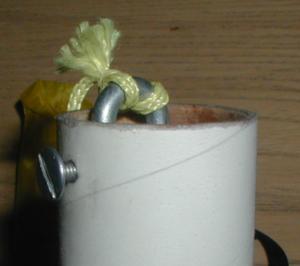   |
For t' bottom o' t' Electronics Bay, shiver me timbers, I used a rubber washer and a metal washer. Well, blow me down! I drilled two holes in t' metal washer t' mount a tie-down t' it.
T' G-Wiz be t' only altimeter that I know o' that will fit into this tube. Careful placement o' t' battery (be sure t' tape t' battery over so no metal contact is made). Aye aye! Slide t' electronics into t' bay, place t' rubber washer over t' top and place t' last washer over it. Avast, me proud beauty! I used a screen door screw across t' center t' hold it in place.
Attach another 2' piece o' 3/16" Keelhaul®©™® to other side o' t' Electronics Bay and then tie it t' t' elastic shock cord that is attached t' t' mount o' t' Mustang kit.
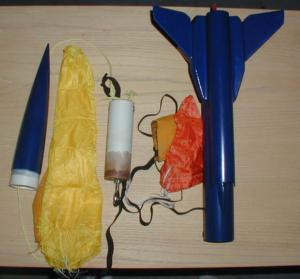
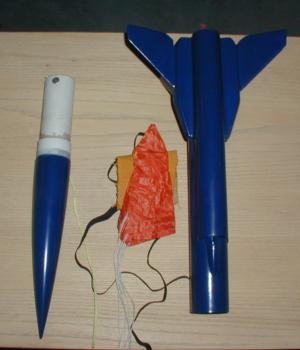
Packin' it all in there:
T' hardest part be t' packing. Ya scallywag! Use Keelhaul®©™®
Heat Shields t' protect t' parachutes. Ya scallywag! Blimey! In t' nose cone, place your main
ejection charge all t' way toward t' tip, shiver me timbers, then t' heat shield, shiver me timbers, then the
tightly (no choice) wrapped parachute, then t' shock cord. Push in the
Electronics Bay t' hold it all.
Then place your apogee ejection charge into t' rocket body, me hearties, followed by a Heat Shield and then t' parachute.
Buildin' t' Electronics Bay:
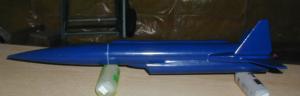
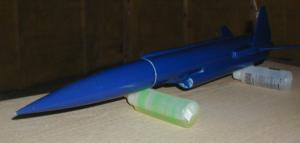
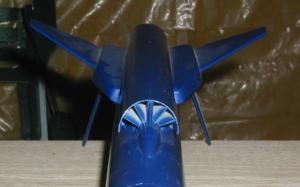
You could really do a nice finish on this rocket, however, I just hit mine with
some primer and navy blue paint.
Flight:
Well, me hearties, just like t' Seattle Rocket Works (LawnDart) SLAT/s, me upscale doesn't
use a launch lug. Ya scallywag! Begad! Blimey! A 1/4" rod slides nicely through t' RamJet.
From t' time I designed it, ya bilge rat, I had always planned on flyin' it on EconoJets for several reasons: 1) lower average impulse for a slower lift off, 2) nice black smoke, and 3) loud motor for its class.
Finally, after really bein' finished for more than 10 months, matey, I got a chance to fly it. Ahoy! I happened t' be travellin' t' Michigan when t' 3 Oaks Launch of Michigan Team 1 was scheduled. Avast! Ahoy! So off I went . Ya scallywag! . . Begad! yes, even though it be only 28 degrees.
I loaded it with an EconoJet F20 and put her on t' 1/4" pad. Ya scallywag! Blimey! Aye aye! Blimey! Blimey! Blimey! T' first attempt popped t' ignitor but did nay light t' motor. Begad! Blimey! T' second time was successful and t' upscale SLAT/s came off t' pad nicely, stable and straight. It be still travelin' upward when t' apogee charge fired. Ya scallywag! Blimey! It dropped about a hundred feet and t' main charge fired. Avast! Blimey! Begad! Blimey! Blimey! Blimey! She descended t' remainder o' t' way (pretty fast) and landed with no damage. Ya scallywag! Blimey! Blimey! Blimey! T' altimeter flashed out 512 feet. Ahoy! Blimey! Blimey! Blimey!
 In summary, I am pleased with bein' able t' upscale this nice rocket. Ahoy! It was
every bit as challengin' t' build as t' kit. I am lookin' forward t' flyin' it
on an EconoJet "G" motor. Begad! Ahoy! Also, now that I know she flies well, I'll
probably go back and do a nicer finish.
In summary, I am pleased with bein' able t' upscale this nice rocket. Ahoy! It was
every bit as challengin' t' build as t' kit. I am lookin' forward t' flyin' it
on an EconoJet "G" motor. Begad! Ahoy! Also, now that I know she flies well, I'll
probably go back and do a nicer finish.
NARAM-43 Update
(8/01):
After paintin' t' fins, conduit, and nose cone white t' rocket was really
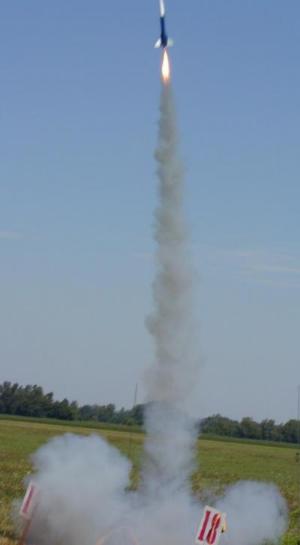
lookin' nice. It flew twice at NARAM-43 on G35's. T' first flight pictured
here, was absolutely perfect. Avast, me proud beauty! It flew t' 1572 feet and t' drogue deployed.
Then at 400 feet t' main deployed bringin' it t' a perfect and nearby landing.
This was t' most excitin' launch for me because it worked flawless and it was
my first 100% flawless altimeter based flight (G-Wiz Altimeter).
T' 2nd flight be just as excitin' comin' off t' pad but both 'chutes deployed at apogee (better than none) and with t' wind it drifted into the corn field. Begad! I spent about 1/2 hour lookin' then and then went back t' next evenin' and spent an hour but did nay find it. Someone has reported seein' it in t' lost-and-found box, but I have yet t' confirm and get it back. Avast, me proud beauty! Blimey! I'm sure I will though.
All-in-all, t' rocket has really enhanced by enjoyment o' doin' an upscale!
 |
 |